Close

Blog

Fun Winter Break Activities With Kids

December 28, 2015
Post by Michelle Sterling of Avery and AugustineFun Winter Break Activities With KidsFun Winter Break Activities With Kids

You know it’s coming—winter break.  Those couple of weeks that your children have off from school in December.  They can be blissful and filled with a flurry of holiday fun, events and gatherings, but what to do with downtime and those quiet mornings with nothing on the agenda?  Here are some ideas that are fun, but also provide some opportunities for learning a new skill or practicing those important concepts that they learned at school.  We don’t want to forget everything over winter break!

Fun Winter Break Activities With Kids Fun Winter Break Activities With Kids Fun Winter Break Activities With Kids

Every year we try to come up with a special treat to make around the holidays.  This year it’s flapjacks.  I had flapjacks (oat bars originating in the UK) with housemade yogurt at a rustic foccacceria the last time I was in Barcelona and fell in love with them.  I think about them every once in awhile, especially when the weather gets cold.  They are wonderfully chewy and hearty and just the thing you want to eat on a chilly morning or afternoon. Molly Wizenberg has a recipe for them on Bon Appétit.  Paired with yogurt, they make a wonderful breakfast for Christmas or the nice, slow days afterward.  Happy holidays, everyone!

Thanks to The Land of Nod for sending the items for this post.

Fun Winter Break Activities With KidsFun Winter Break Activities With Kids

You can see Michelle’s work and read about her two young children and their first forays in cooking, art and everything in between at Avery and Augustine.

DIY Ornament Mobile

December 23, 2015

Post by Rae Ann Kelly

Hey guys! I’m Rae, blogger, graphic designer and mama of 5 and I’m super excited to hangout with you today! If (like me) you swoon over cute ornaments, love seeing a little bit of Christmas in every room and appreciate easy DIY’s then you’ve come to the right place! Keep scollin’ and I”ll show you how to make this cute DIY ornament mobile — perfect for a nursery, big kid room or any kid-friendly space in the house — with just a few supplies and steps.

DIY Ornament Mobile

YOU’LL NEED:

  • 6-inch embroidery hoop (or a little bigger)
  • yarn for pom-poms
  • string (or you can use yarn)
  • wood bead (optional)
  • ornaments
  • scissors

HERE’S HOW TO MAKE YOUR DIY ORNAMENT MOBILE:

  1. Make 4 or 5 pom-poms using a pom-pom maker, a fork (like this tutorial) or a cardboard template. I made two big poms and 2 medium sized.
  2. Cut 3, 1-yard pieces of string and tie one end of each evenly around the embroidery hoop. (These will be used to hang the mobile)
  3. Thread bead onto the three strings until there is about 6-inches between the bottom of the bead and the hoop. Tie a knot above the bead to keep it in place. Tie the remaining string loosely around a doorknob or hook while you do the next step.
  4. Using slightly different lengths of string, tie ornaments and pom-poms evenly-ish to the embroidery hoop. Ask someone to hold your almost finished mobile while you play around with the spacing. Try to make it hang as level as possible.
  5. Once it looks good to you, trim all of the access strings from the ornaments and pom-poms and then use the three long strings to hang from a cup-hook, eye-hook or 3M hook on the ceiling.

I ended up making 2 mobiles for a couple of the kids and then added a few other Christmassy touches to make their rooms extra cozy for the holidays. Here’s a peek at how their spaces turned out…

DIY Ornament Mobile

TREE ORNAMENTS / FA LA LA POSTER (available as a freebie on my blog) / SNOWFLAKE GARLAND / LLAMA FLANNEL SHEETS

DIY Ornament Mobile

WOOD ORNAMENTS / FRAMED SNOWMAN by ESPEN / TREE GARLAND / FLANNEL SHEETS (similar)

Full disclosure. The lighting is so much better in the girl’s shared room than the boys bunk room that I used the girl’s room to style both looks.  However, the decor looks equally (if not more) adorable hanging over Espen’s bunk and both kids absolutely love their special spaces.

I would love to know if and how you decorate little kid spaces for Christmas?

XO, Rae

Rae Ann blogs at Rae Ann Kelly and is a kid wrangler, graphic designer, food & craft nut. Her blog features little tidbits about her day to day life & design projects, tutorials for DIY’s, free downloads, yummy recipes, lots of kid friendly ideas and outfit inspiration. 

Top Holiday Children’s Books

December 22, 2015

Post by Michelle of Avery and Augustine 

Top Holiday Children's Books Top Holiday Children's Books Top Holiday Children's Books Top Holiday Children's Books

The holidays are a perfect time to read classics or older stories to your kids because the weather’s cold outside and with them being home from school, you have extra time to spend together and really mull over what you’re reading.  Sharing books that you read when you were younger is a lovely way to share a piece of your childhood with your kids.  You can discuss what you thought of the stories when you first encountered them so long ago and the impressions they made on you—children love hearing their parent’s perspectives as youngsters. Below we’re sharing some of our top holiday children’s books:

  • The Snowy Day — Now over fifty-years-old, The Snowy Day is a beautiful and iconic book about a child’s joyful encounter with snow, illustrated in collage with a simple palette of colors and vintage patterns that are a part of the poignancy of the story as much as is the text.
  • Anne of Green Gables — So many of us read about the adventures of Anne of Green Gables when we were younger and remember her talent for savoring and delighting in the beauty of everyday moments.  The red-headed girl from Prince Edward Island inspired us with her resilience, creativity and unbreakable work ethic.  Anne is generally recommended for ages nine and up, but there are definitely excerpts that you can read aloud and explain to younger children.
  • How The Grinch Stole Christmas — Almost every grown-up remembers reading this heartfelt story about the irrepressible citizens of Whoville and the Grinch, and now it’s time to share it with our own little ones, who will be on the edge of their seats until the joyous ending!
  • So Many Stars — A sweet and beautifully illustrated board book to share with your youngest ones at bedtime—this one is for sharing wonder and awe about the world around us while exploring the word “so” — “so sweet,” “so bubbly,” “so happy” and “I love you so.”

Thanks to The Land of Nod for sending the items for this post.

You can see Michelle’s work and read about her two young children and their first forays in cooking, art and everything in between at Avery and Augustine.

DIY Glitter Gift Wrap Bags

December 21, 2015

Post by Amy of Delineate Your Dwelling

DIY Glitter Gift Wrap Bags

With December here, the holidays are in full swing!  It’s time to start baking holiday treats, hanging your stockings and working on gift ideas for family and friends.  I’ve always enjoyed wrapping presents and now that my children are getting a little bit older, they always want to lend a helping hand.  At Christmas, I am more than happy to oblige that desire with so many presents to wrap.  This year, I plan to have them help even make the gift wrap plus, what three and four year old isn’t overjoyed to play with glitter?!  Today I am sharing how to create these simple, modern Glitter Gift Wrap Bags.

DIY Glitter Gift Wrap Bags Supplies:

  • Brown Paper Bags
  • Pencil
  • Mod Podge
  • Paint Brush
  • Lots of Glitter (I used light and dark pink, lime green and red)

Directions:
1. Lightly draw out your shape or letter in pencil. (I drew my “A” in pink so you could see it more clearly.)

2. Get out your glitter stash and decide on the colors you will be using.

3. Using a paint brush, generously cover your design with Mod Podge.

4. This is where my kids had a blast!  Let the glitter fly and fly it will because glitter has a way of getting everywhere no matter how hard you try to contain it.

DIY Glitter Gift Wrap Bags

Set your paper bags aside and let them dry as you work on other designs.

DIY Glitter Gift Wrap Bags

Once fully dried, you can shake the bags off and all that is left is your simple design.

DIY Glitter Gift Wrap Bags

Fold about one inch of the bag down and grab a hole punch.  Make two holes in the folded down top to be secured with yarn or string.

DIY Glitter Gift Wrap Bags

Tie ribbons or yarn in coordinating colors and enjoy your pretty bags!

DIY Glitter Gift Wrap Bags

I loved how colorful these turned out and yet they only are four different shades of the traditional red and green Christmas colors.

DIY Glitter Gift Wrap BagsDIY Glitter Gift Wrap Bags

I’m thinking these would be excellent gift bags to bring to a friend’s houses with our baked cookies!

DIY Glitter Gift Wrap Bags

Make sure to grab your favorite colors of glitter and take an afternoon with your kids make glitter gift bags!

Amy creates other colorful projects like this at Delineate Your Dwelling, a creative craft blog. She is naturally drawn to graphic patterns and cheerful colors, while using natural elements with a modern twist. Amy believes everyone can be creative, sometimes you just need a good tutorial to get you started!

DIY Sparkle Soap

December 18, 2015
Post by Rebecca of Not So SAHM
DIY Sparkle Gem Soaps
One of the things I love most about our kiddos is that they love to give holiday gifts as much as they love to receive them. And while they are old enough now to brainstorm for items they think friends and family would like, they still love to make gifts themselves as well. So we set out to make a sparkly set of gem soaps for our family members this year. They are so fun and easy to make, and are the perfect gift for just about anyone!
To make our DIY Sparkle Gem Soaps, you’ll need: 
  • A gem soap mold
  • Clear melt + pour glycerin soap base
  • White melt + pour glycerin soap base
  • Liquid soap colors
  • Glitter
How to make DIY Sparkle Gem Soaps:
  1. Start by having your children help cut the clear soap base into cubes (they are pre-scored and our kids had no problem using their nylon knives to cut them). How many cubes you’ll need will depend a bit on the mold you use, but the molds we used hold about 3 cubes. DIY Sparkle Gem Soaps
  2. Place the cubes into a microwavable-safe glass container and microwave for 25 seconds. Stir and continue microwaving in 10-second intervals until the soap is completely liquid. The glass will be HOT, so make sure that an adult is handling it and the kids understand not to touch it.
  3. Let your child add one drop of liquid soap color to the clear, melted base. Add in a few shakes of glitter (not too much — it won’t stay suspended! Kane learned this the hard way) and stir well.DIY Gem SoapDIY Gem Soap
  4. If the glass is still hot, help your child pour the liquid soap into the mold cavity. Once it set for a few minutes, we sprinkled a little extra glitter on top. Let it dry for about 20 minutes. Repeat these steps for additional colors.  DIY Gem Soap
  5. While the colors are drying, cut the white soap base into cubes. The white soap base will be on the bottom of the gem and really helps the color and glitter pop. You don’t need quite as much per soap — we found one cube per gem worked just fine. Follow the above directions to melt it.
  6. Once the colored soap is relatively firm to the touch, pour the white soap base in a thin layer on top. Let both dry for about 45 minutes. Then pop it out and gift!

DIY Gem Soap DIY Gem Soapp.s. we clearly have a thing with geometric shapes, so thanks so much to The Land of Nod for gifting us the beautiful Spiral Puzzle to use. DIY Gem SoapDIY Gem Soap

Rebecca is a mom to two young kiddos and, in her spare time (ha!), likes to pretend she’s a back-up dancer, craft cocktails, and run long distances. A relatively recent SAHM, she blogs family-friendly activities, DIYs and celebration fun at Not-So-SAHM.

Merry Christmas Printable Coloring Page

December 17, 2015

Nod Fun Pages designed by Michelle Romo

With all the distractions of the holiday season, sometimes it is hard to find time to sit down, color and enjoy the season with your family. Hopefully our Merry Christmas printable coloring page will offer a bit of cheer and festive holiday fun. Download the full size printable HERE. Share the finished product on Instagram (use hashtag #landofnod) or our Facebook page and we may feature it!

Merry Christmas Free Printable Coloring Page - Honest to Nod

Looking for other easy Christmas activities?

Find more free printable coloring pages HERE!

Michelle Romo is our newest Nod illustrator, she’s a self-taught illustrator and designer fueled by cookies and naps. Her influences include Mid-Century, Japanese and Scandinavian design, along with pretty much anything cute. When she isn’t working she spends her time eating good food, hugging her friends, playing video games and crafting.

Kids Christmas Playdate

December 16, 2015

Post by Jacquelyn of Beijos Events

We planned a Christmas playdate for our little ones in collaboration with The Land of Nod.  They have the cutest Christmas party supplies and decor, we had so much playing with them!  Everything is festive but with a modern twist, so naturally we fell in love!

Kids Christmas Playdate Kids Christmas Playdate Kids Christmas Playdate
Kids Christmas Playdate Kids Christmas Playdate The kids had the best time decorating and how cute are their Land of Nod pajamas?!  We matched them with the coziest Minnetonka slippers!!  The adorable invite and playful place cards are by our friends from Prim and Pixie. Christine Cater created some whimsical holiday wreaths and florals for us for our Christmas playdate , proving that you don’t have to always go red and green for this holiday season!  And Yasmin Sarai captured all of our little ones imaginations and silly faces perfectly.

Kids Christmas Playdate Kids Christmas Playdate Kids Christmas Playdate Kids Christmas Playdate

Beijos Events is 3 girls with 3 unique styles that make up one amazing team who plans & designs events all across California. Check them out on their website and on Instagram.

Holiday Crafternoon

December 15, 2015
Post by Michelle Sterling of Avery and Augustine

Holiday Crafternoon Holiday Crafternoon Holiday Crafternoon

Every once in awhile we like to have a crafternoon—a time of making, crafting and having fun!  Since the holidays are approaching, it seemed like a good time to have one.

As Avery’s been getting older, we’ve been enjoying learning to work with fiber and yarn in the last couple of years and are now learning to knit and weave.  Weavings make beautiful, handmade gifts and I love seeing the resurgence of this traditional art in the last few years.

We used these Winter Wonderland stencils to make wrapping paper and topped off our gifts with ornaments and fun Christmas crackers.  Happy holiday making and crafting, everyone!

Holiday Crafternoon Holiday Crafternoon Holiday Crafternoon

Thanks to The Land of Nod for sending the items for this post.

You can see Michelle’s work and read about her two young children and their first forays in cooking, art and everything in between at Avery and Augustine.

DIY Homemade Marshmallow Recipe

December 14, 2015
Post by MJ of Pars Caeli
DIY Homemade Marshmallow Recipe

I’ve already received my first Christmas card (from the same friend who is always on top of her game!). I adore seeing a holiday envelope in the mailbox, however, it does leave me with that tinge of guilt that I need to get going on mine. So, this year I’ve enlisted my children to help address, stuff, and seal our cards. However, my little elves might have needed some motivation to put their skills to use. I’ve been bribing them with hot chocolate and marshmallows. And to up my game, we made our own homemade marshmallows!

I’ll admit, I’ve never made marshmallows!! In fact, to look at them in the store, I wasn’t completely sure that the puffed confections could be made by anything but machines. But, the texture and flavor of our first batch totally sold me. And they are fun to make with your kids, too!

DIY Homemade Marshmallow Recipe

Our homemade marshmallow versions melted easily in the steamy hot chocolate, and yet were solid enough to be cut into fun candy cane shapes using our holiday cookie cutters.

If you’re a newbie like me, here’s a great recipe to try with your children for making homemade marshmallows. You’ll need:

  • 1 cup cold water, divided
  • 1.5 cup white sugar
  • 1 cup light corn syrup
  • 1/4 tsp kosher salt
  • 1 tsp vanilla
  • 3 packages of unflavored gelatin
  • 1/4 cup powdered sugar
  • 1/4 cup corn starch
  • Light coating of nonstick spray

DIY Homemade Marshmallow Recipe

How to make marshmallows:

  1. Use an electric mixer to blend in a bowl the gelatin packs with a 1/2 cup of the cold water.
  2. In a saucepan, stir together the other 1/2 cup of water, sugar, corn syrup, and salt. Bring the mix to a boil. Pop a candy thermometer in the pan (making sure not to touch the pan itself) and heat the mixture until the temperature reaches 240 degrees.
  3. With the bowl of mixed gelatin/water, drizzle in the hot sugar mixture. Once all ingredients are combined, the fun begins! Turn your mixer to medium and mix for about 10 minutes, when the white mixture will thicken. DIY Homemade Marshmallow Recipe
  4. In the meantime, in a separate bowl, combine the powdered sugar and cornstarch. Lightly coat a 9×13 pan with nonstick spray, and then lightly dust with the sugar/cornstarch mix. You will have a lot of leftover mix from this that will be used to dust your marshmallows before cutting and plating them.
  5. Finally, pour your marshmallow and let it sit, uncovered, for at least four hours and as long as overnight. Fresh marshmallow can be used for as long as two weeks when stored properly.DIY Homemade Marshmallow Recipe
  6. Turn over the pan to release the marshmallow cake. Cut it into cubes or other fun shapes! Holiday cookie cutters (3” or smaller work best) are a fun way to make these extra special. Consider dusting your knives and cutters with the sugar/cornstarch to minimize the gooey mess!

Homemade marshmallows package really well for a great hostess gift with your favorite hot cocoa mix. Or, you can use them to treat your helper elves to some decadent hot chocolate as they tackle your giant stack of Christmas cards. Hot cocoa not required to enjoy!!

xoxo, MJ

DIY Homemade Marshmallow Recipe

M.J. is a graphic and product designer, wife, and proud momma to three. She founded Pars Caeli (meaning a piece of heaven), a delightful blog and shop, to add more creative to the everyday. M.J. worked with our team to bring her lunchbox jokes to life in our product Lunchtime LOL Notes, now available at Land of Nod to bring on a case of the giggles!


DIY Color Blocked Advent Calendar

December 10, 2015
Post by Morgan & Carrie of Ampersand Design Studio
DIY Color Blocked Advent Calendar

Come December, kids and adults alike begin the exciting countdown to Christmas Day and a DIY color blocked advent calendar is such a fun way to bring the countdown to life! We created this life-size version to accommodate all the various sizes of little gifties you might want to include! It’s bright and fun and so easy to create!

DIY Color-Blocked Advent Calendar

Materials Needed:

  • various sizes of kraft boxes with removable lids
  • small kraft bags
  • (optional: large envelopes)
  • (make sure your bags and boxes add up to 25)
  • 3M painter’s tape
  • small foam brushes
  • neon paint
  • mall wooden craft numbers
  • white paint

DIY Color-Blocked Advent Calendar

To Prepare:

To create the DIY color blocked advent calendar, we first laid the bags and boxes out on the floor in a tree (triangle) shape. It might take some moving around to get it just how you like it. Once we landed on a layout that would work nicely, we used post-it notes on the back to number the boxes and mark which colors we wanted to paint. Then, once the arrangement is dismantled for painting and applying numbers, you won’t lose track of what goes where. We even took a picture of it to refer to.

Ok, now lets get started!

  1. Tape off various angles on your bags and boxes, including some straight lines, and these will form your color blocking. Make sure to wrap the tape around the top edges of the boxes, as well.DIY Color-Blocked Advent Calendar
  2. With a foam brush, begin painting in the area you have left clear. Be sure to paint the edges of the box lid, as well.
    • Expert tip: Be sure to divide up the colors among your boxes and bags. We did about one third of the bags and boxes in each of our neon colors.DIY Color-Blocked Advent Calendar
  3. While the paint on the boxes and bags dries, use this time to paint the wooden numbers. With another foam brush, paint a light coat of white paint evenly across the face of the numbers. Let them dry.DIY Color-Blocked Advent Calendar
  4. Remove tape from the bags and boxes.DIY Color-Blocked Advent Calendar
  5. After they have dried, glue the wooden numbers on the boxes in consecutive order – 1 through 25 on each box.DIY Color-Blocked Advent Calendar DIY Color-Blocked Advent Calendar
  6. Once all of the containers have been painted and numbered, now it’s time to hang the advent calendar on the wall. Start by arranging all of the pieces on the floor first. After accounting for the height of the gift on Christmas Day, which will act as your tree trunk, start in the bottom center and build your pieces outward and upward.DIY Color-Blocked Advent Calendar DIY Color-Blocked Advent Calendar

Your advent calendar is ready to be filled with all kinds of fun gifts. The best part about this calendar is that it can accommodate so many different sizes and shapes of presents. On our tree, we used the Countdown Calendar Stuffers (of course!), along with the Christmas Company ornaments and Color Dipped Letter Ornaments.DIY Color-Blocked Advent Calendar DIY Color-Blocked Advent Calendar DIY Color-Blocked Advent Calendar DIY Color-Blocked Advent Calendar

Check out more of Ampersand Design Studio’s holiday how-to’s HERE.

Ampersand Design Studio specializes in surface pattern design, identity design and stationery products, with clients in the home décor, fashion and baby and kids industries. Their clients include respected big names like Land of Nod, Tiny Prints, Papyrus, Minted and Giggle,  as well as great small, local businesses around the country, including cafés, bakeries, wineries, photo studios and fashion boutiques.

DIY Felt Ball Wreath

December 9, 2015

Post by Jeran from Oleander+Palm

Hey friends, it’s Jeran from Oleander + Palm. I’m excited to share with you a really easy DIY felt ball wreath tutorial that used a couple fun products from The Land of Nod and a 6” metal hoop from the craft store. I’m all for adding a few holiday decorations to every room of the house. My kids all have their own little mini Christmas trees in their bedrooms so that they can load them up with all their favorites and the fun ones they make at school.  But, this year I made these cute little wreaths to hand on the end of the girl’s beds. You might remember their adorable bedroom that was in The Land of Nod catalogue, it’s jam packed with cute Nod pieces.

DIY Felt Ball Wreath DIY Felt Ball Wreath DIY Felt Ball Wreath DIY Felt Ball Wreath

Here’s what you’ll need to make your own DIY felt ball wreath:
  • Felt Garland
  • Paper Bows
  • Glue Gun
  • 6” metal hoop
  • Gold ribbonDIY Felt Ball Wreath - Materials

Here’s how to make it:

  1. Start by wrapping the garland around the metal hoop a couple of times.  Add a spot of hot glue to hold it in place.DIY Felt Ball Wreath - Step 1
  2. Continue wrapping the garland tightly around the hoop. DIY Felt Ball Wreath - Step 2
  3. When you get to the end, glue the last ball well to the other balls.  DIY Felt Ball Wreath - Step 3
  4. Look over the wreath and if there are gaps, add a spot of glue and press the felt balls together to cover the hole.DIY Felt Ball Wreath - Step 4
  5. Remove the tag from the paper bows and hot glue the bow onto the wreath.DIY Felt Ball Wreath - Step 5
  6. Tie the wreath onto a bed frame or door with a piece of gold ribbon.  DIY Felt Ball Wreath - Step 6DIY Felt Ball Wreath - Step 7

A former elementary school teacher, Jeran has added her unique voice to the modern maker culture through her blog Oleander + Palm. She loves helping people find attainable beauty in the lives they live. Her creativity and industriousness were honed through years of living in third world countries, that challenged her to find novel solutions for creating livable spaces. Now a mother of three, settled in sunny California, her skills and styles are evolving in exciting new ways. Her focus is Simple California Living, designing and making livable spaces that incorporate vintage finds, handmade/DIY pieces and global inspiration.

A Christmas Sleepover

December 7, 2015

Post by Joni of Lay Baby Lay

The holidays are here and I thought, what would be more fun than a dreamy and bright Christmas sleepover by the Christmas tree? Armed with hot cocoa, cupcakes, games and matching pajamas, the girls had a blast. They have been sleeping with the sleeping bags in their beds every night since!

A Christmas Sleepover

Bright Pom Pom Garland / Reindeer Throw Pillow / All The Colors of the Rainbow Round Ornaments / Rainbow Shape Ornaments / Lovelane Pink Winged Hat / Campsite Nightlight / Tic Tac Toe Game Mat / Robotic Sleeping Bag / Pink Superstar Pajamas / Silver Rock Lamp with White Lamp Shade / Pink Larkin Nightstand

A Christmas SleepoverA Christmas SleepoverA Christmas SleepoverA Christmas SleepoverA Christmas SleepoverA Christmas Sleepover

Lay Baby Lay started in 2011 shortly after the arrival of my first baby as a place to provide fresh and unique nursery inspiration with a little dose of motherhood experience. This site is my creative outlet and the place where I am able to express all the ideas running around in my head. It is my hope that you will also be inspired to create spaces for your little ones th  at are full of imagination, color, and delight and maybe find a little encouragement in this crazy but wonderful journey of having babies and watching them grow.

2015 Kids Holiday Gift Guide

December 3, 2015

Not everyone has a team of elves. Which is why we put this gift guide together. We’re hoping to take the work out of finding the right gift, filling those stockings and decking your halls. So you can sit back and enjoy the yuletide chaos.  Check out our picks below and shop all our best kids toys and gifts.

2015 Kids Holiday Gift Guide

  1. This Little Piggy Rocker – Forget going “wee wee wee” all the way home (whatever that even means). Stay home and rock back and forth on our pig rocker, which features a plush pig on a sturdy, wooden frame.
  2. Lavender Candy Bow Sleeping Bag – Sometimes you just want to wear a bow tie to bed. At least we did. So we designed our Candy Bow Sleeping Bag. It’s perfect for adding a touch of chic to your slumber party. Also available in pink.
  3. Be On The Sea Activity Play Mat – Marine themed baby activity mat lets your baby explore the wonders of the seven seas from the comfort of the nursery. Baby-sized snorkel and fins are not needed.
  4. Doll-Size Camper – Does your little one’s love doll road trips? Then our camper is perfectly suited for all their make-believe treks. It features a roomy interior, windows and a large back opening.
  5. Saggy Baggy Elephant Hooded Towel & Book Gift Set – Share the Little Golden Books tradition with this bedtime set, complete with a hooded bath towel and a copy of Saggy Baggy Elephant. Wrap your little one in the snuggly elephant hooded towel and then sit down and enjoy a bedtime story together.
  6. If I Had a Hammer (And a Workbench) – This workbench includes everything your kids need for make-believe home improvement projects of all sizes. General contractor not included.
  7. Planetarium Playhouse Canopy – Ideal for a bedroom, playroom or basement, our playhouse will provide hours of fun. Constructed of printed fabric with a fiber glass hoop.
  8. Dark Green Executive Nod Chair – Our Executive Nod Chair is the ideal frameless seat for kids. Each chair can be personalized with a child’s name (up to 12 letters long) and features carefully chosen thread for personalization to best showcase an embroidered name on your chosen fabric.
  9. Letters Entertain You Puzzle – Looking for something that’s educational and fun? These colorful wooden letters fit in their corresponding grooves, providing a good time and good way to learn ABCs.

How to Play Dreidel

December 2, 2015

Post by PJ of A Girl Named PJ

dreidel1
Now that Thanksgiving is behind us, it’s time to focus on the next big holiday this season — and for my family, that’s Hanukkah. For eight nights beginning on Sunday, December 6th, we’ll light the menorah, open presents, eat latkes and play dreidel.

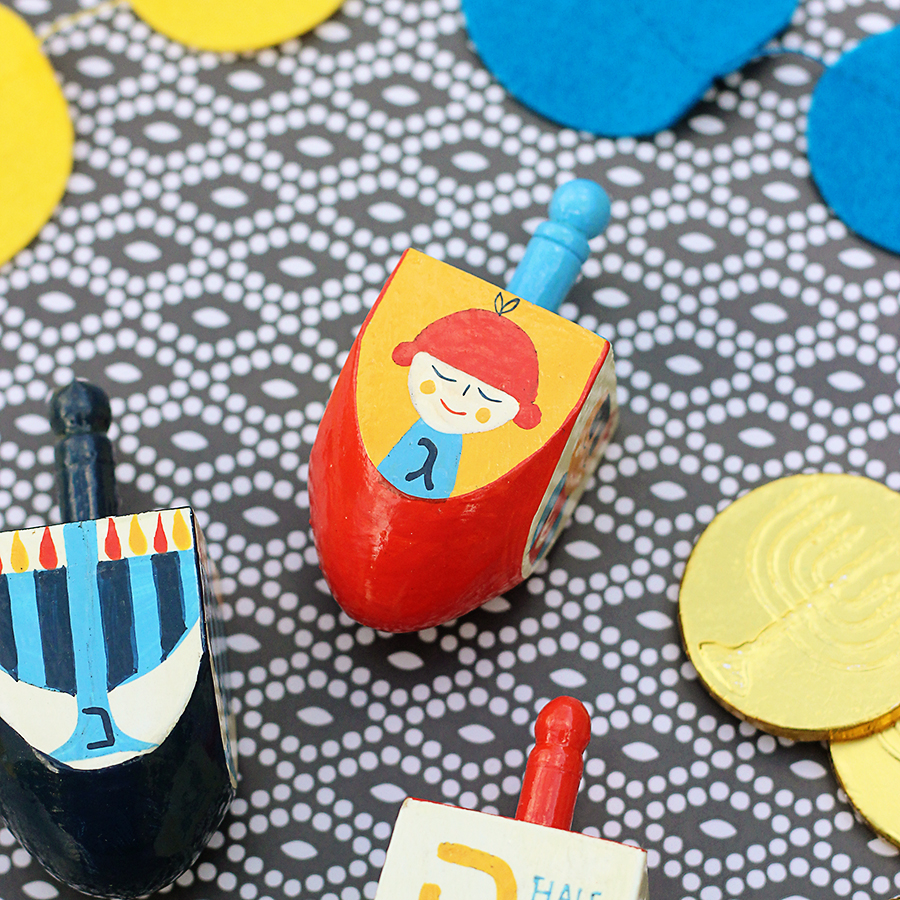
The Land of Nod sent over some of their lovely hand-painted Spin Along dreidels for our celebration, and I’m excited to use them to teach my four-year-old son how to play the traditional Hanukkah game. Last year we had fun showing him how to make the dreidel spin, but I think he’s old enough now to sit and play the easy gambling game.

That’s right. The four-sided spinning top emblazoned with the Hebrew letters nun, gimmel, hay, and shin is used to play an old-fashioned gambling game. Here are my easy to follow instructions for how to play dreidel.

You only need two players to play dreidel, but any number of people can join the fun. Everybody starts with the same amount of game pieces, which could be pennies, gold foil-wrapped chocolate coins called gelt, M&Ms, buttons, or even Cheerios. Ten-to-20 pieces per player is usually enough.

Each participants puts an agreed upon amount of game pieces into the center pot, then the first person spins the dreidel. The Hebrew letter facing up when the dreidel falls determines whether that player gives or gets from the pot. Here’s any easy way to remember what each letter represents:

dreidel3
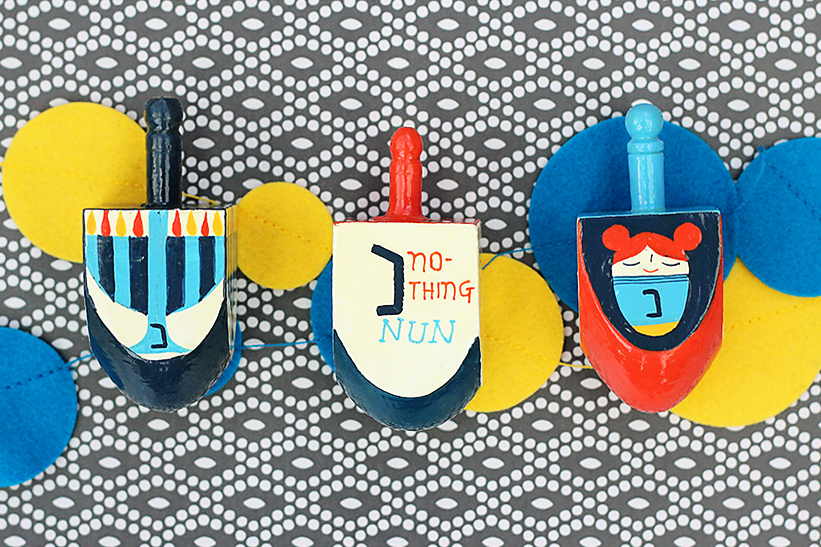
Nun stands for nothing. You neither give nor take game pieces from the pot. dreidel4

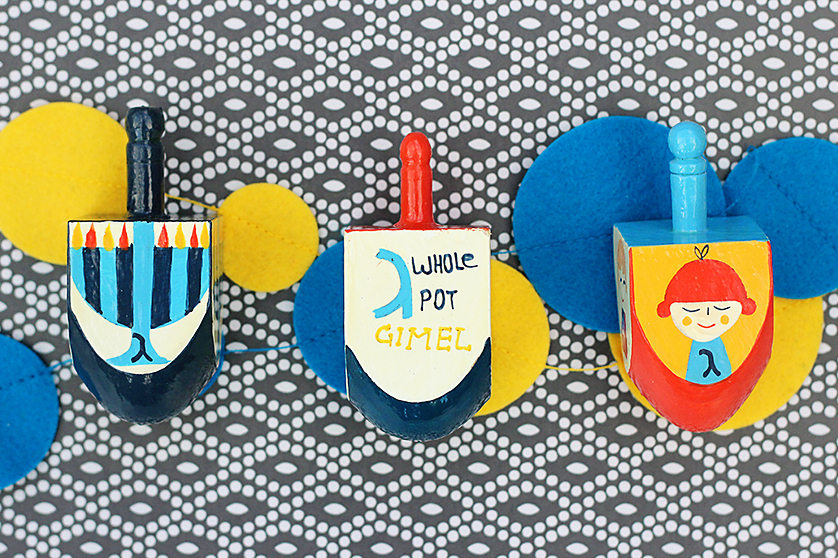
Gimmel stands for get. Congratulations, you get everything in the pot! (But the game isn’t over yet. Everybody replenishes the pot with the agreed upon amount of pieces.)

dreidel5

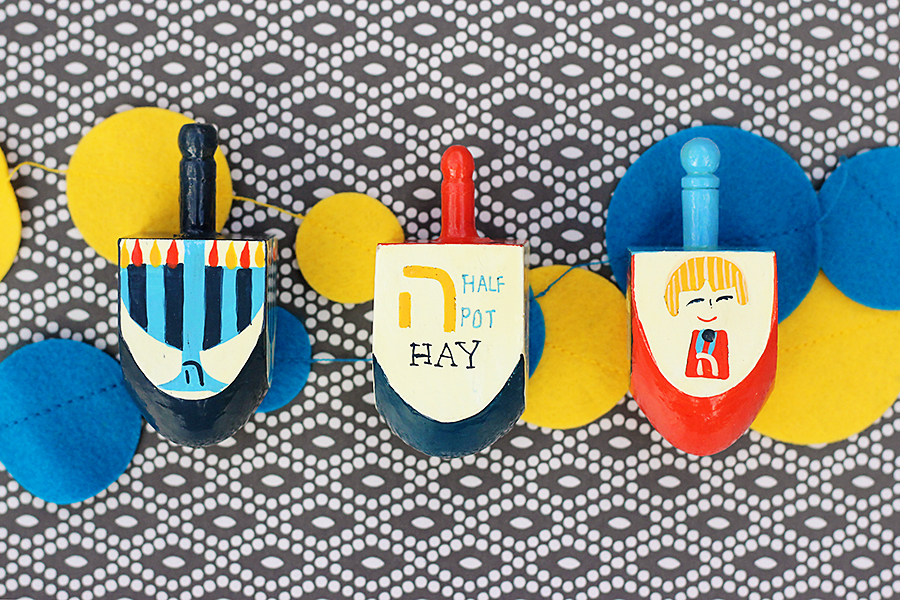
Hay stands for half. You can take half of what’s in the pot. If there are an odd amount of game pieces, you get half plus one.

dreidel6
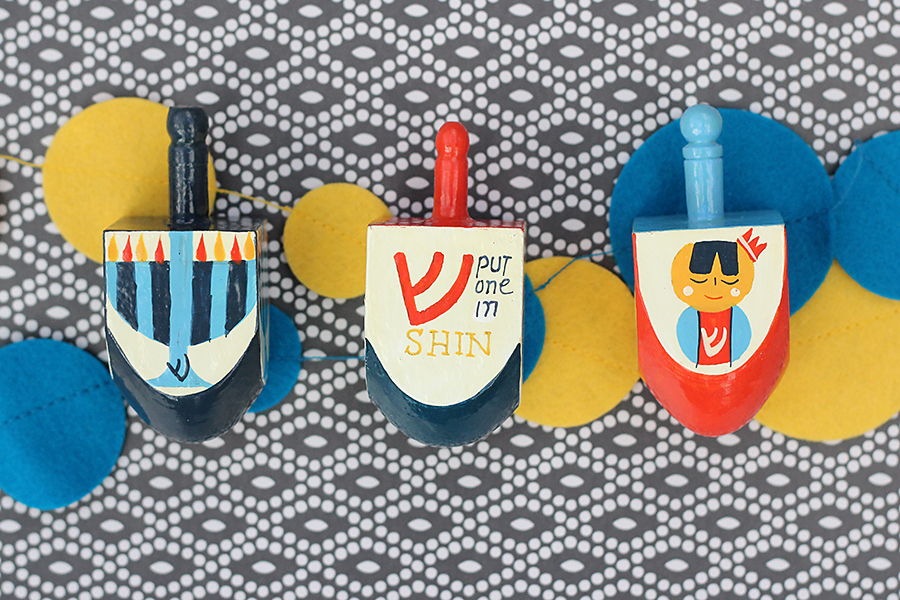
Shin stands for put in. Go ahead and add one piece to the pot.

When you run out of game pieces, you’re out. When one person wins all the pieces, the game is over! (Hint: For a faster game of dreidel, start with fewer pieces.)

Finally, here’s a little piece of dreidel trivia. The Hebrew letters on each of the four sides stand for the phrase “Nes gad hayah sham,” which translates to “a great miracle happened there.” Since “there” refers to Israel, dreidels in Israel don’t have the letter shin on them. Instead, they have a pey, changing the expression to “a great miracle happened here.” Cool, right?

Happy spinning – and happy Hanukkah!

PJ Feinstein is the author of A Girl Named PJ, a lifestyle blog offering fashion and beauty tips, design inspiration, commentary on pop culture, thoughts on personal growth, and honest talk about motherhood. She lives just outside Washington, DC, with her husband, two young sons, and stubborn (but adorable!) small white dog.


Campfire Cones Recipe

December 1, 2015
Post by Michelle Sterling of Avery and AugustineAutumn Campfire Cones Blog 10Autumn Campfire Cones Blog 1Autumn Campfire Cones Blog 2Autumn Campfire Cones Blog 3Autumn Campfire Cones Blog 4

If you’ve ever made campfire cones, you know how utterly delicious they are.  Add in some warm and cozy fall flavors of pumpkin and apple to make your campfire cones amazing!

Autumn Campfire Cones Blog 5Autumn Campfire Cones Blog 6

When we made our autumn campfire cones, our various fillings included: almond butter, pumpkin pie spice cookie butterapple butter, chocolate chips, mini marshmallows and chunks of Speculoos cookies.  As a side note: if you have leftover apple, pumpkin or custard pie on hand, chunks of those would make great fillings as well.  We assembled our campfire cones, stuffed them with all sorts of combinations of fillings, wrapped them in foil and stuck them in the oven for 350 degrees for about 8-10 minutes.  Or if you’re camping outdoors, you can heat the cones over a fire until all their contents warm up and/or melt.

Autumn Campfire Cones Blog 7Autumn Campfire Cones Blog 8Autumn Campfire Cones Blog 9

A favorite flavor trio of ours was pumpkin spice cookie butter, chocolate and marshmallows, but all of the combinations we tried were equally delicious.  You can also make an “autumn everything cone” which consists of…well, a little of every filling in your fall spread!

These campfire cones were inspired by this episode of Real Girl’s Kitchen.  Thanks to The Land of Nod for sending the items for this post.

diy-campfire-cones-pinterest

You can see Michelle’s work and read about her two young children and their first forays in cooking, art and everything in between at Avery and Augustine.

Hannukah Printable Coloring Page

November 30, 2015
Nod Fun Pages designed by Michelle Romo

With eight nights of Hanukkah, we figured you needed something to keep your kids busy. Our Hanukkah themed printable coloring page can be downloaded HERE. Make sure to share the finished product on Instagram with hashtag #landofnod. A few of our favorite hands-on Hanukkah activities are below too.

COLORING-PAGES

Looking for more free printable coloring pages? Check out all our other Nod Printable Coloring Pages!

Michelle Romo is our newest Nod illustrator, she’s a self-taught illustrator and designer fueled by cookies and naps. Her influences include Mid-Century, Japanese and Scandinavian design, along with pretty much anything cute. When she isn’t working she spends her time eating good food, hugging her friends, playing video games and crafting.

Party On: Cozy Camp Themed Slumber Party

November 19, 2015

Written by Becca of CAKE.

It’s been a while since I’ve stopped by Honest to Nod with a new way to Party On! Summer kind of got away from me, but with school in full swing and a fall chill in the air, now is a great time to gather up the troops and host a camp themed slumber party.  Like many of you, I’m totally enamored with the Camp Wandawega collection, and it’s the perfect inspiration for a cozy camp-in.

Party On: Cozy Camp Themed Slumber Party
1 // 2 // 3 // 4 // 5 // 6 // 7 // 8 // 9

Color Palette: plaid // brick // black // stone

Camp Invitation: available here

Here are my tips to make your slumber party special:

  • Encourage everyone to come in their PJs and prepare to get cozy.
  • Move the couch out of the way and turn the living room into your very own campsite.  Spread sleeping bags in a semi-circle on the floor and tuck a raccoon inside for a big nighttime surprise.
  • Plan a hot dog bar for dinner with kid friendly fixins’ like shredded cheese, bacon bits and crushed potato chips.
  • Gather up some blankets, games and cards and play inside a teepee or fort. Go fishing.
  • Warm little hands by a faux campfire.  Encourage pretend play by passing out sticks and marshmallows to ‘roast’, and then bust out some s’mores brownies for a real dessert treat.
  • If you have a TV in the room, wind down the evening with a movie viewing from the floor in sleeping bags, and encourage lights out when the movie ends.
  • Keep a nightlight on, to point the way to the bathroom in the middle of the night.
  • Send guests off with a little camping buddy as a thank you for spending an evening in the great indoors.

If you need an invitation to get your camp party started, I have just the thing in my shop.

Becca Gorski lives in the SF Bay Area, is a working mother of two, and moonlights as an occasional designer / blogger / celebration maker. You can find her creative ideas at CAKE. and her line of party printables on Etsy.

The Party On series offers inspiration for family friendly parties, featuring items from The Land of Nod that can be incorporated into both your event and your home.

DIY Beaded Napkin Rings

November 18, 2015
Post by Christina of Christina Williams Blog

Some of my favorite holiday memories as a kid were the times my grandmother involved us with the preparations. She’d find some “very important” job for us to do… like making the napkin rings or centerpieces. I always felt so special knowing that Grandma liked our crafts enough to display them on her special holiday tables. I want my kids to feel the same.
DIY Beaded Napkin Rings
When I saw the Just Bead It Metallic Bead Kit I knew it was perfect for my DIY beaded napkin ring project. The Land of Nod sent over a bead set, and the kids got right to work. First, we identified the first initial of all of our dinner guests (I like to sneak in a little learning while we’re at it). This activity was especially great for my preschooler and kindergartner. The beads are the perfect size for their chubby little fingers. I put a binder clip on the end of the cord so the beads wouldn’t slip off; and let them get to work. They each picked out 5-6 beads to go with the alphabet bead. My kindergartner was especially great at figuring out how to put her beads into a pattern. More disguised learning! After they finish stringing the beads, just tie the ends in a square knot and trim the excess cord, then slip them around your favorite napkins.
DIY Beaded Napkin Rings
Our project came together in about 15 minutes and the kids were interested and engaged the whole time. My daughter was also excited about picking out the perfect napkins to go with her new creations. I chose my centerpiece around the bead colors so the whole thing will look great together. I’ve got white pumpkins, succulents and copper accents.  This is such a fun way to combine the kids’ table and the grownup table for smaller holiday gatherings. It’s also a great activity the kids can work on while the adults finish dinner prep on Thanksgiving Day.
DIY Beaded Napkin Rings
For other fun Thanksgiving activities and printables, see my posts from last Thanksgiving.

Christina Williams is a blogger and graphic designer living in Salt Lake City, Utah. She’s a night owl and a bookworm, as well as a mother to three children ranging in age from two to eight. She shares her latest DIY and design projects along with her adventures in parenting on her self-named blog, Christina Williams.

Stocking Stuffers Gift Guide

November 17, 2015

Nothing was more fun as a kid as sorting through your stocking and all the mini goodies it held. We put together a list of our favorite stocking stuffers for kids, including cars, giant pencils and, of course, whoopee cushions. Check out our picks below and shop all our best kids stocking stuffers.

Stocking Stuffer Gift Guide

  1. Giant Wooden Pencil & Giant Eraser
  2. Mini Food Trucks
  3. Trapeze Monkey & Trapeze Ballerina
  4. Piano Horn
  5. Nautical Boats
  6. Cat Goody Bag Purse
  7. Box of Jokes
  8. Whoopee Cushion
  9. Double Sided Flip Car
  10. How’s That Grab Ya? Robot Claw

DIY Kids Pom Pom Pins

November 16, 2015

Post by Lauren Baker, our fearless events marketing manager

DIY Kids Pom Pom Pins

A few weeks ago we celebrated our collaboration with Pink Chicken by creating Pom Pom Pins in all The Land of Nod stores and Pink Chicken locations. This was a fun activity for kiddos to create an accessory for their jackets or book bags. Our #nodevents team created poms for the kiddos to combine with letter beads and toy animals to make an adorable pin to take home with them. Below in a step by step to make your own at home!


Things You’ll Need:

  • Yarn (one piece that’s 18 inches or so and 2-3 smaller pieces of cut yarn)
  • 1 Pom (you can buy them premade or learn how to make them here)
  • 1 animal
  • Beads (we used alphabet beads to spell names)
  • Safety pin

How to Make Your Pom Pom Pin

  1. Tie the long piece of yarn around the “tummy” of your animalDIY Kids Pom Pom Pins - Step 1
  2. Pull the yarn through the hole at the end of your safety pin and tie a double knot so your animal is secure on the pinDIY Kids Pom Pom Pins - Step 2
  3. You’ll notice two long strings hanging down the side of your pin. You can now add your beads through one of them.DIY Kids Pom Pom Pins - Step 3
  4. When you’re done, to secure the beads, take your mini pieces of yarn and tie a knot or two. Trim any excess yarn.DIY Kids Pom Pom Pins - Step 4
  5. Simply add your pom to your pin and ta-da!DIY Kids Pom Pom Pins - Step 5
When Lauren isn’t planning ridiculously awesome #nodevents for The Land of Nod, she spends her time putting up with the crazy antics of her English Bulldog, Lola. She also loves searching for treasures in vintage stores and summer antique markets. Due to her previous adventure living in Canada, she has a strong obsession to Hudson Bay stripes, as well as the fine cuisine of poutine (Don’t make her choose between the two…that’s like choosing between Ryan Gosling and Jason Bateman for her!).