Close

Blog

Dinosaur Themed Big Boy Room

July 21, 2015

Post by Eden of Sugar and CharmDinosaur Themed Big Boy Room

When my son, Romeo, turned 3 years old, it was time to say goodbye to the baby crib, baby toys and give him a “big boy” room. Since we moved into a house and his current room is pretty small, I wanted to keep it fresh, simple and not too cluttered.
Dinosaur Themed Big Boy Room
The theme of the room is really just a classic, modern, rustic vibe. We peppered in dinosaurs because who doesn’t love dinosaurs as kid?! I still do! I figured it was one thing he might still like at the age of 8 because, let me tell you, we go through character phases fast around this house! Thomas Train one day, Darth Vader the next! Still can’t decide which song is driving us crazier.

I figured keeping the room somewhat classic and simple will hold the longevity of the room look and keep everyone happy for awhile.
Dinosaur Themed Big Boy Room
We chose the Bayside Panel Bed from Land of Nod for its timeless, traditional style and then  incorporated a modern bedside table to add a touch of retro to the room. The bedding was too cute to pass up with tiny orange arrows and we both fell in love with the flannel bedding and dinosaur pillows, which we take on vacation with us now!
Dinosaur Themed Big Boy Room Dinosaur Themed Big Boy Room Dinosaur Themed Big Boy Room
I tried to keep the furniture to a minimum since it can really fill a space up quickly. So we put a few shelves up on the wall, for books and toys and then two small vintage crates, I picked up at an antique store, for the other toys.

Inside the closet, we have a shelf filled with books and of course, more toys!! I layered a jute rug and a classic blue rug to add to the traditional decor of the room. I really love the contrast between traditional and modern!      Dinosaur Themed Big Boy Room

And, to spruce up the white walls a little, we added tiny tree decals to one side. They’re charming, easy to put up and easy to take down! Yay for keeping it easy. We’re really happy with the results of pulling Romeo’s dinosaur themed big boy room together and the best part is that he seems to be happy with it! Although I’m sure he’ll want it to look like Vader’s Death Star by the 2nd grade!

Eden Passante founded Sugar and Charm to share her passion for sweet recipes, hosting inspiration and easy ways to add charm to the daily life. She lives in Los Angeles with her husband and darling baby boy, Romeo.

Lulu DK – Nod Artist Interview

July 17, 2015

Lulu DK - Land of Nod Artist Interview

Tell us a bit about yourself…
  • HOMETOWN: New York City
  • CURRENT TOWN: Los Angeles
  • FAVE ICE CREAM FLAVOR: Mint chocolate chip
  • FAVE BREAKFAST FOOD: English muffins (with butter and jam)
  • FAVE VACATION SPOT: Beach beach beach. Palm trees, aqua ocean a must. Preferably in Africa or somewhere exotic
  • FAVE COLOR: Ivory
  • FAVE MOVIE: The Sound of Music
  • FAVE DECADE: Now

Lulu DK - Land of Nod Artist Interview

WHEN DID YOU BECOME INTERESTED IN BEING AN ARTIST? I am the youngest of 6 children, so from a very young age, I would watch my family members drawing and creating all the time (I come from a very hands on, creative “make it yourself” type of family… so naturally I just followed along.) My first remembered memory is me drawing on the floor… I remember exactly what I was wearing, thinking and drawing. I mention it because my pants were bright red with yellow decorations on it (they were awesome and I wish I still had them – so very me to this day).  And I was drawing a billion colors… I remember exactly that I wanted to find a way to cover the page with a billion colors… I think it is safe to say my path to the current was already in motion. Quite a dream come true when you know what you want to be (and become it) from the age of 5. Blessed.

WHAT ARE THE MOST REWARDING AND DIFFICULT PARTS OF RUNNING YOUR OWN BUSINESS? I am on such a path of creation, that I wake up and thank my lucky stars every morning, but make no mistake about it, running a company has many many challenges that nobody on the outside ever gets to see… Call me if you are planning on starting a company and we can talk. 😉

Lulu DK - Land of Nod Artist Interview

TELL US ABOUT YOUR KIDS AND HOW YOU BALANCE WORK/MOM LIFE.  I have 3 boys (twin 6 year olds and a 4 year old).  They are amazing and perfect and crazy and loud and funny and wild and somehow I find a little peace to work and create (like when they are at school all day). I also have an amazing & very, very hands-on husband. If he could have 4 more children, he would! I involve the children in a lot of what I am creating and doing. They draw and create right next to me a lot of the time… I’m a painter, not a lawyer, so I realize this is a little more exciting for them, but kids are eager to learn and will do so in any department. I have them help me with my emails so that they can practice reading… saying things like “these words are getting too small for my eyes… can someone help me?” Etc… gotta keep it fun

IF YOU COULD TRAVEL ANYWHERE, WHERE WOULD IT BE? I’m a Morocco/ India type of girl.

IF YOU COULD POSSESS A SUPERPOWER, WHAT WOULD IT BE? I would totally fly.

Lulu DK - Land of Nod Artist Interview

TELL US ABOUT YOUR COLLABORATION WITH THE LAND OF NOD. Working with The Land of Nod was one of the most fun experiences because they let me fly (wink wink) where a lot of companies hold back on color and design because they feel it won’t reach the masses. The Land of Nod was more “go big or go home”, which is clearly fun for any designer!

HOW WOULD YOU STYLE IT IN A ROOM?  I have always loved the main parts of a room to be more on the neutral/pastel organic (such as walls, sofas, etc.) and then all the accessories pop. I like this for many reasons 1. It allows me to really maximize a room with accessories that all work together and create a statement while still keeping a room quite zen in flavor. 2. You can change it up more, so one day you are feeling more pinky, red orange, well then you can change up the room to be that, rug, pillows, blankets, etc. Or perhaps your child has grown up… the base stays neutral but the bedding, rugs, pillows and details can mature without doing a whole expensive room makeover.

Lulu DK - Land of Nod Artist Interview

HOW WOULD YOU DESCRIBE YOUR STYLE?  Preppie bohemian. Classic and clean, but well traveled, organic and enthusiastic.

ANY OTHER HOBBIES/INTERESTS? Sleep is a big hobby of mine. Travel, swimming, reading, writing.

Check out the full LuluDK for Nod collection HERE.

Lulu deKwiatkowski was born and raised in New York City, spending her childhood between the electric streets of Manhattan and the colorful and sun-drenched beaches of the Hamptons and Bahamas. Studying abroad during her high school years, she returned to New York, graduating from Parsons School of Design with a Fine Arts and Interior Design degree. In 1998, Lulu happened upon a fabric mill outside of Paris, and inspiration struck. A few months later Lulu DK was born.

Join us for Camp Nod!

July 16, 2015

Post by Lauren Baker, our fearless marketing events manager

Join us this summer for Camp Nod!

Camp Nod is back! Join us at our store locations from Monday, July 27, to Friday, July 31. Each day, we’ll have a FREE activity at 3 p.m. for you and your little ones! Attend all five days of Camp Nod and you’ll receive a $25 gift card!

Space is limited, so RSVP to nodevents@landofnod.com and indicate which location and days you’d like to attend.

When Lauren isn’t planning ridiculously awesome #nodevents for The Land of Nod, she spends her time putting up with the crazy antics of her English Bulldog, Lola. She also loves searching for treasures in vintage stores and summer antique markets. Due to her previous adventure living in Canada, she has a strong obsession to Hudson Bay stripes, as well as the fine cuisine of poutine (Don’t make her choose between the two…that’s like choosing between Ryan Gosling and Jason Bateman for her!).

A Creative Way to Display Kids’ Artwork

July 15, 2015
Post by Courtney of The Chirping Moms
IMG_4436

Both of my girls love creating art. They spend hours each day drawing, coloring, glueing and painting. They also go to a school where they are constantly bringing home wonderful masterpieces. I love displaying their art, and if it were up to them, we’d display each and every thing they make. Our refrigerator was quickly packed with pictures and the pantry door was quick to follow. They moved onto trying to tape everything they made throughout the living room and dinning room. I truly love looking at their art, but wanted to come up with a neat way to display it. I also thought it would be cool to come up with a way to display the art that also really doubled as decor for the room. We decided on a special “Art Wall” for our dining room.

First I started with items to display the art: I chose a few white art frames and big metal clips. The clips are awesome because you can easily switch out the child’s masterpieces. My girls love adding something new in the clip and can do it themselves (instead of taping things to the wall).

art wall

Next it was time to add some items to the art wall. I knew I wanted a mirror and loved the big green triangle from The Land of Nod. To give the wall some texture and something that really “popped” (literally), we went with the awesome Land of Nod giraffe head. It’s made of paper mache and it is truly a piece of art.

IMG_4443

I thought a framed poster reading “Super Superb” was a perfect addition to the wall and described how we feel about the awesome art our kids create. Last, we added some metal letters that spell ART to complete our wall.

IMG_4464

What used to be a blank grey wall in our dining room is now my favorite wall in the house. The wall reminds me of the importance of encouraging my kids’ and their creativity. It’s bright, cheerful and filled with the most beautiful art I could imagine.

IMG_5466

Courtney Byrne is a mother of three little children. She has two girls and a baby boy. Courtney is the Co-Founder of the popular blog, The Chirping Moms. The blog share adventures in motherhood along with great activities for kids, crafts, recipes and ideas for family travel. You can keep up with them on Facebook, Pinterest and as @TheChirpingMoms on Twitter and Instagram. In addition to writing The Chirping Moms, Courtney is also a contributing writer to the Four Seasons family travel site Have Family Will Travel and has been featured on The Huffington Post and What To Expect.

Establishing a Creative Hour for Kids

July 13, 2015

Post by Michelle Sterling of Avery and Augustine 

Establishing Creative Hour for Kids

Summer is the perfect season to do something creative every day. Free, open and undirected time to be creative is so important for children so they can work out their ideas and experiment with different arts and crafts. You don’t have to necessarily change up supplies every day. It’s good for children to use the same tools (e.g., crayons) over and over again, finding different ways that they work and discovering new uses for them. When they have free rein with age-appropriate materials, they eventually master use of them and feel competent as individuals.

Establishing Creative Hour for Kids

When it comes to young children and experiences with art, the operative word should be exploration. When children are creating and making art, they don’t have to fit into a mold, meet someone’s expectations or use supplies in a certain way — it’s all up to them. This way, children realize that their ideas and opinions are important. Also, consistently giving them free time to create allows them to think through ideas or concepts, rethink them, reimagine them or try them in a different way. They can problem-solve an idea that doesn’t quite work out how they had planned.

Establishing Creative Hour for Kids

In all this, children are engaging in the creative process, building on their existing ideas, finding out what makes sense to them, experiencing trial and error, making mistakes and being okay with it. Children will see their ideas evolve and change from day to day. They will pull new inspiration from books, things they see and their experiences in the world into their work to build on their existing ideas, to create and recreate something. Given free time, children will be creative and learn to think creatively.

Establishing Creative Hour for Kids

Now that summer is in full swing, we try to have a “creative hour” every day (at least an hour if not longer). Avery and Nate mostly use loose paper to draw and write on, but they sometimes also use blank notebooks, so I can date the art on each page and have it all in one nice, bound collection. It keeps their drawings in one place, they can flip through it without having to deal with loose papers flying out, and it makes it easier to archive on their bookshelves. Soon enough, a row of notebooks will spring up and we’ll be able to look through each one, seeing the progression of their lines, scribbles, styles and interests. This set of markers is brilliant–there are two of each color, which helps tremendously while children are in the “learning to share and take turns” stage.

Creative Hour 8

As everyone can attest to, making sure everything has its place is key to organization and general tidiness. I like these cubby cups because they keep supplies orderly and in one place. I can’t necessarily leave our art supplies out in the open like I’d like, because Nate does still need some supervision when using markers, etc. When Avery and Nate are done with their creative hour, I can grab the cups in one fell swoop (keeping everything together and sorted) and put them away out of reach. We store flat media like paper, card stock and stencils in clear envelopes and miscellaneous creative materials in these suitcases. Their cheery print peps up our collection of art supplies, for sure. We stack everything in this bin and it gets put away out of sight, ready for the creativity of tomorrow.

Establishing Creative Hour for Kids

To read more about children and the creative process, check out early childhood author/educator Mary Ann Kohl’s blog.

Thanks to The Land of Nod for sending us the items for this post.

Establishing Creative Hour for Kids

Post by Michelle Sterling of Avery and Augustine. You can see Michelle’s work and read about her two young children and their first forays in cooking, art and everything in between at Avery and Augustine.

DIY Shibori Bedding

July 10, 2015

Post by Kim of Beehive Art

DIY Shibori Bedding

We’ve been up to our eyeballs at the studio in SHIBORI tie dye. If you haven’t tried this age old Japanese dyeing technique, add it to your summer fun list. AND what could be better to dye than a yummy 100% cotton sheet set from The Land of Nod!

Materials needed:

The first step is folding and binding your pillowcase and sheets.

Pillow Case Shibori Bedding Directions:

  1. Fold fabric into an accordion, matching up edges neatly. I folded it lengthwise in quarters, and started folding the accordion from one end.
  2. Fit fabric to wood piece.
  3. Sandwich fabric between two pieces of wood.
  4. Secure tightly with rubber bands from all sides.

DIY Shibori Bedding - Pillowcase Steps

Flat Sheet Shibori Bedding Directions:

  1. Keep sheet folded in half lengthwise, and begin folding accordion from one end of the sheet. It’s a lot of fabric to deal with, go slow and take your time. The folding is key to a beautiful indigo dyed piece.
  2. Match up sides as best you can, smoothing out the layers of folded fabric. A long table, counter or clean floor will be the best place to fold this piece.
  3. Gently ease a rubber band to the middle of folded fabric. Wrap it tight keeping the folds in place. Secure both ends of the folded fabric with rubber bands. This will help keep the fabric from shifting when you add more rubber bands.
  4. Rubber band the entire length of the fabric. The more rubber bands you use the more intricate your design will be. The rubber bands need to be good and tight, this will take some work!

DIY Shibori Bedding - Flat Sheet Steps

Fitted Sheet Shibori Bedding Directions:

  1. Spread the sheet out and gather and bundle of fabric from the center, pull it up and wrap rubber band around the bundle. Wherever you wrap the rubber bands the fabric will remain white. The tighter the rubber bands, the better the design and contrast of dye.
  2. Go nuts and add as many rubber bands as you can, this will take time and will be well worth it. To make multiple rings, add two or three rubber bands to each bundle of fabric.

DIY Shibori Bedding - Fitted Sheet Steps

Once all three pieces are bound with rubber bands, soak in a bucket of water while you prepare the dye vat.

DIY Shibori Bedding

This dye kit has great directions for preparing the indigo dye vat and dying techniques. Follow them closely and have fun with it, there are no mistakes!

DIY Shibori Bedding - Dye Vat DIY Shibori Bedding - Dye Vat

When you’re ready to lift the fabric out of the dye vat, it will be light green. As it oxidizes it will turn a deep shade of indigo blue. This is where the magic happens!

DIY Shibori Bedding - Dye

Finished flat sheet:

DIY Shibori Bedding - Finished Flat Sheet

Finished pillowcase:

DIY Shibori Bedding - Finished Pillowcase

Finished fitted sheet:

DIY Shibori Bedding - Finished Fitted Sheet

I let the fabric sit overnight before removing the rubber bands. You can also dye the bundles again for a darker shade of blue. You will need a pair of scissors to remove the rubber bands and a bucket of water to rinse the fabric. Finally, machine wash in cold water. And if you’re itching to dye all things indigo, it’s your lucky day! The dye vat lasts for several weeks.

Happy DIYing your shibori bedding everyone!

DIY Shibori Bedding - Finished Product

Kim Poler is queen bee of beehive ART. She lives for inspiring visual expression, explosions of colors, forms and exciting combinations of mixed-media art. She creates, designs art projects, teaches children art and blogs at Beehive Art

Artsy Studio Space Reveal

July 9, 2015

Post by Jeran of Oleander and Palm

Artsy Studio Space Reveal
Hi there, it’s Jeran from Oleander + Palm. I’m excited to share with you my new studio space. I recently moved from working on my dining room table to a small office space downtown. The space is small, but the rent is cheap and it’s a perfect space for my needs.

The space is actually two small rooms. When you walk in the door, I’ve set up the first space as my office and storage space. And then it opens into a larger space with a wall of windows (you can see more of that room here and here). I keep this second space almost empty so that I can have space for photographing, making and hosting craft events.

I measured and planned every last inch of this office space, so that I could get the most out of it. I wanted to keep it organized and neat, but also allow it to be a place for my creativity to be sparked. I found the perfect desk at The Land of Nod, and so I built the room design around it. I’m a huge fan of Nod products for grown ups as well.

Artsy Studio Space Reveal

On the wall I hung some of my favorite things. I really don’t know how to define my style, but I do know that I like clean modern lines and shapes mixed with thrifted vintage pieces and some of my global treasures. The large tribal piece is a Tapa Cloth from Papua New Guinea, where I grew up. It’s a handmade cloth made from the bark of a specific tree. Traditionally this cloth is used for clothing. The bubble clock, not only keeps me on schedule, but it adds a fun throw-back and industrial touch. The sea oil painting, I found at a thrift store for $2. Green is my go-to color, so this painting was a no brainer for my wall. And the little wall shelf gave me a spot to add a plant and a spot to drop my phone and keys as I came in the studio door.

Artsy Studio Space Reveal

The white leather chair is not only clean and modern, but it’s very comfortable. I love it’s minimal lines, it’s perfect for my small space that I didn’t want to feel cluttered. On the desk, I keep tools and office supplies in the very stylish little metal drawers. And to protect my pretty desk from scratches and crafty messes, this clear mat is a must have.

Artsy Studio Space Reveal 
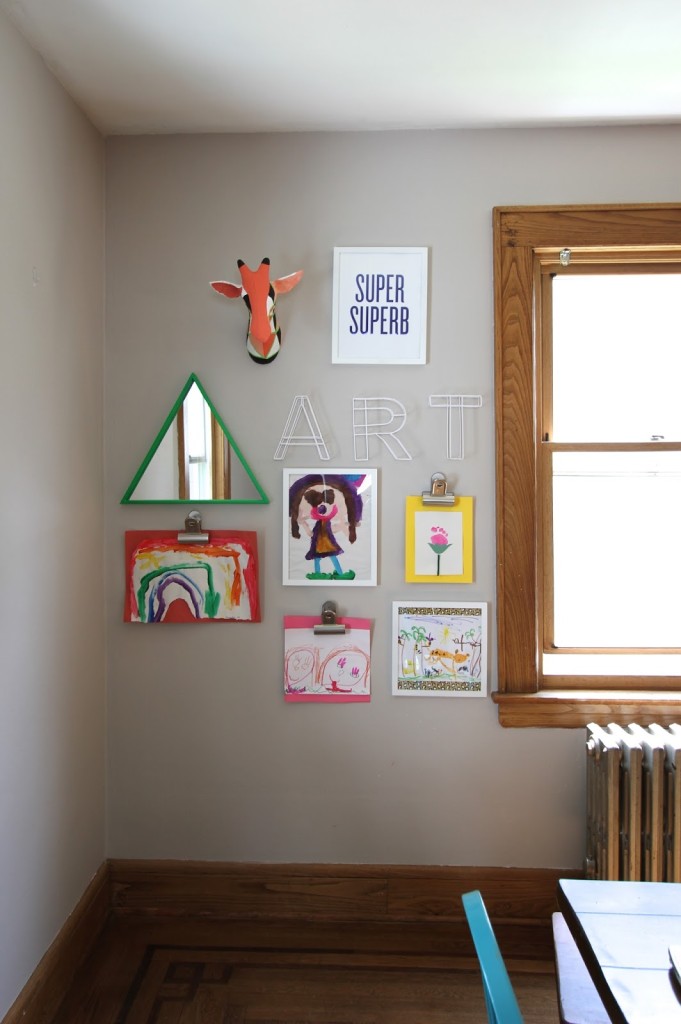
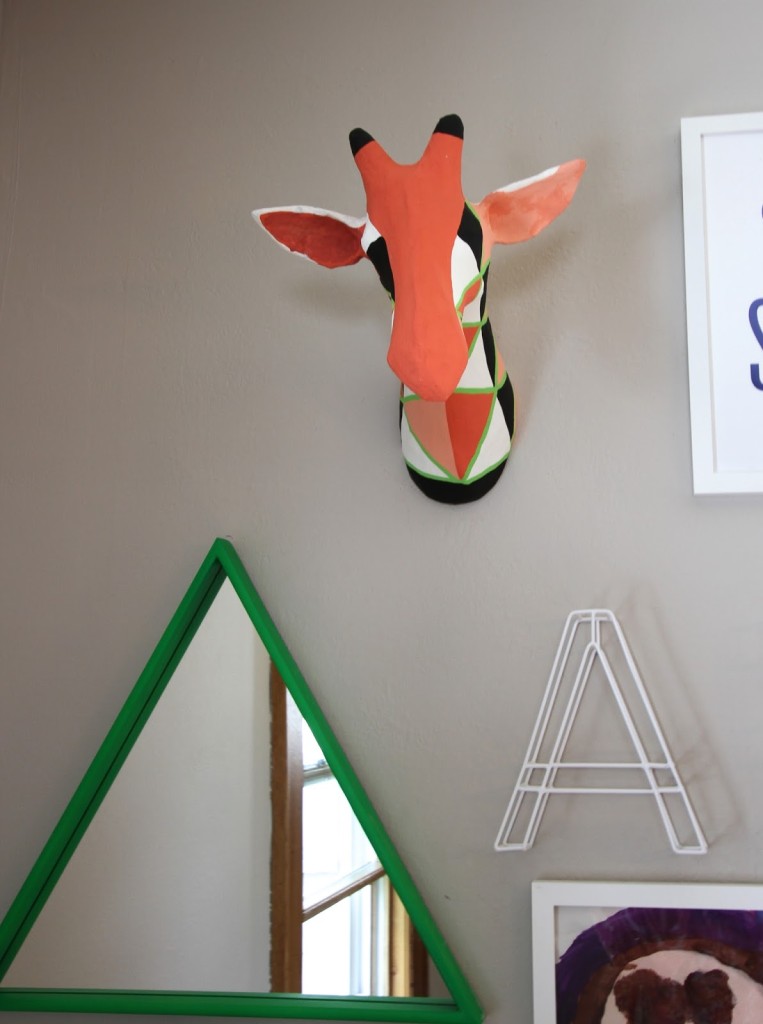
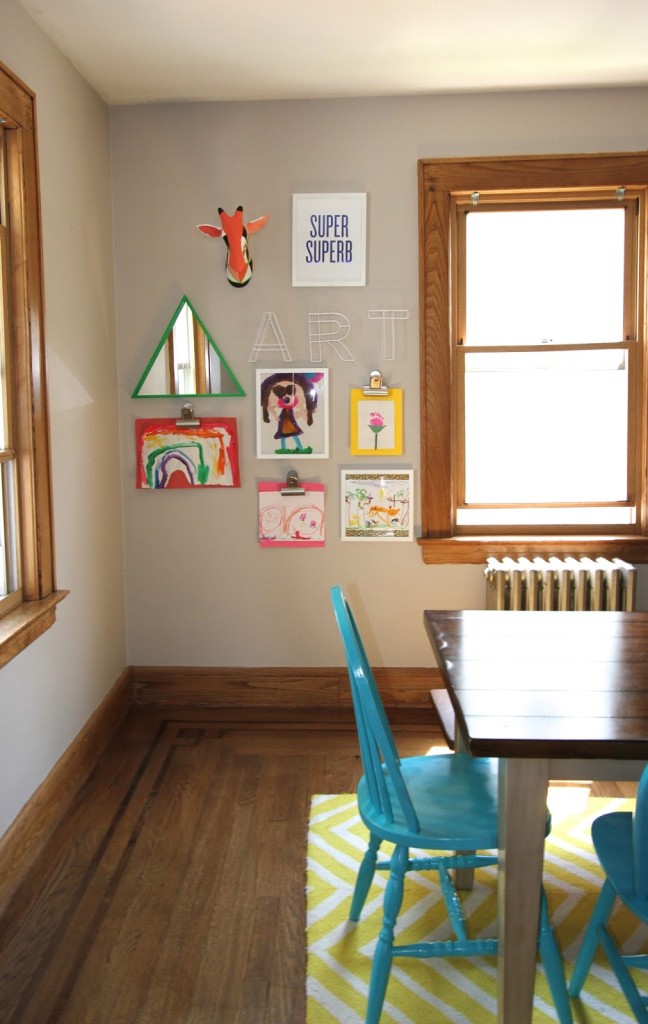
On the wall opposite the desk and added as much open shelving as possible. It’s a little messy, but it’s so nice to have all my supplies all in one spot. I keep all the nick nacks I use to style my pics and all my craft crap here.

Artsy Studio Space Reveal Artsy Studio Space Reveal

Behind the door I hung a peg board that I bought for 50 cents at a thrift store and gave a quick coat of grey spray paint. I keep my broom, dust pan and an extra chair for guests hanging here. The more I can get up off the floor, the bigger the space feels.

Artsy Studio Space Reveal
Thanks for visiting Oleander + Palm’s Studio! I know you are going to want a Land of Nod desk for your work space now too. Whether it’s a space for grown up making or a spot for your kiddos to do homework, The Land of Nod’s furniture and accessories can help you create a organized and stylish spot for all ages.

A former elementary school teacher, Jeran has added her unique voice to the modern maker culture through her blog Oleander and Palm. She loves helping people find attainable beauty in the lives they live. Her creativity and industriousness were honed through years of living in third world countries, that challenged her to find novel solutions for creating livable spaces. Now a mother of three, settled in sunny California, her skills and styles are evolving in exciting new ways. Her focus is Simple California Living, designing and making livable spaces that incorporate vintage finds, handmade/DIY pieces and global inspiration.

Whale Themed Printable Coloring Page – Perfect for Road Trips!

July 8, 2015

Printable Coloring Pages designed by Michelle Romo

Packing up the kids and heading on a road trip this summer? Make sure you have more than enough activities to keep them occupied (and you sane) during the trip. Download this free whale themed printable coloring page HERE. Share a pic of your little one with the finished product on Instagram (use hashtag #CrateKids) or our Facebook page. We may feature it!

Nod Printable Whale Coloring Page – Perfect for Road Trips!

If you’re looking for more keep-the-kiddos-busy activities, a few of our favorites are:

Michelle Romo is a self-taught illustrator and designer fueled by cookies and naps. Her influences include Mid-Century, Japanese and Scandinavian design, along with pretty much anything cute. When she isn’t working she spends her time eating good food, hugging her friends, playing video games and crafting.

Introducing The Land of Nod Fall 2015 Collection!

July 7, 2015

Written by Rachel, Nod’s PR & Social Media Lead

Our new fall collection is here! With exclusive decor, artist designed kid and baby bedding and skillfully crafted furniture, The Land of Nod 2015 Fall Collection is no to be missed! Check out a few of our favorites below, and the whole collection on our website.

The Land of Nod Fall 2015 Collection - Campground Kids Bedding

Campground Bedding
Designed by Roxy Marj

The Land of Nod Fall 2015 Collection - Color Pop Cube Bins

Color Pop Cube Bins
Part of the LuluDK for Nod Collection

The Land of Nod Fall 2015 Collection - Elevate Mini Crib

Elevate Mini Crib

Forest Pop Wall Decor
Designed by Gingiber

The Land of Nod Fall 2015 Collection - Furniture Decals

Mod Botanical Furniture Decals
Part of the Lotta Jansdotter for Nod Collection

The Land of Nod Fall 2015 Collection - Kids Tent

Urban Design Playtent
Part of the Lotta Jansdotter for Nod Collection

Modern Nautical Glam Basement Reveal

July 6, 2015

Post by Giulia Doyle, photographer and blogger at Audrey’s

Modern Nautical Glam Basement Reveal

Half Tone Basket / Pinstripe Storage Bins / Faux Leather Pouf

It’s been awhile since I talked about our basement reno – the reason is simple. It took us forever to complete it! As per usual in home renovations, we underestimated the time we really had available to us to work on the project and everything took longer than we thought it would. But here we are – project complete, ready for us to hang out and guests to sleep comfortably.

Modern Nautical Glam Basement Reveal

Ahmaze Quilt / Swiss Dot Sheets / Wood Cubby Shelf / Geo Throw Pillow

If you recall, I had created a mood board with the help of Creative Director, Danielle Kurtz at The Land of Nod. She helped me push my ‘ho hum’ nautical design ideas and make this basement a bit more fun and glam. I think all the pieces work beautifully together and play nicely off the neutral whites. This basement is now a fresh, bright and happy space.

Modern Nautical Glam Basement Reveal

Sunburst MirrorHello Pillow

So what did we do? We insulated all the walls, framed, ran electrical, dry-walled, painted, and installed sub-floors, vapor barriers and our wallpaper wall. We brought in much needed storage in neutral white, brought down our guest bed and made things much cozier with rugs, bedding, and pillows from The Land of Nod, added storage baskets, night stands, some great wall art and a mirror, a reading lamp and table lamp and seating for the kids. I was also so excited to use the giant D on our crazy wallpaper wall!

Modern Nautical Glam Basement Reveal

In Print Storage Baskets / Not Giant Enough Letter

So, along with a couple DIY’s, such as the rope wrapped support post, the white sconces I sprayed painted navy blue and the leather pulls to update my old dresser, I think this Modern Nautical Glam Basement is a success and I could not have done it without the amazing help from The Land of Nod. What do you think?

Modern Nautical Glam Basement Reveal

Wood Rock Lamp with Black Shade / Ice Cream Art / Wall Hanging

Giulia Doyle blogs at Audrey’s. She loves to share the sweet and savory, be it in the kitchen or travels. She juggles a family and a full-time job – they cook, travel and often paint a wall a new color. 


Kid-Friendly Healthy Bubble Tea

July 2, 2015

Post by Rebecca of Not So SAHM

Kid-Friendly Healthy Bubble Tea

Have you ever heard of bubble tea!? It’s a Taiwanese tea-based drink that is a frothy mix of milk, tea, fruit and tapioca pearls (boba). It’s also FULL of caffeine and sugar, which is probably why it is one of my favorite sweet treats. But it’s a fun experience that I always wanted to share with the kids — albeit in a much healthier way. So we came up with this fun colorful take on the drink that is much more kid-friend my kiddos LOVED it!

Kid-Friendly Healthy Bubble Tea

To make our kid-friendly healthy bubble tea, you’ll need:

  • 1 cup rainbow boba
  • 2 cups vanilla almond milk
  • 1 1/2 cups frozen fruit (we used strawberries we picked and froze ourselves)
  • 1/2 tablespoon honey
  • bubble tea straws (not necessary, but it’s much more fun to eat this way because you can scoop up the pearls and regular straws are too narrow to fit the boba!)

How to make:

  1. Make rainbow boba according to package directions.
  2. Blend almond milk, frozen fruit, and honey in a blender.
  3. Divide boba equally between two glasses and fill with fruit milk blend.
  4. Top with a bubble tea straw and go to town!

P.S. thanks to The Land of Nod for the fabulous + bubbly garlands!! I continue to be totally obsessed with all the Nod garlands and use them for everything from party styling to wrapping presents to permanent room decor.

Kid-Friendly Healthy Bubble Tea

Kid-Friendly Healthy Bubble Tea

Kid-Friendly Healthy Bubble Tea

Kid-Friendly Healthy Bubble Tea

Rebecca is a mom to two young kiddos and, in her spare time (ha!), likes to pretend she’s a back-up dancer, craft cocktails, and run long distances. A relatively recent SAHM, she blogs family-friendly activities, DIYs and celebration fun at Not-So-SAHM

Carry Home Dollhouse

July 1, 2015

Post by Michelle Sterling of Avery and Augustine

Kids Toys - Carry Home Dollhouse

Welcome to the dollhouse of your dreams! You’ve got four amiable roommates who all share one stylish wardrobe and go shopping together at the farmer’s market every weekend, always coming home with ingredients to make a flaky fruit pie. Or occasionally, a buttermilk chess pie.

Your new digs consist of patterns and prettiness everywhere you look, with adorable surprises under every flap. You’re dreaming…or are you? This lovely plush dollhouse will have little ones happily immersed in its imaginary world. It’s a great tool for pretend play that’s portable, carried from room to room in the house and toted out and about during mornings at the café with mom or on long road trips in the car.

Kids Toys - Carry Home DollHouseKids Toys - Carry Home Dollhouse

What stories will your little one come up with about the girls who call this unbelievable dollhouse their home? Here’s the beginning of a story told by Avery.

Lulu and Her Teddy Bear (She named the doll with pink hair “Lulu.”)

“Lulu wanted to make a pie once. And eat it with her teddy bear with some tea. She had to get the ingredients that she needed to make a pie. It was going to be a apple pie. So she got the apples and then she had all the ingredients at home in the pantry that she buyed a long time ago. She always wanted to make a apple pie…”

Anyone want to imagine what happened next? Let’s just say it was a happy ending.

Kids Toys - Carry Home DollhouseKids Toys - Carry Home Dollhouse

Thank you to The Land of Nod for sending us the dollhouse for this post.

Kids Toys - Carry Home DollhouseKids Toys - Carry Home Dollhouse

Post by Michelle Sterling of Avery and Augustine. You can see her work and read about her two young children and their first forays in cooking, art and everything in between at Avery and Augustine.

Guggenheim – Learning Through Art – Spotlight on PS 144 in Queens

June 30, 2015

Written by Rachel, Nod’s PR & Social Media Lead

Today’s post is a continuation of a series on The Land of Nod’s sponsorship of the Guggenheim’s A Year with Children 2015, which features art created by the Guggenheim’s artist-in-residence program, Learning Through Art. Learning Through Art teaching artists partner with classroom teachers in each of the city’s five boroughs to design collaborative projects that explore art and ideas related to the classroom curriculum.

Each Tuesday in June we highlighted of the school’s projects. Today’s spotlight is on PS 144 in Queens.

Third graders at PS 144 were inspired by architects Frank Gehry and Frank Lloyd Wright as they came up with models of their ideal classroom. The student artists considered shape, line, and form while exploring innovative ideas for redesigning a classroom space through sculpture. As young product and interior designers, they experimented with multiple possibilities by building prototypes. Students explored options for the shape of a classroom by creating small paper sculptures before they built their 3-D classroom models from wire, plastic, paper, foam, metal, and found objects.

Guggenheim – Learning Through Art – Spotlight on PS 144 in Queens

LTA students in the classroom
Third grade, PS 144, Queens, 2015
© 2015 Solomon R. Guggenheim Foundation, New York

Guggenheim – Learning Through Art – Spotlight on PS 144 in Queens

Student Artwork
Third grade, PS 144, Queens, 2015
Photo: Kris McKay © 2015 Solomon R. Guggenheim Foundation, New York

Molly O’Brien, Teaching Artist for PS 144, believes that, “The greatest lessons can be learned using art: expression, acceptance, confidence, innovation, teamwork, critical thinking. I look at my role as a teaching artist as an opportunity for the students and me to collaborate as artists. Students are constantly surprising me with their brilliance. I encourage them to question the world around them, and in return their questions inspire my own practice.”

This spring, we were honored to be one of the sponsors of  A Year with Children 2015, which features art created by the Guggenheim’s artist-in-residence program, Learning Through Art. This program has been serving New York City public school students for more than forty years. Learning Through Art teaching artists partner with classroom teachers in each of the city’s five boroughs to design collaborative projects that explore art and ideas related to the classroom curriculum.

Last Day to Save on Play Space Essentials

June 29, 2015

Today’s the last day to save up to 15% on play space essentials including play tables, play chairs, step stools, toy boxes and benches! And we’ve sweetened the deal with free parcel shipping today only.

extracurricular

Extracurricular Table / Squared Up Step Stools / Fruit Salad Rug / Metalwork Bookcase

If you’re stumped on how to create the perfect play space for your kiddos, here are a few tips:

  • Think about how your child will use the room. Work together with your child on the room design to make sure all the elements they want are included. They’ll feel a connection to the space and will be more likely to use it.
  • Storage, storage & more storage. Choose a mix of open and closed storage. Open storage is perfect for displaying beautiful, colorful toys & helps add personality to the room. Closed storage allowed you to store toys with lots of pieces of out sight.
  • Pick a color scheme that will grow with your kids. Your kid’s taste will change as quickly as the seasons. Try adding a pop of color with easy-to-remove decals or painting one wall.

For more design tips & tricks and how-to’s, head to our Design Library. And don’t forget, our playroom sale ends 6/29 at midnight!

Science Themed Graduation Party

June 26, 2015

Post by Colleen of Lemon Thistle

Science Themed Graduation Party

Let’s face it. Throwing parties can be stressful (with a capital S), but they can also be a ton of fun. A couple of weeks ago we traveled 8 hours by car to celebrate my little sister’s university graduation. She’s a ‘super nerd’ (we lovingly call her) and she graduated with an Honors degree in Cellular Molecular Biology and a Chemistry Degree. I wanted to throw a little graduation party for her to invite some friends to visit with our family while we were in town and celebrate her incredible accomplishments. After telling her to invite her friends over I realized a few things. I had NO idea what her house looks like… is there a good place to put a party table? I had NO room in our car (filled with playpens and snacks for our twins) to pack bunches of decorations but I really, really wanted it to be fun and special for her. PLUS, my sister is my biggest blog fan and has talked me up to all of her friends so I felt like I really had to make it look good.

So I set to the internet to find some ideas for adult science graduation parties and came up pretty empty. Then I came across this Fundamental Party kit from The Land of Nod and decided that was my solution. Since I’m a DIY’er at heart, I decided I’d DIY a science themed backdrop to go along with the decorations. I used black dollar store table cloths to cover the table and wall so I didn’t have to worry what kind of wall/ decorations I was competing with. That wall is actually brown/tan with nails sticking out of it… the backdrop covers it all! I had my sister write equations and diagrams in chalk pen on the table cloth for a chalkboard look. I created some molecules using painted Styrofoam balls and barbecue skewers for something a little extra. I’m so thrilled with how it turned out and it was a ton of fun to get to know her friends a little bit.

Science Themed Graduation Party

Nod Science Party-15061110 Nod Science Party-1506118 Nod Science Party-1506114Here’s some tips to throw a stress-free (but beautiful!) party no matter where on earth you are:

  • Find some awesome pre-made party decorations. Paper and plastic make for a fast clean up!
  • Get a table cloth and backdrop- again, disposable is best!
  • DIY a couple handmade touches ahead of time that you can toss when you’re done (like my molecules, or a centerpiece)
  • Bring everything you may possibly need (I learned the hard way that not everyone stocks tape in their house- save yourself the stress!)
  • Have food either prepped ahead of time or choose ready made options (we hit the grocery store when we got to town since we were traveling on a hot day)
  • Keep it simple – don’t get too fussy, you and your guests will enjoy themselves more if you’re not running around asking them to tape up last minute signs and arrange flowers.
  • Focus on one area – you don’t need to spread decorations around a whole house for a fun party. Make a great table and relax about the rest!

I hope these tips will help you have  a stress-free party (no matter where you are!), they certainly helped me pull this off in 45 minutes in a house I’ve never been to. Do you have any tips for a simple (but fun!) party? Share them in the comments below, I’d love to hear from you!

Colleen is a wife, Mama to 21 month old twins, and the DIY and lifestyle blogger behind Lemon Thistle where she shares printable art and hands on tutorials for DIY home decor, parties and gifts. Colleen believes you can have a beautiful life, home, and party without spending a lot- we’re keeping it real on a budget so everyone can join in on the fun.

Creating a Sensory Friendly Playroom

June 24, 2015

Post by Julia of Tag&Tibby

wide_roomLast summer we moved to our new home in North Carolina. Our previous home in Minnesota was small: our two children shared a bedroom and playtime happened mostly in the living room. Now that we have a playroom and I wanted to make it more personal for our children’s’ needs!
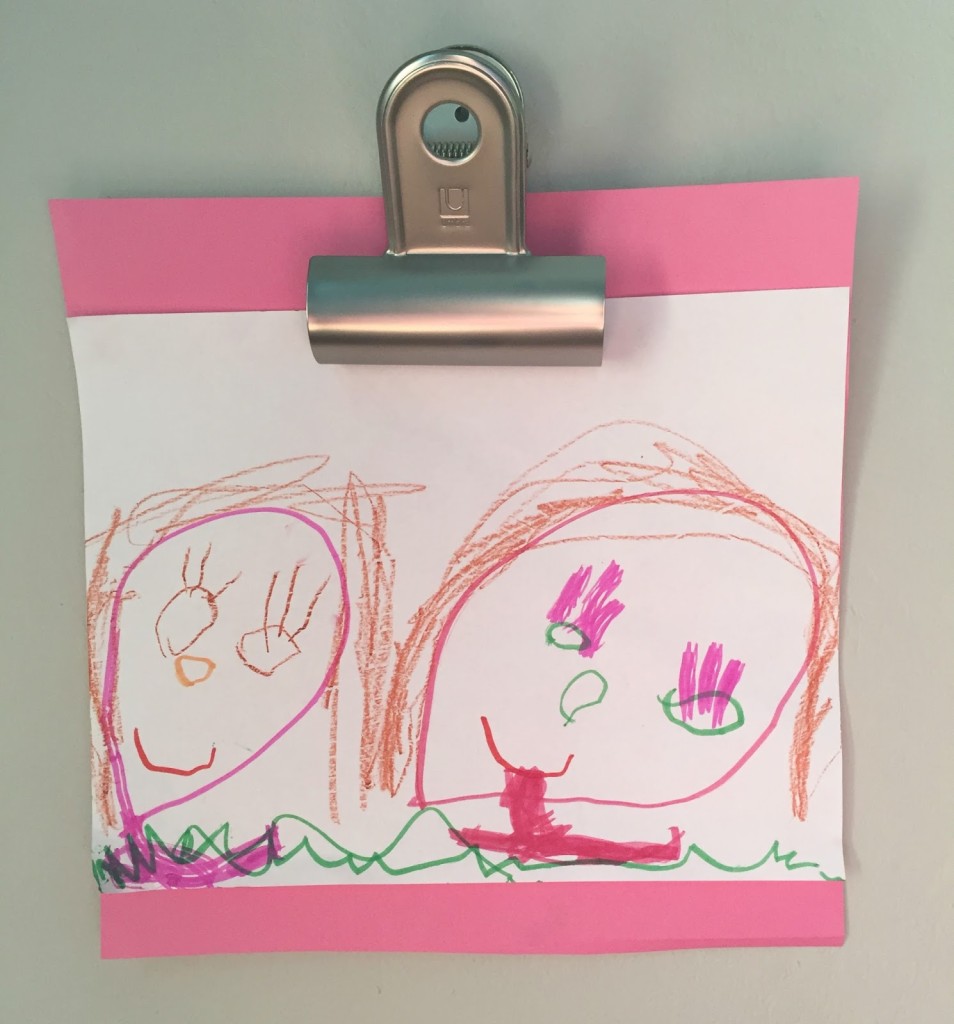
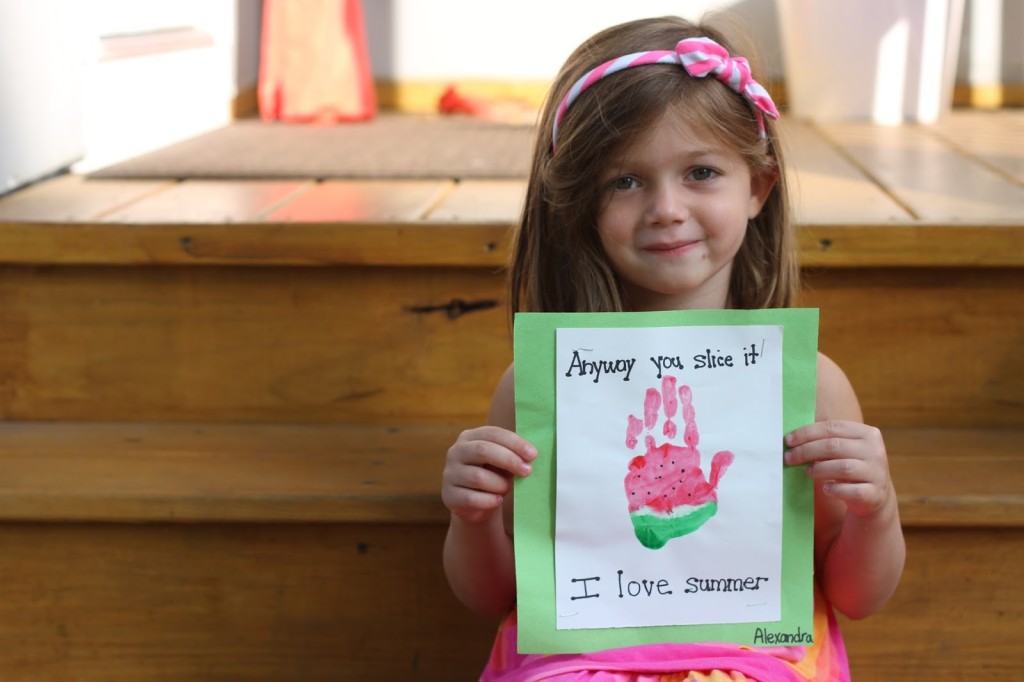
Our oldest is on the autism spectrum. He is high functioning, processes information visually, and loves routine. He is very social but at times during the day needs a quiet space to be alone. Both of our children are fun loving and silly, and I wanted to make our playroom a safe, comfortable environment for both of them to play.

I contacted Land of Nod to see if they would be interested in helping me add some sensory friendly components to the room. They graciously sent the Planetarium Playhouse Canopy. Our little guy is always asking questions about science and the weather and I knew it would be a hit. Our kids now have a soft place to sit and read, and it is the perfect spot to have a little alone time or be silly with their finger flashlights.

Creating a Sensory Friendly Playroom Creating a Sensory Friendly Playroom Creating a Sensory Friendly Playroom

Some sensory friendly playrooms use really bright, vivid colors. But I believe if the room is a place to visually relax a soft blue or green is the way to go. I added a faux wood plank wall for texture, and the star bright decals add so much character to the room.

Our two kids are 5 and 7. They are in their elementary years so we were looking to add to hobbies they have established. They both love Legos, so it was important to include that in the room. And our daughter loves to craft and read. We keep our board games and puzzles in the closets and extra books and craft supplies in the thrifted cabinet to prevent visual over-stimulation. Additionally, we chose to leave “white space” in the room for the kids to be creative and spread out their toys.

Creating a Sensory Friendly Playroom
I brought the trampoline from our porch and right away our son started jumping. Jumping, hopping, running, spinning are all forms of vestibular input and is really helpful to add in a playroom for sensory processing.

Bryce craves a daily routine. It makes a tremendous difference to his day when he knows the “plan.” That can be a little hard sometimes for me: a creative, go with the flow Mama! So I added our weekly calendar to the wall and a white board for him to draw out our daily schedule. We find that reward charts (check out my free printable) and visual timers are also helpful.

Creating a Sensory Friendly Playroom

The kids LOVE the new playroom. They are spending more time there, making it messy, and using their imaginations. We are excited to spend even more time there this summer! For more pictures of the playroom makeover visit Julia’s blog Tag & Tibby.

Creating a Sensory Friendly Playroom - Before & After

Julia is the founder and editor of Tag&Tibby: a site dedicated to simple DIY projects, home design, and recipes with a hint of vintage. She is a wife and mom to two awesome kids and has a background in product design.  

Guggenheim – Learning Through Art – Spotlight on PS 86 in the Bronx

June 23, 2015

Written by Rachel, Nod’s PR & Social Media Lead

Today’s post is a continuation of a series on The Land of Nod’s sponsorship of the Guggenheim’s A Year with Children 2015, which features art created by the Guggenheim’s artist-in-residence program, Learning Through Art. Learning Through Art teaching artists partner with classroom teachers in each of the city’s five boroughs to design collaborative projects that explore art and ideas related to the classroom curriculum.

Each Tuesday in June we’re highlighting one of the school’s projects.  Today’s spotlight is on PS 86 in the Bronx.

Sixth graders at PS 86 explored drawing techniques and created self-portraits on iPad sketchbooks.  Using technology allowed students to explore the differences between digital and analog drawing. The student artists then created portrait monoprints, allowing them to tackle different media and materials inspired by the same subject… themselves!

Guggenheim - Learning Through Art – Spotlight on PS 86 in the Bronx

LTA students in the classroom
Sixth grade, PS 86, Bronx, 2015
© 2015 Solomon R. Guggenheim Foundation, New York

Guggenheim - Learning Through Art – Spotlight on PS 86 in the Bronx

LTA students in the classroom
Sixth grade, PS 86, Bronx, 2015
© 2015 Solomon R. Guggenheim Foundation, New York

Guggenheim - Learning Through Art – Spotlight on PS 86 in the BronxStudent Artwork
Sixth grade, PS 86, Bronx, 2015
© 2015 Solomon R. Guggenheim Foundation, New York

Teaching Artist Jeff Hopkins says that “art is about sharing stories and connecting with others. Students learn to ask: What stories do I have to share? What stories do others have that might connect to my own experiences? The language of visual art is a communication tool as essential as speaking or writing. When students learn to think visually, they learn a new way to connect with the world around them.”

This spring, we were honored to be one of the sponsors of  A Year with Children 2015, which features art created by the Guggenheim’s artist-in-residence program, Learning Through Art. This program has been serving New York City public school students for more than forty years. Learning Through Art teaching artists partner with classroom teachers in each of the city’s five boroughs to design collaborative projects that explore art and ideas related to the classroom curriculum.


Nod Printable Coloring Page – Happy 4th of July

June 22, 2015

Nod Fun Pages designed by Michelle Romo

We can’t believe that the 4th of July is almost here! We’re looking forward to fireworks, hot dogs and a summery day with our families. Download this free Fourth of July themed printable coloring page HERE. Share a pic of your little one with the finished product on Instagram (use hashtag #landofnod) or our Facebook page. We may feature it!
Nod Printable Coloring Page - Happy 4th of July

Michelle Romo is our newest Nod illustrator, she’s a self-taught illustrator and designer fueled by cookies and naps. Her influences include Mid-Century, Japanese and Scandinavian design, along with pretty much anything cute. When she isn’t working she spends her time eating good food, hugging her friends, playing video games and crafting.

Cheddar Bunny Chicken Tender Recipe

June 18, 2015

Post by Corri McFadden of Glitter & Bubbles

Transforming junk food into healthy eats is way easier than you think! You might just like these Cheddar Bunny Chicken Tenders more than your littles! These tenders are a crowd-please for all ages—and a great option when you want to put a new spin on how you prepare chicken.

Cheddar Bunny Chicken Tender Recipe

Cheddar Bunny Chicken Tender Recipe Ingredients:

  • Annie’s Cheddar Bunny Crackers (or similar cheddar crackers)
  • 1 chicken breast
  • Fat-Free Greek yogurt
  • Salt and pepper

How to:

  1. First, preheat the oven to 350 degrees. Then, start by placing the Cheddar Bunny crackers in a Ziploc bag and then use a rolling pin to crush them. Make sure the pieces aren’t too fine, you’ll want the pieces to be similar in size to panko breadcrumbs! Cheddar Bunny Chicken Tender Recipe
  2. Pour the cracker crumbs and the yogurt into separate shallow bowls and set aside. Slice the chicken breast lengthwise into tenders – one breast creates 4-5 tenders.
  3. Dip each tender in the yogurt then the crackers crumb and shake off any excess. Place each piece on a baking sheet lined with parchment paper and repeat until all of the tenders have been coated.Cheddar Bunny Chicken Tender Recipe
  4. Bake for 25-30 minutes until the tenders are crispy and the chicken is fully cooked. Let them cool and serve to your littles with their favorite dipping sauces!

Cheddar Bunny Chicken Tender Recipe

Corri McFadden is the owner and founder of eDrop-Off Luxury Consignment.  As a style expert and successful blogger, she hosts a weekly fashion segment on Chicago’s “You and Me This Morning” and features more tips and tricks on her website, Corri McFadden. She also recently launched Glitter and Bubbles, a savvy site for modern-day moms looking for inspiration through fashion, décor and food. 

DIY Father’s Day Gift – Felt Catchall

June 17, 2015

Post by Rebecca of Not So SAHM

DIY Father’s Day Kids Craft - Felt Catchall

By some stroke of luck, both of our kids learned to sew at school this year. Now I’m into lots of different arts and crafts, but sewing just isn’t my jam. So of course they both decided they wanted to sew their dad a present for Father’s Day. I racked my brain to think of something simple that was also useful and (*lightbulb!*) I came up with the idea to make Dad DIY felt catchalls. He really needed several containers to hold the daily contents of his pockets and I wanted something that wasn’t going to scratch all our new furniture. So these were perfect! I think he’s going to love them (and his new-found ability to rapidly find his wallet, keys, and security badge in the morning).

DIY Father’s Day Gift - Felt Catchall

To make our DIY Father’s Day Gift – Felt Catchall, you’ll need:

  • 2 sheets of colored felt (we used 9″ X 11″ sheets from a craft store and cut them into 9″ squares)
  • 1/8 circle hole punch
  • Colored embroidery thread and a needle
  • Ruler
  • Black marker
  • Scissors

And here’s how you make it:

  1. Cut your felt sheets into a square. DIY Father’s Day Gift - Felt Catchall
  2. Using your ruler, draw marks onto the corners of your felt where you are going to hole punch (I did this prep work and the kids jumped in at the sewing stage). You’ll need to gather the corners of your felt in two spots, so you will be marking for four holes:- 2 holes, each 1.5″ from the corner of the felt and 0.6″ from the edge- 2 holes, each 1.5″ from the corner of the felt and 1.25″ from the edgeDIY Father’s Day Gift - Felt Catchall
  3. Use the punch to make each hole as marked. I did this on one corner and then folded the felt in half and marked the opposite corner. Then repeated for the remaining two corners. You’ll be able to mark all four corners, but only have to measure once. Punch the remaining holes. Lay punched felt on top of second piece of felt. Using the holes as guides, mark where you’ll need to punch on the second piece. DIY Father’s Day Gift - Felt Catchall                                                  (folding to mark the same spot on the opposite corner)DIY Father’s Day Gift - Felt Catchall

  4. Thread your needle. Gather one corner and sew through the closest two hole punches several times. Tie the ends into a small knot and clip. Repeat for the two holes closest to the felt’s edge, looping the embroidery thread over the top as you sew. DIY Father’s Day Gift - Felt CatchallDIY Father’s Day Gift - Felt Catchall
  5. After you’ve done one corner completely, show your kiddos and help them do remaining three corners. Voila!

We’re wrapping our felt catchalls in The Land of Nod’s fabulous suitcases — the best reusable gift wrapping for this delicate present!

DIY Father’s Day Gift - Felt CatchallDIY Father’s Day Gift - Felt CatchallDIY Father’s Day Gift - Felt CatchallDIY Father’s Day Gift - Felt Catchall DIY Father’s Day Gift - Felt CatchallDIY Father’s Day Gift - Felt Catchall

Rebecca is a mom to two young kiddos and, in her spare time (ha!), likes to pretend she’s a back-up dancer, craft cocktails, and run long distances. A relatively recent SAHM, she blogs family-friendly activities, DIYs and celebration fun at Not-So-SAHM.