Close

Blog

Shared Girls Room Refresh by Lay Baby Lay

January 16, 2015
Post by Joni of Lay Baby Lay

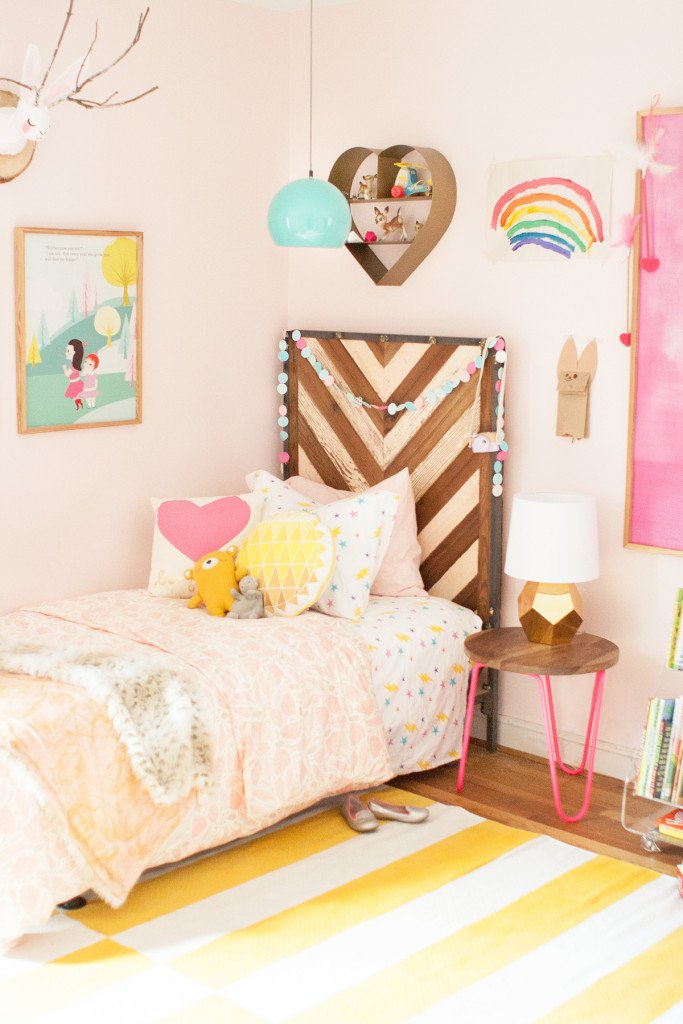
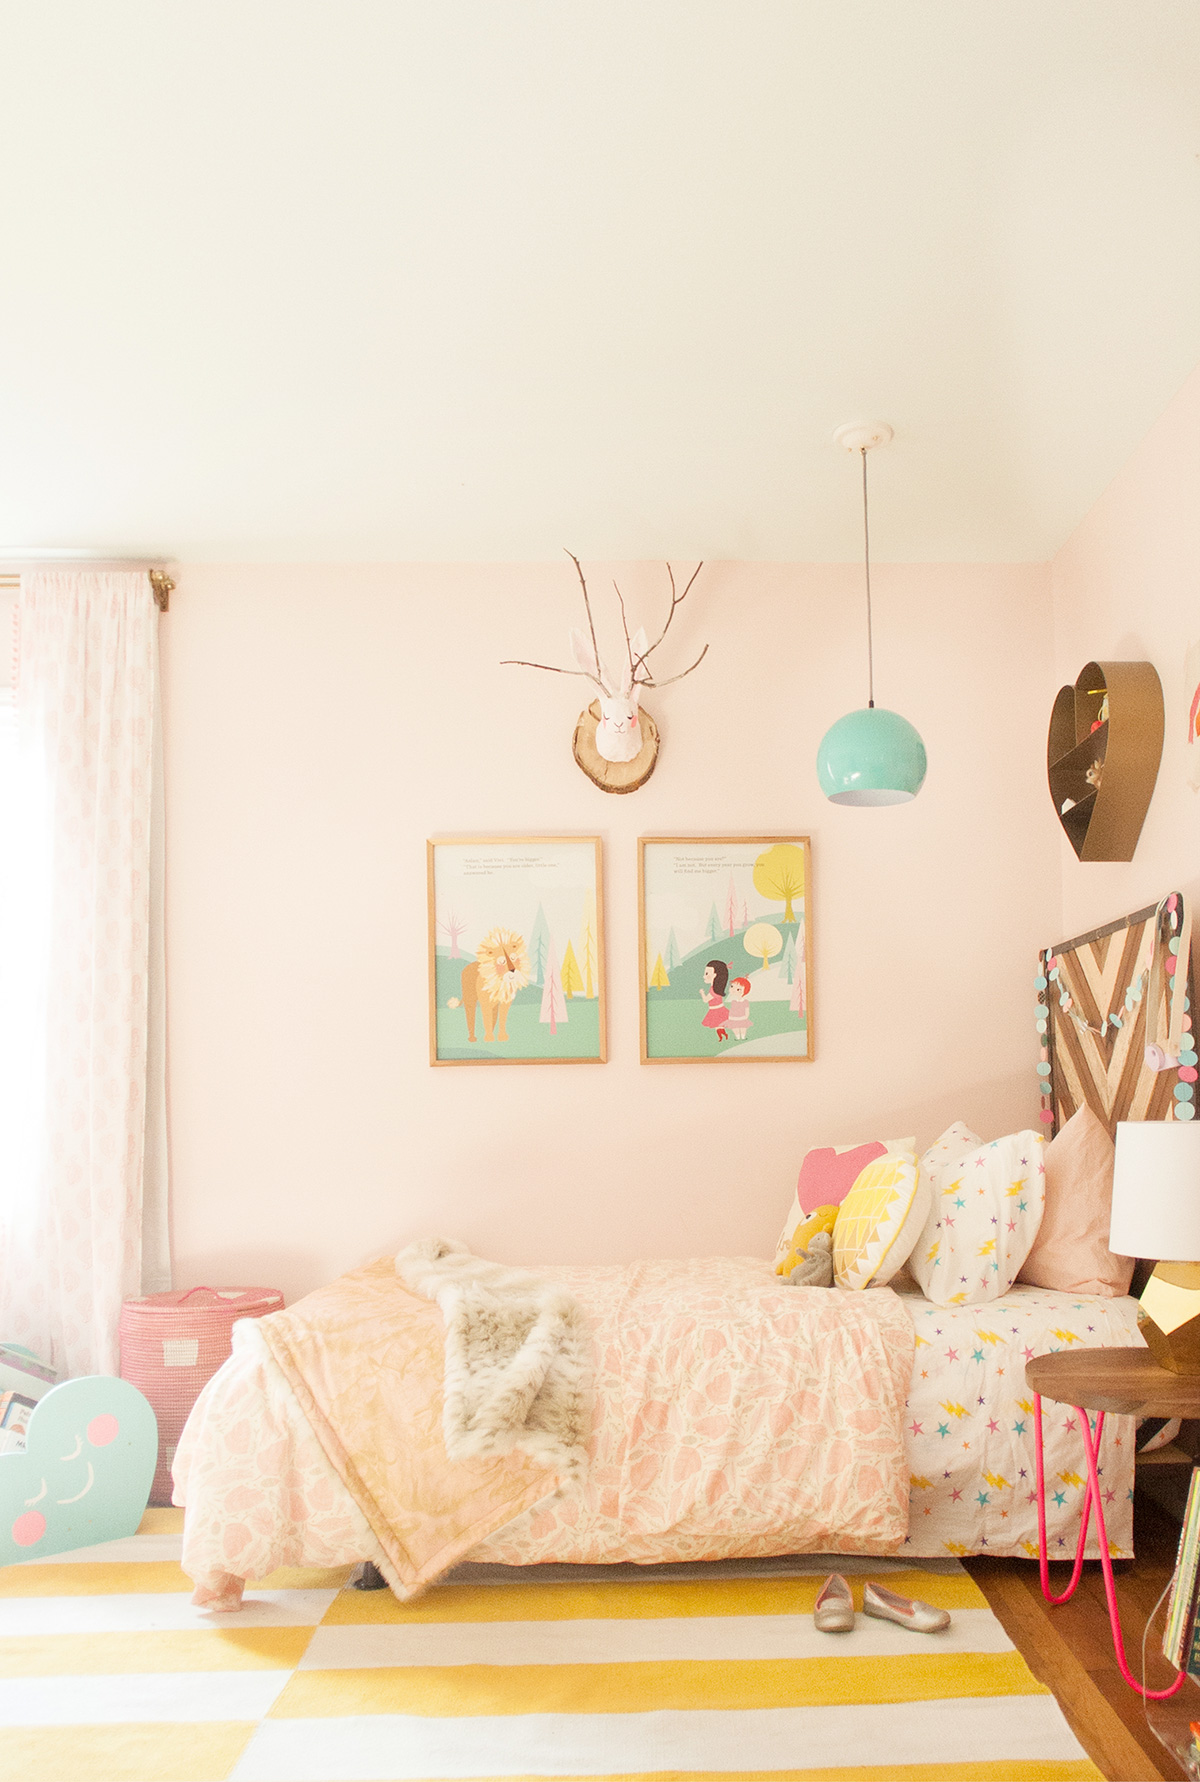
I just finished up a refresh on my shared girls’ room. Vivi had been asking for pink walls, and since we have moved things around a few times trying to figure out the best arrangement as she grew, we had various scuffs and holes on the wall. Starting with a fresh coat of paint can be so, well, refreshing. It makes everything feel cleaner, brighter, and more organized (and who can’t appreciate that if you have toddlers?). We went with Sherwin Williams’ Angelic for the paint color, and I was excited to incorporate some Land of Nod kids bedding (as well as other adorableness!) for a happy, whimsical look.

We are going to move Brigette into her big sister’s room when she transitions to a big girl/toddler bed, so I wanted bedding that coordinated without being too matchy. One of the things I adore about The Land of Nod bedding is that you can mix just about whatever combination you want, and it will look perfect together.
Shared Girls Room Design Refresh by Lay Baby Lay 5
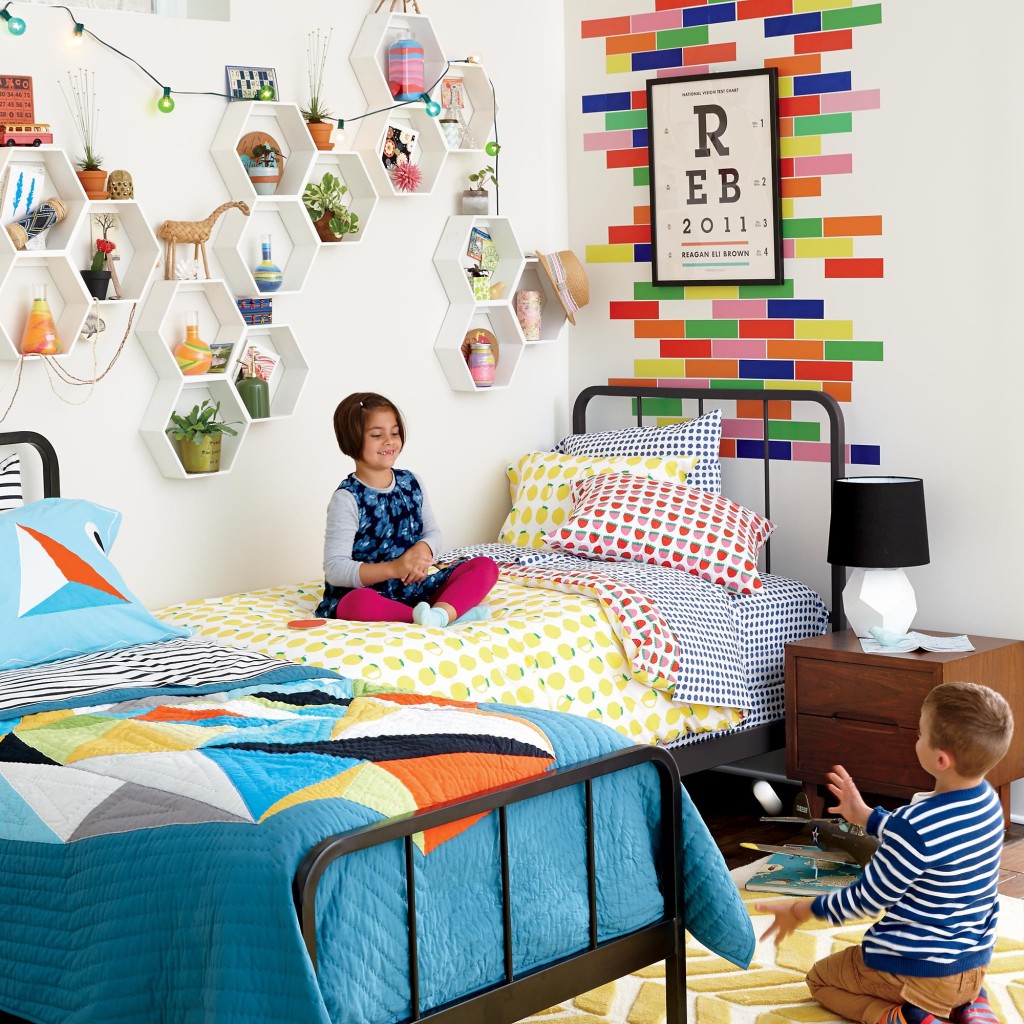
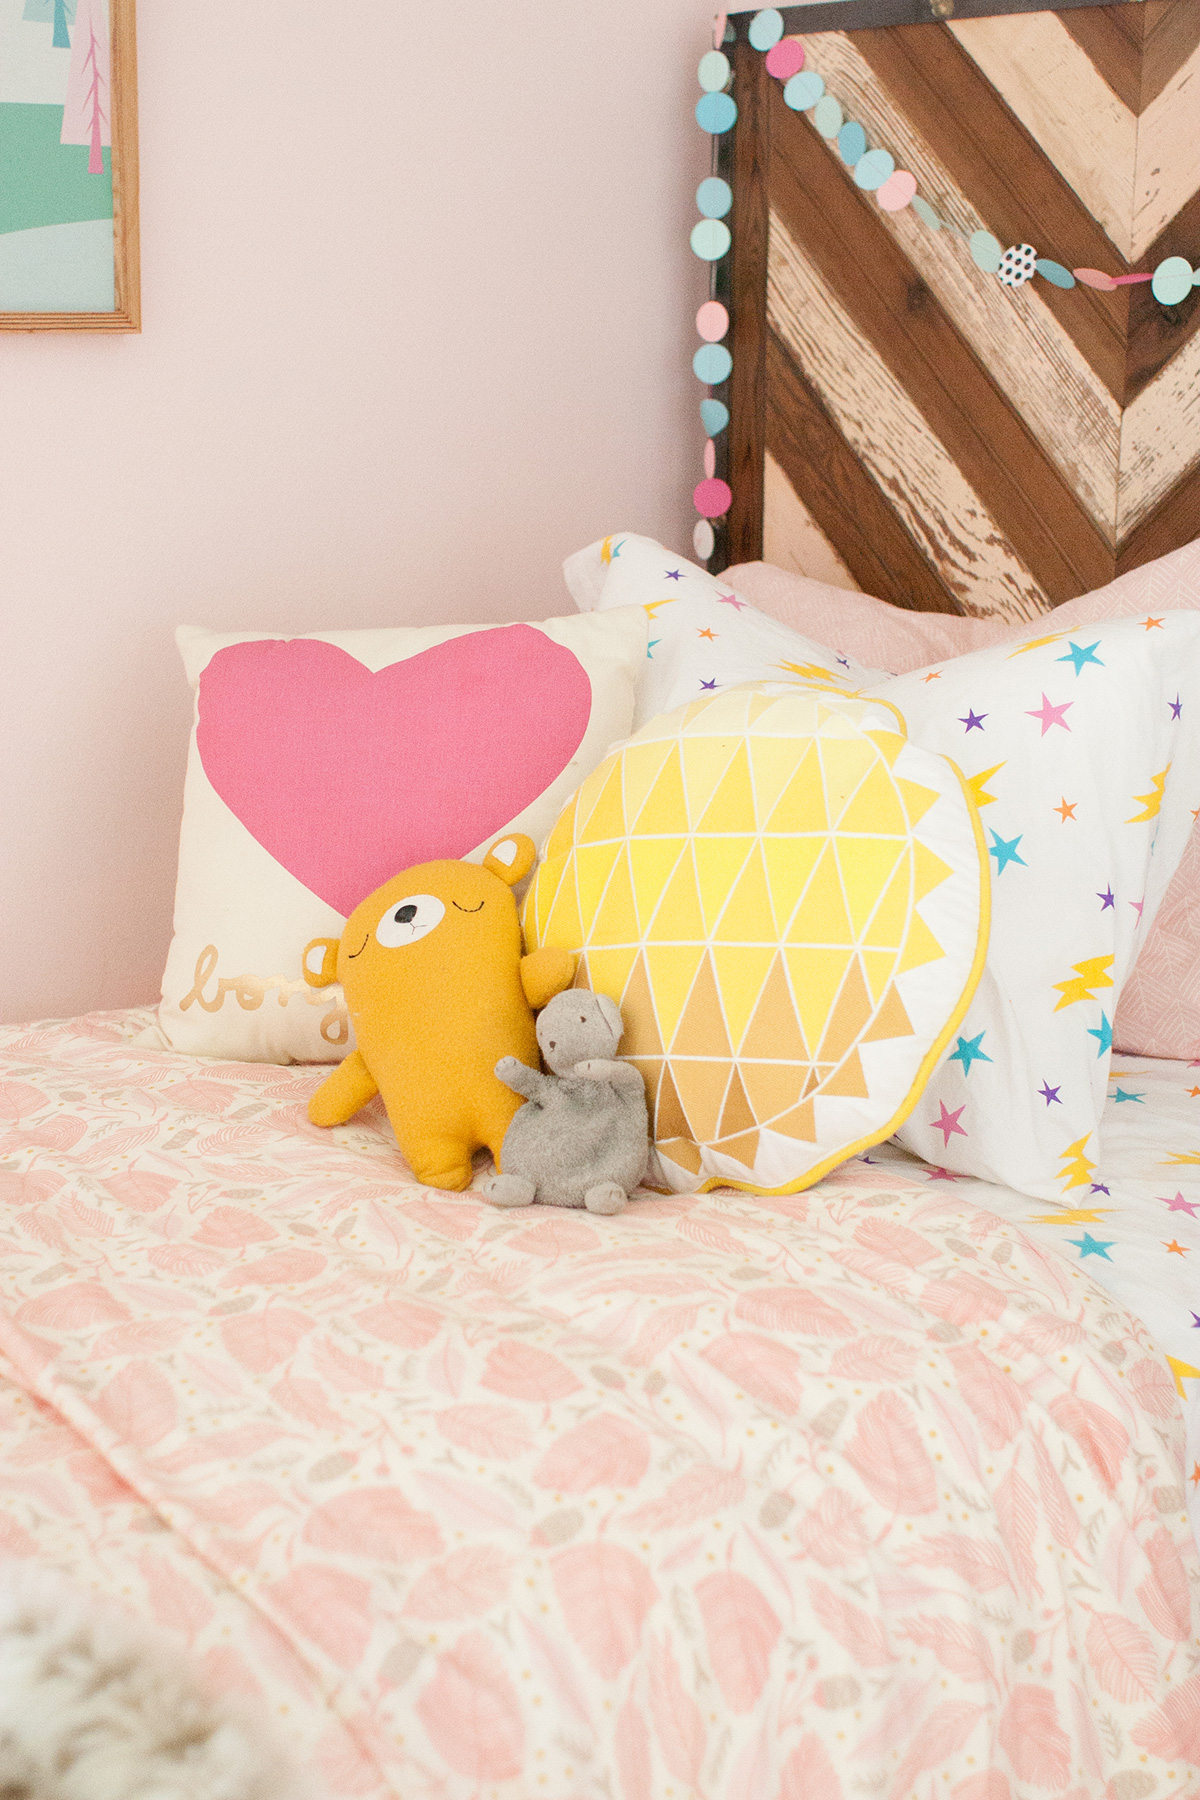
For Vivi’s twin bed, we used the save the day sheets (I love these! Girly and superhero at the same time!) and the beautiful well nested duvet cover. We added in a bonjour heart pillow and a geometric sun pillow for extra color and some extra cushion for reading.
Shared Girls Room Design Refresh by Lay Baby Lay 7
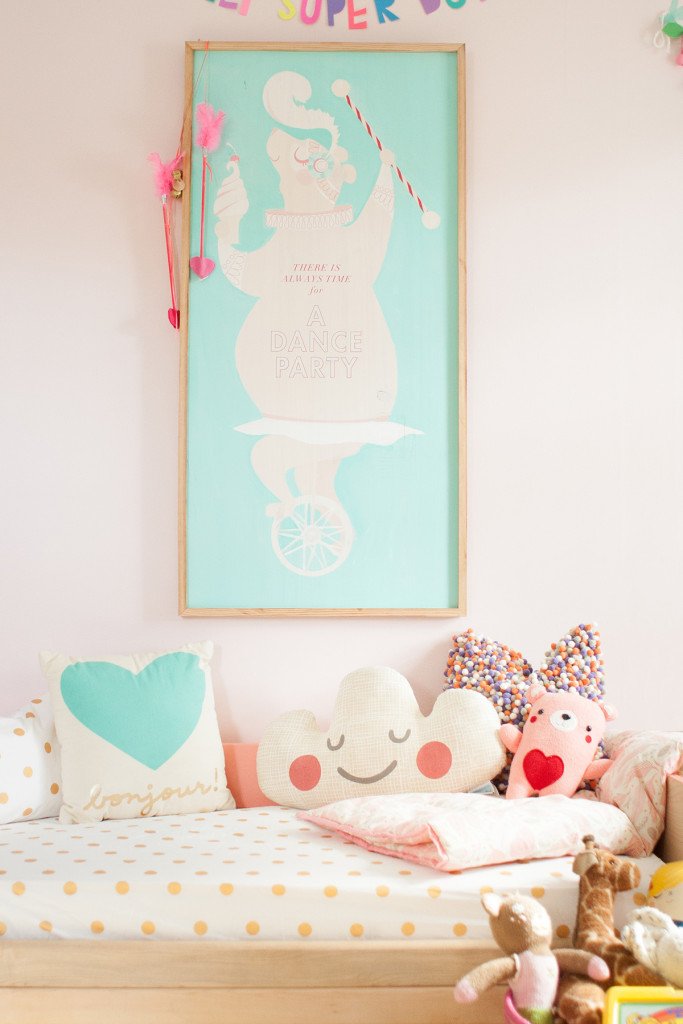
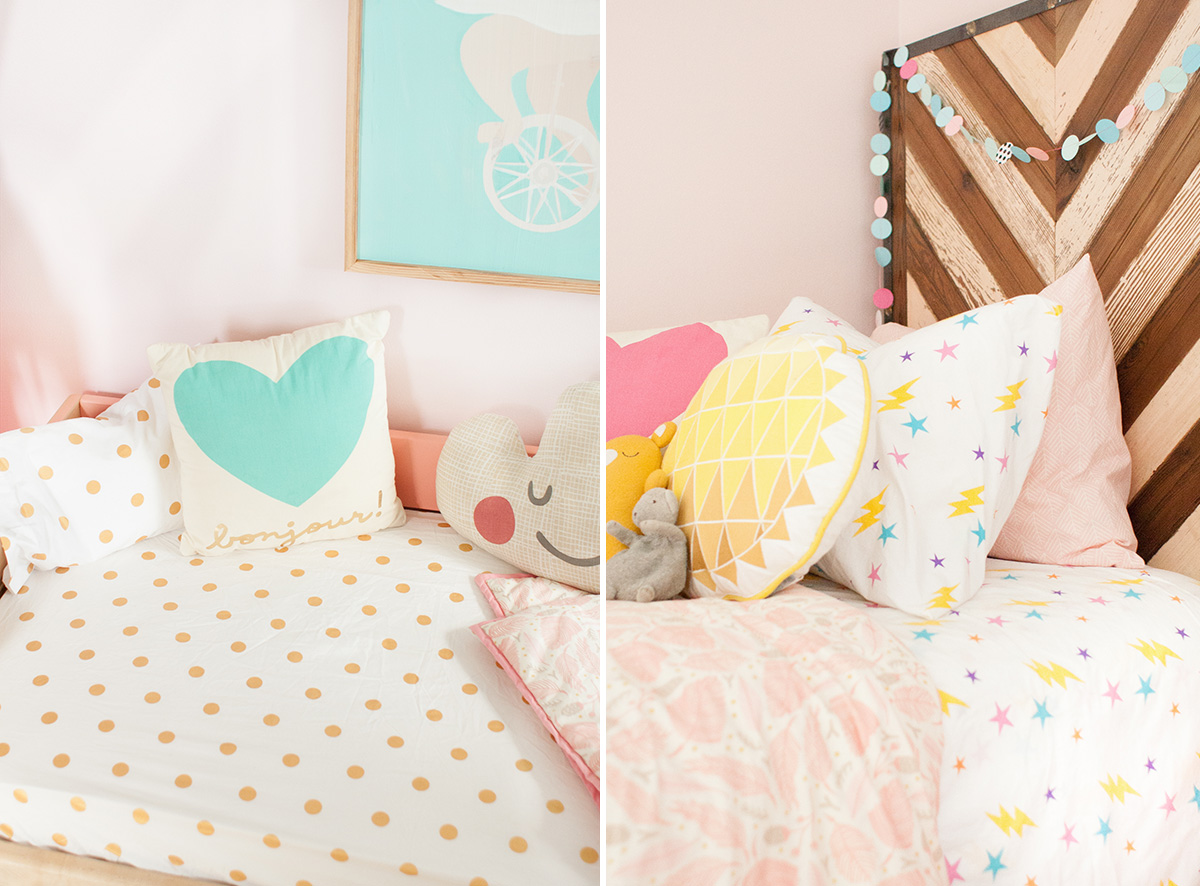
On Brigette’s bed we used the gold dotted crib sheet and the well nested crib quilt. I love toddler sized beds – they are the cutest, and leave lots of room for playing! We added on that cute mint bonjour heart pillow and head in the clouds pillow along with a pom pom pillow (I love all the little poms!!) which makes her bed a nice little divan for reading or playing during the day.

Shared Girls Room Design Refresh by Lay Baby Lay 9
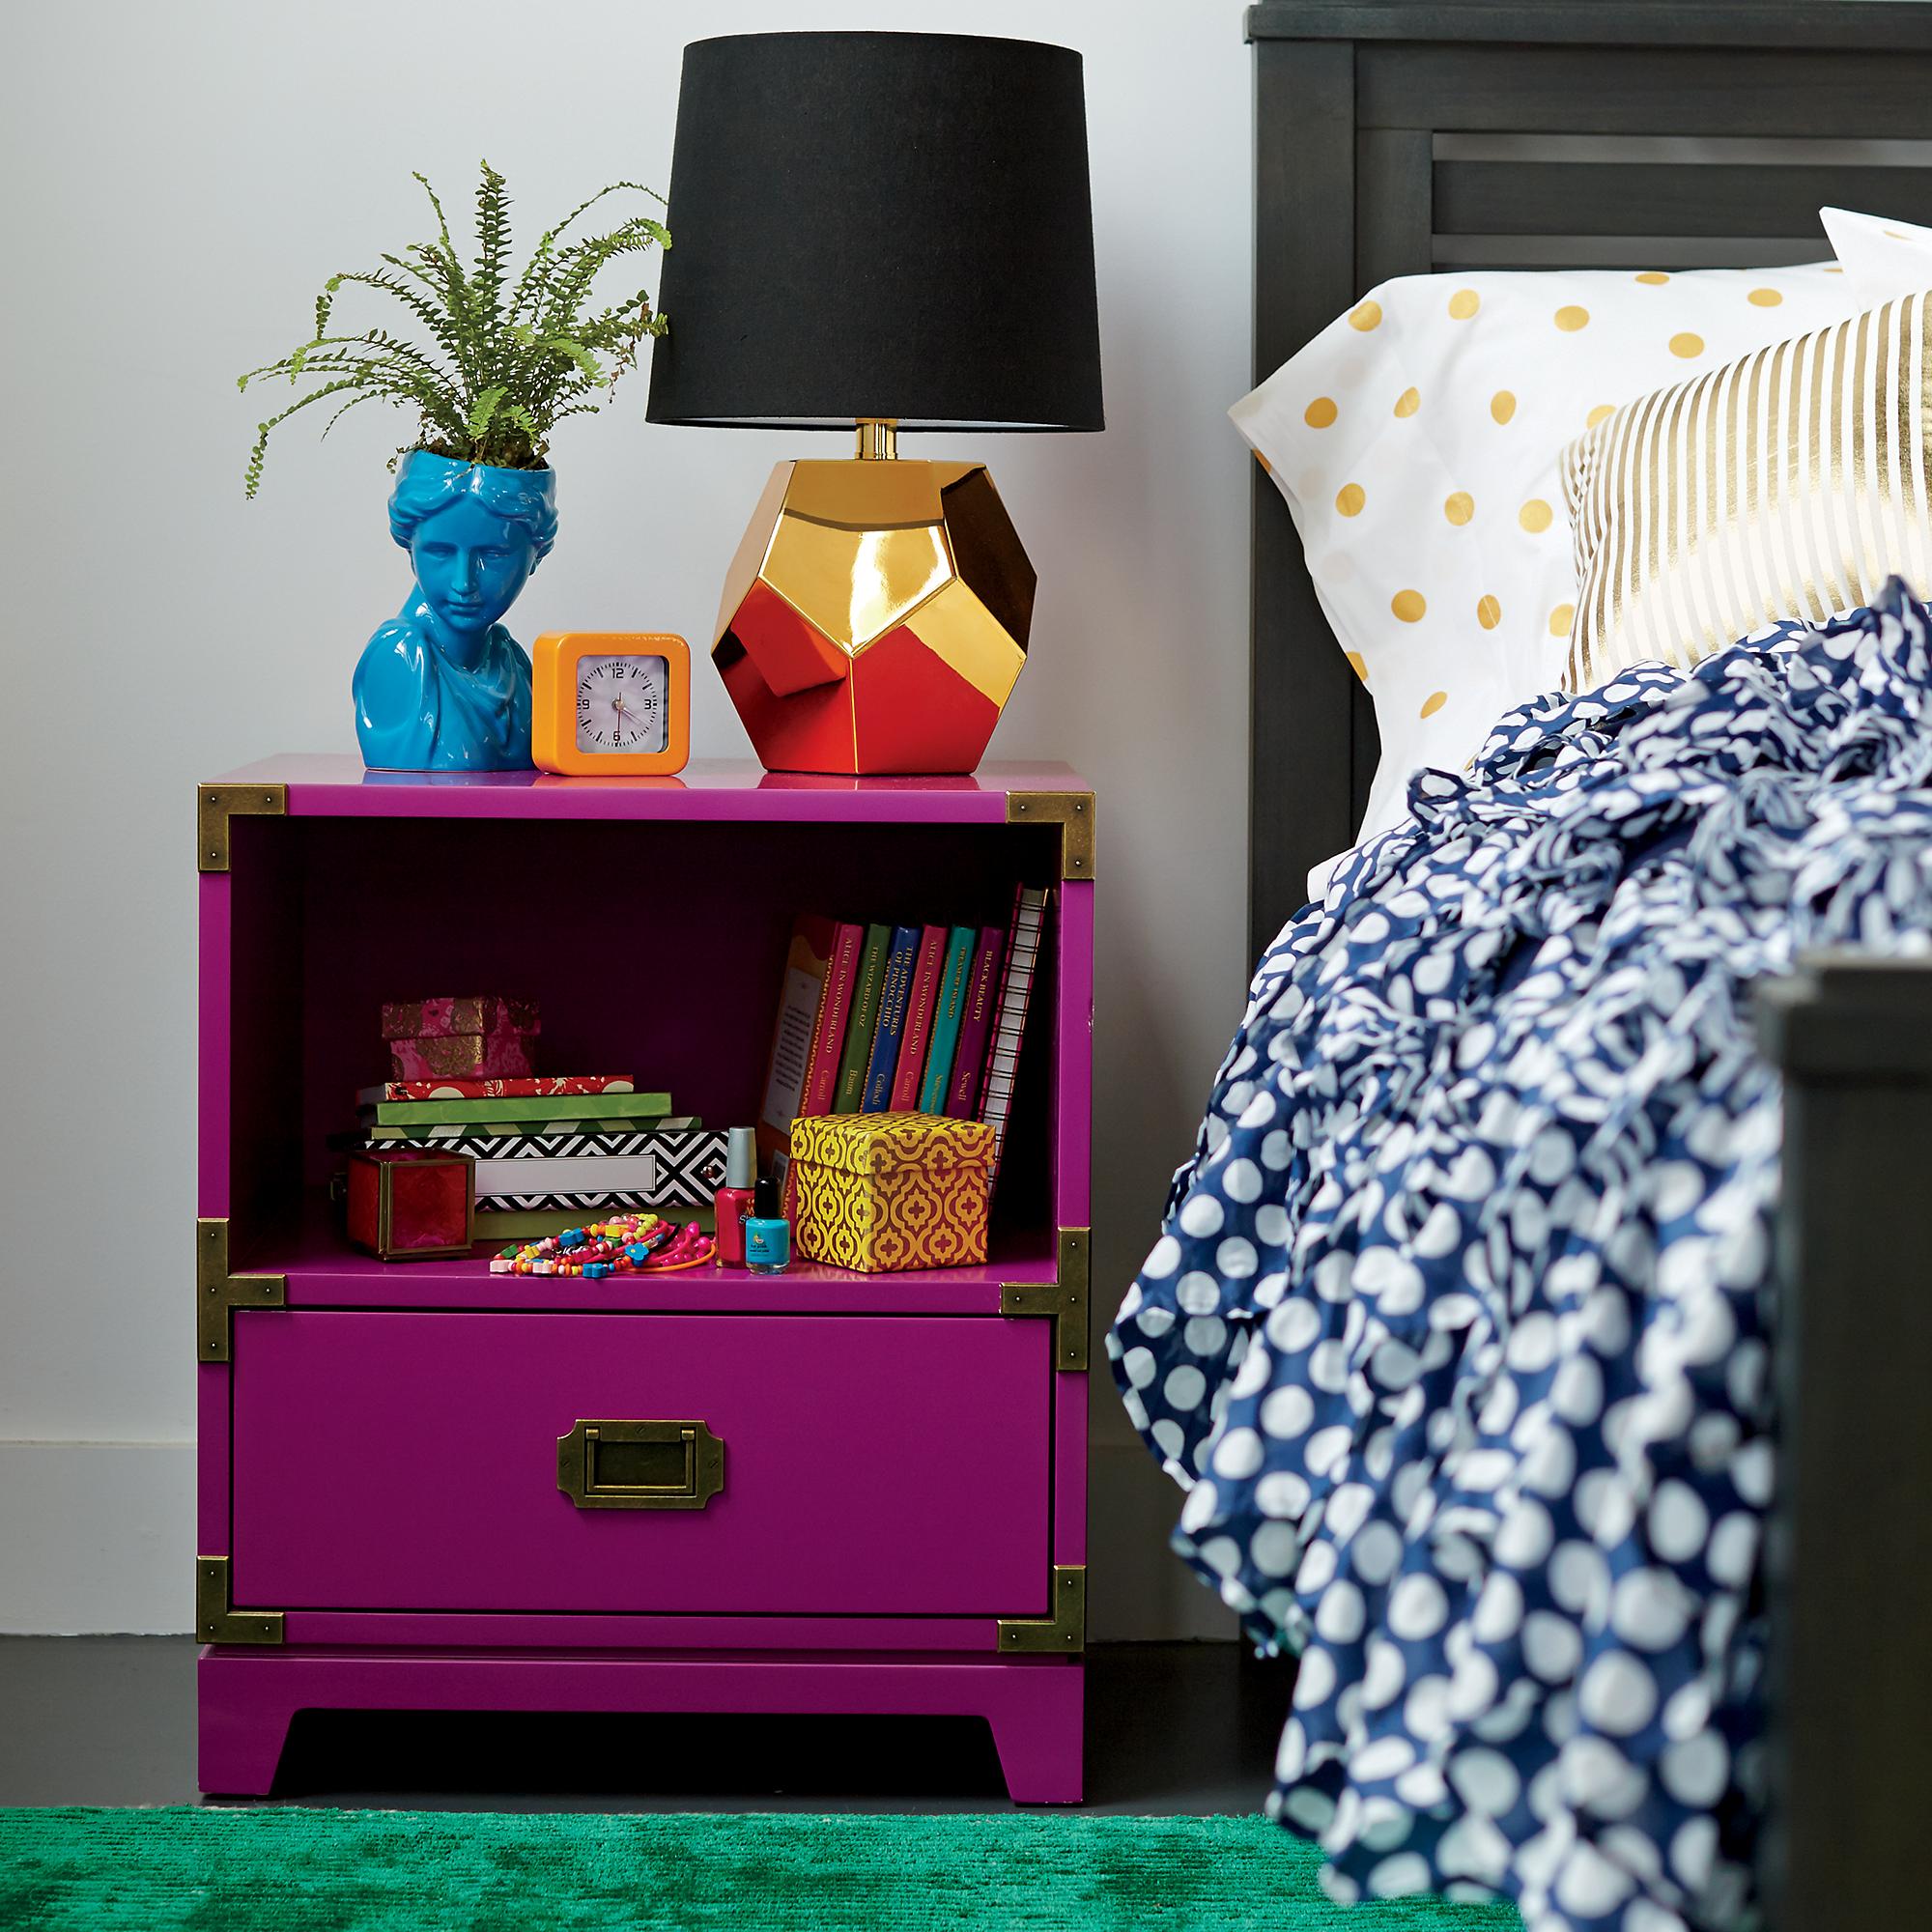
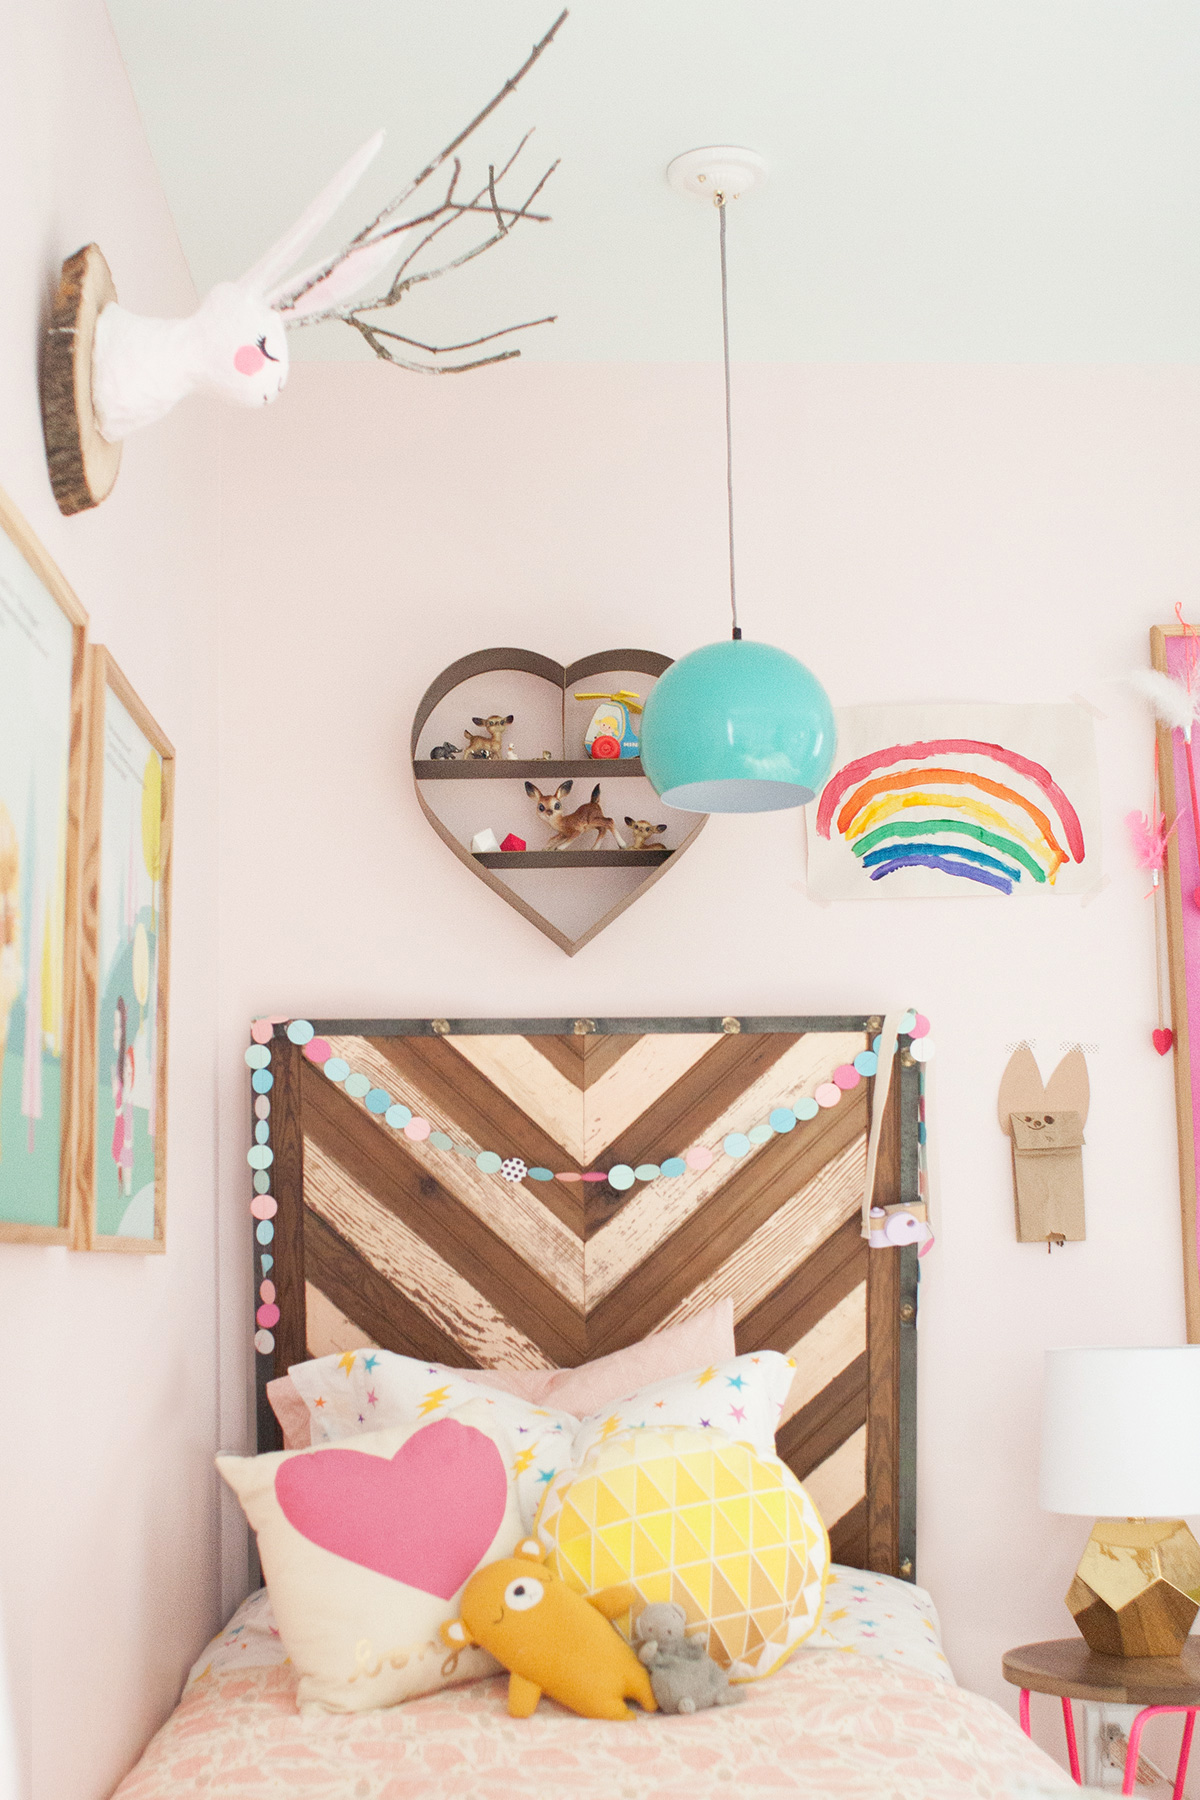
I love having their room more thoughtfully pulled together! The pink is so happy and bright, and Vivi loves to make up her bed with her fun collection of pillows! Be sure to visit Lay Baby Lay to see more details from this room and how we incorporated more great pieces from the Land of Nod! (like the heart shelf, gold lamp, and neon nightstand shown above!)

Thanks so much to The Land of Nod for helping us make such a dreamy space for our girls!

Shared Girls Room Design Refresh by Lay Baby Lay 11
Lay Baby Lay started in 2011 shortly after the arrival of my first baby as a place to provide fresh and unique nursery inspiration with a little dose of motherhood experience. This site is my creative outlet and the place where I am able to express all the ideas running around in my head. It is my hope that you will also be inspired to create spaces for your little ones that are full of imagination, color, and delight and maybe find a little encouragement in this crazy but wonderful journey of having babies and watching them grow. 

Step Up the Playfulness in Your Decor: Washi Tape Stair DIY

January 14, 2015
Post by Danielle Kurtz, Creative Director at The Land of Nod
Washi Tape Stair DIYSome of my favorite design elements are those that show up in unexpected places. Most people don’t think twice about the risers on their stairs, but they’re really just begging to be adorned. I’ve seen them painted in a rainbow or wallpapered in a playful pattern, and I LOVE those ideas. But, we thought we’d try something a little less permanent, which requires a lot less investment of time and money when it came to the staircase decor in the Nod Family Home. So enters one of our favorite decorating materials…washi tape!Washi Tape Stair DIY 2For our stair DIY we used washi tape on this staircase to write out a beautiful quote by e.e. cummings. Look for inspiring words in your favorite book, poem or even a song. It can be sentimental and sweet, like the one we chose, or witty and fun. Choose a quote that’s length matches your number of stairs, you don’t want a whole paragraph, but want at least one word per step. Write out your number of steps and write your quote from the bottom step up.Washi Tape Stair DIY 3Washi Tape Stair DIY 4For our “font” we decided to embrace the squared off nature of the tape and did a faceted style type. It’s imperfect, which we think is just perfect.Washi Tape Stair DIY 5Use a box or block of wood to determine the baseline for your text, and settle on a general height for your tallest letter. And, you’re off. We decided to vary the color on each step in rainbow order. But, you can use all one color, vary colors by letter, whatever feels right to you. The beauty of washi tape is if you make a mistake, you can remove it and try again. Also, it’s super easy to remove down the road if you decide to try something different.Not feeling the quote idea for your stair DIY? Try making patterns on the risers. Think dots, x’s, +’s, stripes. The possibilities are endless!Danielle is the Creative Director at Nod and an over-protective mother of two. She’s also completely obsessed with Pinterest, Twitter, Instagram and her Kindle, but not necessarily in that order. Danielle loves to craft, sew and crochet. Her current craft of choice is weaving tiny wall tapestries.

Nod Printable Coloring Pages: Snow Day

January 13, 2015

We’re all about keeping your kiddos occupied. Michelle Romo, an amazing artist who recently joined the Nod team as an illustrator,  created a few Nod Fun Pages to do just that. With all the snow we’ve had recently in Chicago, we figured we should start with a printable coloring page dedicated to snow days.

All you need is a printer and markers. Make sure you download the full size printable coloring page HERE.

Share the finished product on Instagram (use hashtag #landofnod) or our Facebook page and we may feature it!

Enjoy!

Land of Nod Printable Coloring Pages: Snow Day

Looking for more free printable coloring pages? Check out all our other Nod Printable Coloring Pages!

Post-Holiday Toy Organization

January 12, 2015
Post by Danielle Kurtz, Creative Director at The Land of Nod

Post-Holiday Toy OrganizationMy favorite day of the year is when my family and I put up our Christmas tree. And, my 2nd favorite day is when we take it down. I think after the overall abundance of the holidays, it’s so refreshing for our space to feel a little spare.

Though, there’s just one problem. Every year when the post-holiday urge to cleanup kicks into gear, it’s not as easy as putting everything in its place because everything doesn’t have a place. All those new toys, books and games need a home. That means a healthy dose of purging and reorganizing is in order.

Post-Holiday Toy Organization - StorageFor post-holiday toy organization, first, you need a good foundation. I’ve found the best starting point is modular and flexible storage, like our Cubic Collection. Your kid’s toys will evolve as they grow from stuffed animals and blocks to dress up clothes and board games. So, look for furniture solutions that can continue to function as your needs change.

Second, purge. You may have to send the kids to grandma and grandpa’s for the day to get it done, but your space will simply not multiply as quickly as the toys. I try to do a pretty heavy purge before birthdays and Christmas. Throw away anything broken or with missing pieces. Then, donate items they’ve outgrown or simply don’t use. If you’re planning to have more kids, pack up the items they’ve outgrown and save them for down the road. But, one way or another, purging is an essential toy organization step to keeping a handle on the madness.

Post-Holiday Toy Organization - BasketsLastly, find a home for everything. You may need to invest in a few more bins and baskets. I try to keep like items together (a bin for dinosaurs, a bin for doll clothes, a bin for play food, etc) as this makes for quicker cleanup. Then, stash items that require supervision (paint, board games, etc) on higher shelves, and keep frequently used toys closer at hand.

By Danielle Kurtz. Danielle is the Creative Director at Nod and an over-protective mother of two. She’s also completely obsessed with Pinterest, Twitter, Instagram and her Kindle, but not necessarily in that order. Danielle loves to craft, sew and crochet. Her current craft of choice is weaving tiny wall tapestries.

DIY Craft Stick Puzzle

January 9, 2015

Post by Rebecca of Not-So-SAHM

DIY Craft Stick PuzzleMy guys have been on a mad painting streak lately and we’re constantly on the hunt for new project ideas. If I had to guess, I’d say it’s going to be a winter of prolific painting. I’ve seen several different DIY puzzle crafts floating about and thought it would be fun to try and incorporate their painting obsession into puzzle-making. They loved it!

With just a few supplies, I was able to get them set up and making their own puzzles in no time. And neither one realized I snuck in a little handwriting and math as well (I love when I get to do that!). The idea is to paint a scene or abstract picture across the width of the craft sticks, which can then be reassembled as a puzzle. My guys had their own ideas, of course, but by the third puzzle, they had caught on and realized it was more fun to put back together one entire image.

Here’s how to make your own craft stick puzzle! You’ll need:

DIY Craft Stick Puzzle Supplies

  • Paint (concentrated watercolors or tempera paint will do)
  • Craft sticks
  • A permanent marker
  • Painter’s tape

Lay out desired number of craft sticks (we found 10 worked best) and tape together with painter’s tape. Using the permanent marker, label the bottom of each craft stick in numbered order. Flip over and paint whatever design you’d like. Either realistic scenes or abstract images work well, but painting across the craft sticks to make a complete and integrated image makes for a more fun puzzle to reassemble.

DIY Craft Stick Puzzle 4DIY Craft Stick Puzzle 6 DIY Craft Stick Puzzle 8DIY Craft Stick Puzzle 10Once your painting is dry, remove the painter’s tape and jumble up the sticks. Try to put the craft stick puzzle back together without looking at the numbers on the back! Then check and see if you’ve got it.

DIY Craft Stick Puzzle 12DIY Craft Stick Puzzle 14DIY Craft Stick Puzzle 16Rebecca is a mom to two young kiddos and, in her spare time (ha!), likes to pretend she’s a back-up dancer, craft cocktails, and run long distances. A relatively recent SAHM, she blogs family-friendly activities, DIYs and celebration fun at Not-So-SAHM.

Woodsy Outdoor Boys Bedroom Design

January 7, 2015

Design by Tim Whitworth of The Land of Nod’s Design Services Team

We created this woodsy outdoor boys bedroom design for a five-year-old who loves everything outdoors. It combines basics that can grow with any child and uses accessories to bring the room together. A few key elements of this boys bedroom design include:

  • Create a warm, cozy feel by mixing pattern and texture (plaid sheets, cargo teepee, wood grain dresser)
  • Brought in hints of the outdoors and adventure through accessories, like the outdoors wall art and easy-to-swap throw pillows
  • Hints of metal (nightstand) and black (Primary bed) add tension and interest

Woodsy Outdoor Boys Bedroom DesignOutdoors Banner / Piney Fresh Garland (on sale!) / Cargo Teepee / Squirrel Hook / Bear Hook / Beaver Plush Toy / Pillowcase / Duvet Cover / Indie Plaid Sheet Set / Bear Pillow / Discover Pillow / Red Indoor+Outdoor Rug / Foundry Nightstand / Blue Gumball Lamp / Black Primary Bed / Walnut Andersen Dresser

Don’t forget our furniture sale! All furniture (including the above bed, nightstand and dresser) is 15% off through Monday, January 1/12.

Design by Tim Whitworth of The Land of Nod’s Design Services Team. Our Design Services team offers free one-on-one design advice, mood boards and space planning. You have a room to decorate? They’d love to hear from you.

15% Off Furniture Sale

January 6, 2015

Through January 12th, get 15% off furniture at The Land of Nod! Here are a few of our favorite furniture pieces.

 Anderson Six Drawer Dresser Anderson Six Drawer Dresser

Black Primary Kids Bed Twin Black Primary Kids Bed

As You Wish Upholstered SetteeAs You Wish Upholstered Settee

Campaign Nightstand Campaign Nightstand Be sure to head to www.landofnod.com to take advantage of our 15% off furniture sale, ending midnight January 12.

Shop Nursery Furniture  ||  Shop Kids Bedroom Furniture

Shop Playroom Furniture  ||  Shop Kids Workspace Furniture

Gingerbread Cake Recipe & Toffee Sauce

January 5, 2015

Post by Jeran of Oleander & Palm Gingerbread Cake RecipeIt’s still the season for treats and entertaining at our home. This Gingerbread Cake recipe with Toffee Sauce is a favorite of ours and now baked and served in canning jars it’s an extra special treat.  It’s the perfect ready to serve dessert to have on hand.  We spent a couple days with my family in San Francisco before coming up to my parents house. I packed up a few of these jars and you better believe we enjoyed dessert in our hotel room after walking the streets of the city. I’m sure I’ll be taking these cakes on our next camping trip as well.  It’s packable dessert! Gingerbread Cake Recipe 2I baked the cake in wide mouth canning jars and immediately sealed the cakes with their lids. Because the cake and jars are so hot, the lids seal and help preserve the cakes for a little longer.  I kept mine for a week before serving them and they tasted fresh out of the oven.Gingerbread Cake Recipe 3Gingerbread Cake Recipe 4Gingerbread Cake Recipe

(I adapted this recipe from Company’s Coming Desserts Cookbook)

  • 2 cups flour
  • 1/2 cup sugar
  • 1/2 cup butter (softened)
  • 1 tsp. each cinnamon, allspice,  and ginger
  • 1/2 tsp. grated fresh ginger
  • 1/4 tsp. salt
  • 1/2 cup molasses
  • 1/2 cup corn syrup
  • 3 eggs
  • 1/4 cup oil
  • 1 cup hot water
  • 2 tsp. baking soda

Gingerbread Directions

  1. Mix the first 10 ingredients with a electric mixer.
  2. Dissolve the baking soda in the hot water and add to the other ingredients.  Mix until well blended.
  3. Pour into a greased 9×13 pan or about 15 greased wide mouth canning jars
  4. Bake at 350F for 35-40 mins (about 10 mins less for the jars). Bake until a toothpick inserted comes out clean.

Gingerbread Cake Recipe 5Toffee Sauce

(This is a recipe that we make often with Sticky Date Pudding)

  • 1 3/4 sticks butter
  • 1 1/2 cups light brown sugar
  • 1 cup heavy cream
  • 1/2 tsp. vanilla

Toffee Sauce Directions

  1.  Bring ingredients for the sauce to a boil, then reduce heat to a simmer.
  2. Simmer for 5 mins. ntil the sauce thickens.

Gingerbread Cake Toffee Sauce 6 Gingerbread Cake Recipe with Toffee Sauce Gingerbread Cake Recipe with Toffee Sauce 2

Need more tasty recipes and delicious bites? Check out our Let’s Eat Pinterest Board.

A former elementary school teacher, Jeran has added her unique voice to the modern maker culture through her blog Oleander and Palm. She loves helping people find attainable beauty in the lives they live. Her creativity and industriousness were honed through years of living in third world countries, that challenged her to find novel solutions for creating livable spaces. Now a mother of three, settled in sunny California, her skills and styles are evolving in exciting new ways. Her focus is Simple California Living, designing and making livable spaces that incorporate vintage finds, handmade/DIY pieces and global inspiration.

Free Shipping – Today only!

January 1, 2015

In honor of the new year (Happy 2015!) we’re offering free parcel shipping, today only! Head over to www.landofnod.com for all the details.

mission-control-sleeping-bag

Easy New Years Eve Decorations

December 31, 2014

Post by Nick & Aleah Valley of Valley & Co.

New Years Eve is often thought of as an adult holiday, but why not create a fun and cheery celebration for the kids on New Years Eve morning to let them have a part in the celebration? It could be a fun new tradition. We staged a cozy party featuring easy New Years Eve decorations of silver ornaments from our tree and party goodies from Meri Meri at Land of Nod. The decorative pinwheels are the perfect accessories for dressing up our dining table and lending that extra bit of pizzazz to New Years Eve.

Easy New Year's Eve DecorationsOne idea, decorate with festive paper pinwheels – they make for a wonderful decorative table runner.

Think outside of the traditional New Years Eve color story of black and metallics and punch up the color by using bright cupcake toppers, party blowers and hats!Easy New Year's Eve Decorations 2Easy New Year's Eve Decorations 3Easy New Year's Eve Decorations 4Easy New Year's Eve Decorations 5Entertain kids by giving them their own noisemaker kit and cupcakes to decorate!

Easy New Year's Eve Decorations 6Easy New Year's Eve Decorations 7Easy New Year's Eve Decorations 8Easy New Year's Eve Decorations 9Easy New Year's Eve Decorations 10Easy New Year's Eve Decorations 11Photos: Dennis Wise Photography || Styling: Valley & Co. || Cupcakes and Party Room: Trophy Cupcakes || Party Accessories: Meri Meri

Happy New Year!

Nick & Aleah Valley are the husband + wife owners and operators of Valley & Co. Lifestyle, based in the beautiful Emerald City {Seattle}. They love to make life grand and believe that any occasion, whether small or large, is cause for celebration. They believe that entertaining at home welcomes memories and laughter. Follow them on their blog and Instagram.

Harold and the Purple Crayon

December 30, 2014

Post by Michelle of Avery & Augustine

Harold & the Crayon Harold & the Crayon Harold & the Crayon Harold & the Crayon 13 Harold & the Crayon 1 Harold & the Crayon  3 Harold & the Crayon 5One afternoon, when Avery was a toddler, we read Harold and the Purple Crayon together, which Avery liked a lot.  Inspired by art educator Mary Ann Kohl’s blog post on enhancing literacy through process art, I glued yarn onto paper to create loops and swirls that resembled Harold’s drawings.  Avery was excited to see Harold’s scribbles come to life on paper and she colored in some of the loops.  There are many books that can be easily paired with an art activity.  When doing this, you are providing an opportunity for your child to explore art materials and connect that enjoyable process with reading.  Find out more about process art and be inspired by Mary Ann Kohl’s ideas on her blog.  Her excellent suggestions for books and their accompanying art ideas can be found here.

 You can see Michelle’s work and read about her two young children and their first forays in cooking, art and everything in between at Avery and Augustine.

Shop The Land of Nod Children’s Books

Get the Look – Winter Garden

December 29, 2014

Post by Anna Passadori, Nod’s resident trend expert

For this theme, I wanted to create a Winter Wonderland look that was soft and dreamy. I was inspired by meadows and gardens, but was challenged on how to bring something traditionally more of a Springtime look into the home for the Holidays. I did it by starting with the color palette- whites, grey and gorgeous metallics to set the tone for a festive look, with just hints of color like soft pink, purple and mint.

Holiday Decoration Trend - Winter Gardenimage 1 | 2

Suddenly the florals in this palette felt more elegant and dreamy, like they had been preserved by the winter snow:

Holiday Decoration Trend - Winter Garden 2image 1 | 2

To keep the look from being too sweet, I pictured the garden in the twilight, surrounded above by stars and the moon. Perhaps there were owls flying overhead, and creatures and bears and wolves running below. Material choices (for example textured linens and nubby felt) and finishing techniques (like raw edges) kept the product gentle but not too perfect.

Holiday Decoration Trend - Winter Garden 3image 1 | 2

Lastly to create interest and tension, I added a layer of mystique by incorporating gemstones and other delicate details into the collection:

Holiday Decoration Trend - Winter Garden 5image 1 | 2

Try it yourself! And for more inspiration, view our Winter Garden holiday collection.

Land of Nod Winter Garden Holiday CollectionFuzzy Nod Chair / Pavilion Playhome

Anna develops the trends that help us design product for The Land of Nod. She hails from the west coast and has traveled the world to source product. She loves anything Marc Jacobs, Sofia Coppola or stripes! (So, if anyone can get a photo of Sofia Coppola wearing a striped outfit by Marc Jacobs, please send it along.)

Hot Chocolate Ornaments

December 24, 2014

Post by Cristy of Pretty My Party

The holidays and hot chocolate go hand-in-hand and if you’re looking for a fun, inexpensive gift idea or a fun holiday party favor, these DIY Hot Chocolate Ornaments from Sweetly Chic Events & Design would be perfect! Add a cute tag like the ones from Meri Meri sold at The Land of Nod and you have yourself the perfect little gift.

DIY Holiday Gifts: Hot Chocolate OrnamentsHot Chocolate Ornaments Supplies:

  • Clear, Plastic Holiday Ornament
  • Land of Nod Christmas Gift Tags
  • Powdered Hot Chocolate
  • Holiday Themed Sprinkles
  • Small, Color Coordinating Candies
  • Miniature Marshmallows
  • Funnel

DIY Holiday Gifts: Hot Chocolate Ornaments SuppliesDIY Holiday Gifts: Hot Chocolate Ornaments 2Instructions:

1. Begin by removing the top of your plastic ornament. Using a funnel, carefully pour your hot chocolate mix into your ornament. We used approximately 2-3 packets of hot chocolate per ornament.
DIY Holiday Gifts: Hot Chocolate Ornaments 32.  Next, it is time to add your holiday sprinkles!
DIY Holiday Gifts: Hot Chocolate Ornaments 43.  Again, using your funnel, add the sprinkles into your ornament, evenly coating the layer of hot chocolate.
DIY Holiday Gifts: Hot Chocolate Ornaments 54.  The next layer will be your candy! We chose to use red Sixlets. They were the perfect shape and color!
DIY Holiday Gifts: Hot Chocolate Ornaments 65.  Carefully add your candies, making an even layer on top of your sprinkles.
DIY Holiday Gifts: Hot Chocolate Ornaments 7

6. And now it’s time for the marshmallows!
7.  Add a layer of marshmallows, still allowing a bit of room for the top of your ornament to fit in.
DIY Holiday Gifts: Hot Chocolate Ornaments 88.  Gently replace the top of your ornament and attach your holiday gift tag.
DIY Holiday Gifts: Hot Chocolate Ornaments 9You now have a colorful festive favor, perfect for all of your parties this holiday season!
DIY Holiday Gifts: Hot Chocolate Ornaments 10
We threw a beautiful Holly Jolly Christmas Party, complete with these fun ornaments, a kids dessert table, personalized cookies and more. It was such a fun and festive kids party and a great way to celebrate the holidays!
the-land-of-nod-christmas-party holiday-rice-krispie-pops-shimmer-sticks christmas-fabric-banner christmas-cookies christmas-party-dessert-table1
Credits 
Pretty My Party was founded in May 2012 by Cristy Mishkula, and features the most stylish parties, free printables, fun DIY projects, yummy recipes, and more! Cristy is a mom to a handsome little man and an editor for an award-winning newspaper in Northeastern Pennsylvania. When she’s not at my day job, she’s styling parties and photo shoots or sharing fabulous parties, weddings, recipes, crafts, and more on Pretty My Party!

Nod Celebrates the Holidays

December 23, 2014

Post written by Rachel, our PR & Social Media Lead

This holiday season, we created a winter wonderland at our offices. We held a cube decorating contest (Frozen won), hung snowflakes everywhere and held a holiday party for 100 kids – Nod employee kiddos and little ones from Englewood, a community in Chicago that we’ve partnered with for a number of years.

We turned our office into a winter wonderland and are having a holiday party for our Nod family kiddos and children in need. Follow along as we celebrate with cookie decorating, holiday carols and more!IMG_6840IMG_6938 We decorated cookies, made sock snowmen and were treated to a performance by Emerald City Theatre and a sing-a-long from Lauren Hubert.

IMG_6959IMG_6946IMG_7026All the kiddos were able to take a picture with Santa and then each received a present to take home with them. Best of all, we presented a $15,000 check to a church in the community to help them fund their childhood programs.

IMG_6984IMG_7172 IMG_7173

Happy holidays from Nod!

Ever wonder who’s behind The Land of Nod social media accounts? That’s Rachel! When she’s not telling anyone who will listen that she’s not meant to live in cold, snowy Chicago, you will  probably find Rachel binge-watching Netflix, reading blogs or in her kitchen making guacamole. Or starting crafting projects that never get finished.

Milk & Cookies for Santa – DIY Scrabble Coasters

December 22, 2014

Post by Kelsey Nixon of Kelsey’s Essentials DIY Scrabble CoastersOne of the simple yet classic Christmas traditions that our family always looks forward to is leaving out milk and cookies for Santa (don’t forget the carrots for Rudoph!). If you’ve got one more Christmas craft left in you before the big event, these simple DIY scrabble coasters could be a blast to make with letter loving kids on Christmas Eve. It’s a fun exercise to come up with 4-5 letter words that make up holiday sayings – and a particularly fun challenge when you only have a certain number of individual letters. Even if the kids in your house are a little to you to put together words, this can still be a fun way to work with letters. My two and a half year old Ollie loved fishing out certain letters for me. This craft is inexpensive, quick, and most importantly these can be a memento that your family pulls out year after year to perfectly prop up Santa’s milk alongside his cookies. (This is my favorite chocolate chip cookie recipe) See the simple directions for the coasters below.

Materials for DIY Scrabble Coasters:

  • Scrabble Tiles (found here)*
  • Craft glue
  • Cork coasters or cork board (found at a local craft store)
  • Scissors

DIY Scrabble Coasters 2 DIY Scrabble Coasters 3DIY Scrabble Coasters Instructions

  1. Choose holiday phrases or words that can easily be made up with the Scrabble letters. We found that there were a lot more 5 letter holiday words than 4 letter words, so our coasters aren’t a perfect square, but the shape didn’t bother us and I’m sure Santa won’t mind.
  2. Organize your letters before using the craft glue to glue each letter onto the cork board or coaster aligning the first letter to the upper corner.
  3. Allow each coaster to dry completely before using sharp scissors or an x-acto knife to carefully trim the edges.
  4. Hint Hint: I found that one set of 100 scrabble letters made about 4 coasters.

DIY Scrabble Coasters 5Hopefully these cheery coasters will get your kids even more excited for Santa’s big arrival and make sure that Jolly Old St. Nick is well taken care of when he stops at your house.

Happy Holidays!

Kelsey Nixon  is the host of Kelsey’s Essentials on Cooking Channel and author of Kitchen Confidence. Kelsey’s Essentials is also currently airing Mon-Thurs at 3pm on Food Network. Kelsey, her husband Robby, and son Oliver (“Ollie”) live in New York City. Follow her on Facebook, Twitter and Instagram.

Creating Holiday Entertaining Traditions

December 20, 2014
Post by Nick & Aleah Valley of Valley & Co.

It’s hard to believe that we’re in the thick of the holiday season and that Christmas is next week! While we’ve sure savored every moment, we still have reindeer and Santa to visit, cookies to bake and movies to watch! As it’s Ava’s first Christmas, seeing the excitement and the magic of the season through her eyes has reminded us to slow down and enjoy the little things that make this time of year so special.

Creating new traditions for her has been so important to us for each holiday thus far, and we have made some great family traditions for this holiday season, like searching for our family tree in the snow, adorning a darling little Charlie Brown Christmas tree for her nursery, sewing satin stockings that will forever hang above our mantel, decking out our ceramic village, and throwing a cupcakes and ornaments party! Here are some scenes from our get together, complete with snow globes, wintry scenes, and lots of goodness from The Land of Nod.

Throw an effortless and festive kid-friendly cookie, cupcake or tree trimming party this weekend with our tips:

Make easy cupcake toppers with gumdrops and toothpicks – simply skewer two or three glittering gumdrops through the pick end of the toot pick and insert into a cupcake

Creating Holiday Entertaining Traditions 39  Creating Holiday Entertaining Traditions 15

Creating Holiday Entertaining Traditions 37Lay out soft ornaments atop each kid’s place setting for them to take home.

Creating Holiday Entertaining Traditions 43 Creating Holiday Entertaining Traditions 41 Creating Holiday Entertaining Traditions 35 Creating Holiday Entertaining Traditions 34 Creating Holiday Entertaining Traditions 33 Creating Holiday Entertaining Traditions 13 Creating Holiday Entertaining Traditions 6Set place settings with jars, snow and little bottle brush trees and creatures for kids to make wintry scenes to take home.

Creating Holiday Entertaining Traditions 1

Creating Holiday Entertaining Traditions 7 Creating Holiday Entertaining Traditions 3 Creating Holiday Entertaining Traditions 12 Creating Holiday Entertaining Traditions 32Aleah’s mom {Ava’s grandma} made Ava these beautiful floating houses {inspired by a Land of Nod display she saw earlier this year} and they’re perfectly dreamy for a table top focal point.

Creating Holiday Entertaining Traditions 11Dress up glasses of milk or water with birch paper straws.

Creating Holiday Entertaining Traditions 9 Creating Holiday Entertaining Traditions 38Create a gorgeous {and easy} centerpiece with fresh cut evergreen sprigs and nestle in ornaments.

Creating Holiday Entertaining Traditions 14Creating Holiday Entertaining Traditions 23 Creating Holiday Entertaining Traditions 24  Creating Holiday Entertaining Traditions 10Happy Holidays!

Creating Holiday Entertaining Traditions 17 Creating Holiday Entertaining Traditions 18 Creating Holiday Entertaining Traditions 19 Creating Holiday Entertaining Traditions 20 Creating Holiday Entertaining Traditions 21 Creating Holiday Entertaining Traditions 22 Creating Holiday Entertaining Traditions 25 Creating Holiday Entertaining Traditions 26 Creating Holiday Entertaining Traditions 26 Creating Holiday Entertaining Traditions 29 Creating Holiday Entertaining Traditions 30 Creating Holiday Entertaining Traditions 42 Party design: Valley & Co. || Photos: Dennis Wise || Cupcakes and Party Room: Trophy Cupcakes

Nick & Aleah Valley are the husband + wife owners and operators of Valley & Co. Lifestyle, based in the beautiful Emerald City {Seattle}. They love to make life grand and believe that any occasion, whether small or large, is cause for celebration. They believe that entertaining at home welcomes memories and laughter. Follow them on their blog and Instagram.

O (Crafty) Paper Christmas Trees

December 19, 2014

Post by Rae Ann of Rae Ann Kelly.com

Christmas Craft: O (Crafty) Paper Christmas TreesIt might be a little late in the game to be making Christmas decorations, but there are lots of days ahead where a kid friendly craft will come in handy so I wanted to share this simple paper Christmas tree project. Here’s how we did it…

Christmas Craft: O (Crafty) Paper Christmas Trees SuppliesFirst download and print THESE TEMPLATES. Cut out and trace onto various shades of green card stock. You could also print onto white card stock and then have the kids paint or color in their trees.

Next, cutout along your traced lines, shape into a cone and glue or tape in place.

Finally, embellish with whatever decorative art supplies you have on hand (an artist’s surplus art jar would be perfect for this!). We used mini pom-poms, pipe cleaners, washi tape, buttons and a gold marker.

Christmas Craft: O (Crafty) Paper Christmas Trees 2Full disclosure, I was the main crafter of the trees pictured because most of my kids were in school. However, i left all of the supplies out for them to make their own when they got home and I have to say their trees were far more fun and creative than mine! Also an added bonus, the project kept them and a couple of their friends busy for a good hour which is always handy this time of year!

Happy crafting!

{Images by Stacy Jacobsen}

Rae Ann blogs at Rae Ann Kelly and is a kid wrangler, graphic designer, food & craft nut. Her blog features little tidbits about her day to day life & design projects, tutorials for DIY’s, free downloads, yummy recipes, lots of kid friendly ideas and outfit inspiration.

DIY Stocking Stuffers

December 18, 2014

Post by Michelle Sterling of Avery and Augustine

DIY Stocking StuffersIf you’re stumped on stocking stuffers this year, here’s the good news: I’ve got two DIY stocking stuffer ideas for you, inspired by one of my all-time favorite blogs, Lovely Indeed.  And you might have some of the supplies for them in your house already!  The first is a collage kit, which can be used for making art, and the second is a mini jewelry kit.

DIY Stocking Stuffers - Reindeer Cups DIY Stocking Stuffers - 1 DIY Stocking Stuffers - 3 DIY Stocking Stuffers - 4The collage kit includes blank tags, bits of ribbon, ric rac, twine, washi tape, solid and patterned paper, a couple of pages from an old letterpressed calendar, pom poms, mini cupcake liners, feltfetti, round labels and leftover label frames.  The jewelry kit contains beads of different shapes, sizes and colors, beading cord, twine and ribbon, so the gift recipient can make whatever strikes their fancy.  Packed in cute reindeer cups (sorry! They’re all sold out at The Land of Nod!) and finished off with cellophane bags and striped twist ties, the kits are ready to go.  These kits can serve as party favors or party activities as well.  We had so much fun putting together these stocking stuffers and hope they inspire you to create a few of your own!

You can see Michelle’s work and read about her two young children and their first forays in cooking, art and everything in between at Avery and Augustine.

Festive DIY Holiday Projects

December 17, 2014

Post by Courtney of The Chirping Moms

Festive DIY Holiday Projects - Reindeer Milk Bottles The holidays are here and it’s time for some festive ideas for DIY holiday projects. I always enjoy decorating the house for Christmas and doing fun crafts with the kids. This year, with a brand new baby, my time for DIY projects has been very limited. I decided to order a few holiday items from The Land of Nod for both inspiration and a head start on supplies. Below are four projects I came up with using my Land of Nod picks. They are all quick and easy but still fun and festive!

Land of Nod items I started with:

  • Urban Pine Stockings
  • Nightfall Ornaments
  • Christmas Wishes Mini Garland
  • Paper Straws

DIY Holiday Project – Reindeer Milk Bottles 

Supplies: glass or plastic milk bottle, brown pipe cleaners, google eyes, red pom poms, red and white paper straws and glue

Directions: Glue the google eyes and red pom pom onto the milk bottle to make a face. Cut a brown pipe cleaner in half. Then cut about an inch off each half. Use the small piece to twist around the top of the large piece to create an antler. Glue the 2 antlers to the bottle. I used hot glue for this project, but if you want to let the kids help, use craft glue instead. Fill the finished reindeer bottle with chocolate milk and your reindeer is complete!

DIY Holiday Project - Reindeer Milk Bottles 2DIY Holiday Project – Paper Straw Garland

Here’s a fun one that the kids can help with!

Supplies: Red yard, paper straws, green loop cereal (we used Apple Jacks) and a small piece of tape.

Directions: Cut the paper straws into pieces that are about 1 to 2 inches long. Cut the yarn to the length garland you’d like. Wrap the small piece of tape around one end of the yarn to help you thread the garland. Then, string the pieces of paper straws and the green cereal in a pattern you like. Last, hang on the tree and admire you’re work!

DIY Holiday Project - Paper Straw Garland DIY Holiday Project – Personalized Stockings

Supplies: Stockings, felt, scissors and fabric or masking tape

Directions: Cut the letters out of felt and use rolled pieces of masking tape or fabric tape to stick the letters to the stockings. This is the fastest, easiest way I know to make personalized stockings! If you have time and like to hand sew, you could stitch the felt letters onto the stocking instead. This will ensure they last from year to year. A tip for cutting out the letters: print out the letter you need in block font. You can make the letter as large as you want before printing. Drawing letters and cutting are not my strong point, so I asked a friend to help!

DIY Holiday Project - Personalized StockingsDIY Holiday Project - Personalized Stockings 2DIY Holiday Project – “Deck the Halls” Instagram Banner 

I wanted a new holiday decoration to hang in our hallway. I had also been trying to think of something to do with all of my 2014 Instagram photos. I came up with a “deck the halls” banner for the hallway with some of our favorite photos. To make it really come together, I added the star ornaments. The gold and glitter really light up the hall!

Supplies: Christmas Wishes Mini Garland set (or twine and cut out own gold letters), Nightfall star ornaments, gold card stock paper, square photos printed from Instagram and tape

Directions: Cut squares out of the gold paper, slightly larger than your square photos. Tape the photos to the gold paper. Cut or punch holes in the top of each gold paper square. Thread the photos, gold letters and stars onto the string. Hang and enjoy seeing your favorite moments of 2014!

DIY Holiday Project - "Deck the Halls" Instagram Banner For more fun, festive holiday ideas, visit The Chirping Moms. Happy Holidays!

Courtney Byrne is a mother of three little children. She has two girls that are 3 and 4 and a brand new baby boy. Courtney is the Co-Founder of the popular blog, The Chirping Moms. The blog share adventures in motherhood along with great activities for kids, crafts, recipes and ideas for family travel. You can keep up with them on Facebook, Pinterest and as @TheChirpingMoms on Twitter and Instagram. In addition to writing The Chirping Moms, Courtney is also a contributing writer to the Four Seasons family travel site Have Family Will Travel and has been featured on The Huffington Post and What To Expect.

Family Tradition | Ornament Advent Calendar

December 16, 2014

Post by Becca of CAKE

Family Tradition | Ornament Advent CalendarThe Christmas before we got married, people began giving my husband and I the ‘special’ ornaments. I’m sure you have them in your family too.  The ones that include photos, engravings and old favorites- added to some of our own, which in our case involves a wide variety of special woodland critters.

Family Tradition | Ornament Advent Calendar 2So several years ago when looking for an advent calendar for my daughter, I decided to begin a new family tradition and create an ornament advent calendar.  I gathered up our most special ornaments and placed them in the pockets of our advent.  I bought this advent calendar a few years ago from the Land of Nod because it has nice roomy pockets –  it’s been a perfect addition to our holiday home.

Family Tradition | Ornament Advent Calendar 3At the beginning of the month while decorating the tree, I fill each pocket with our special family ornaments and each morning until Christmas my daughter (and eventually my son when he’s old enough) pull one ornament out to place on the tree.  I help her with the fragile ones, but also try to fill it with some of our softer critters, like these new ones I just ordered from Land of Nod.  So darling.

Family Tradition | Ornament Advent Calendar 4Caitlin loves this tradition and never lets me forget a day. It makes her feel so special to add the favorite ornaments to our tree, and it’s a great family conversation starter, sparking memories of where each ornament originated.

Family Tradition | Ornament Advent Calendar 5In the past I’ve been a bit particular about our tree decor, but starting this tradition has a been great for me too – I’ve loosened up and allowed our tree to become the cozy hodge podge it is (colored lights and all). Someday when the kids are older I’ll probably revert back to my minimalist ways, but if I’m being honest, I’ve become sentimental about the added character that comes with having a family friendly tree and the traditions to go with it.  Happy Holidays to you and yours!

Becca Gorski lives in the SF Bay Area, is a working mother of two, and moonlights as an occasional designer / blogger / celebration maker. You can find her creative ideas on CAKE. | events + design, and her line of merry happy party printables on Etsy.