Close

Blog

Wildflower Themed Birthday Party

October 20, 2014

Post by Tara Berger of One Stylish Party

I’m here to share with you a wildflower themed birthday party thrown in honor of a sweet 3 year old little girl, Alexis Maria who just so happens to be the daughter of my best friend Victoria.

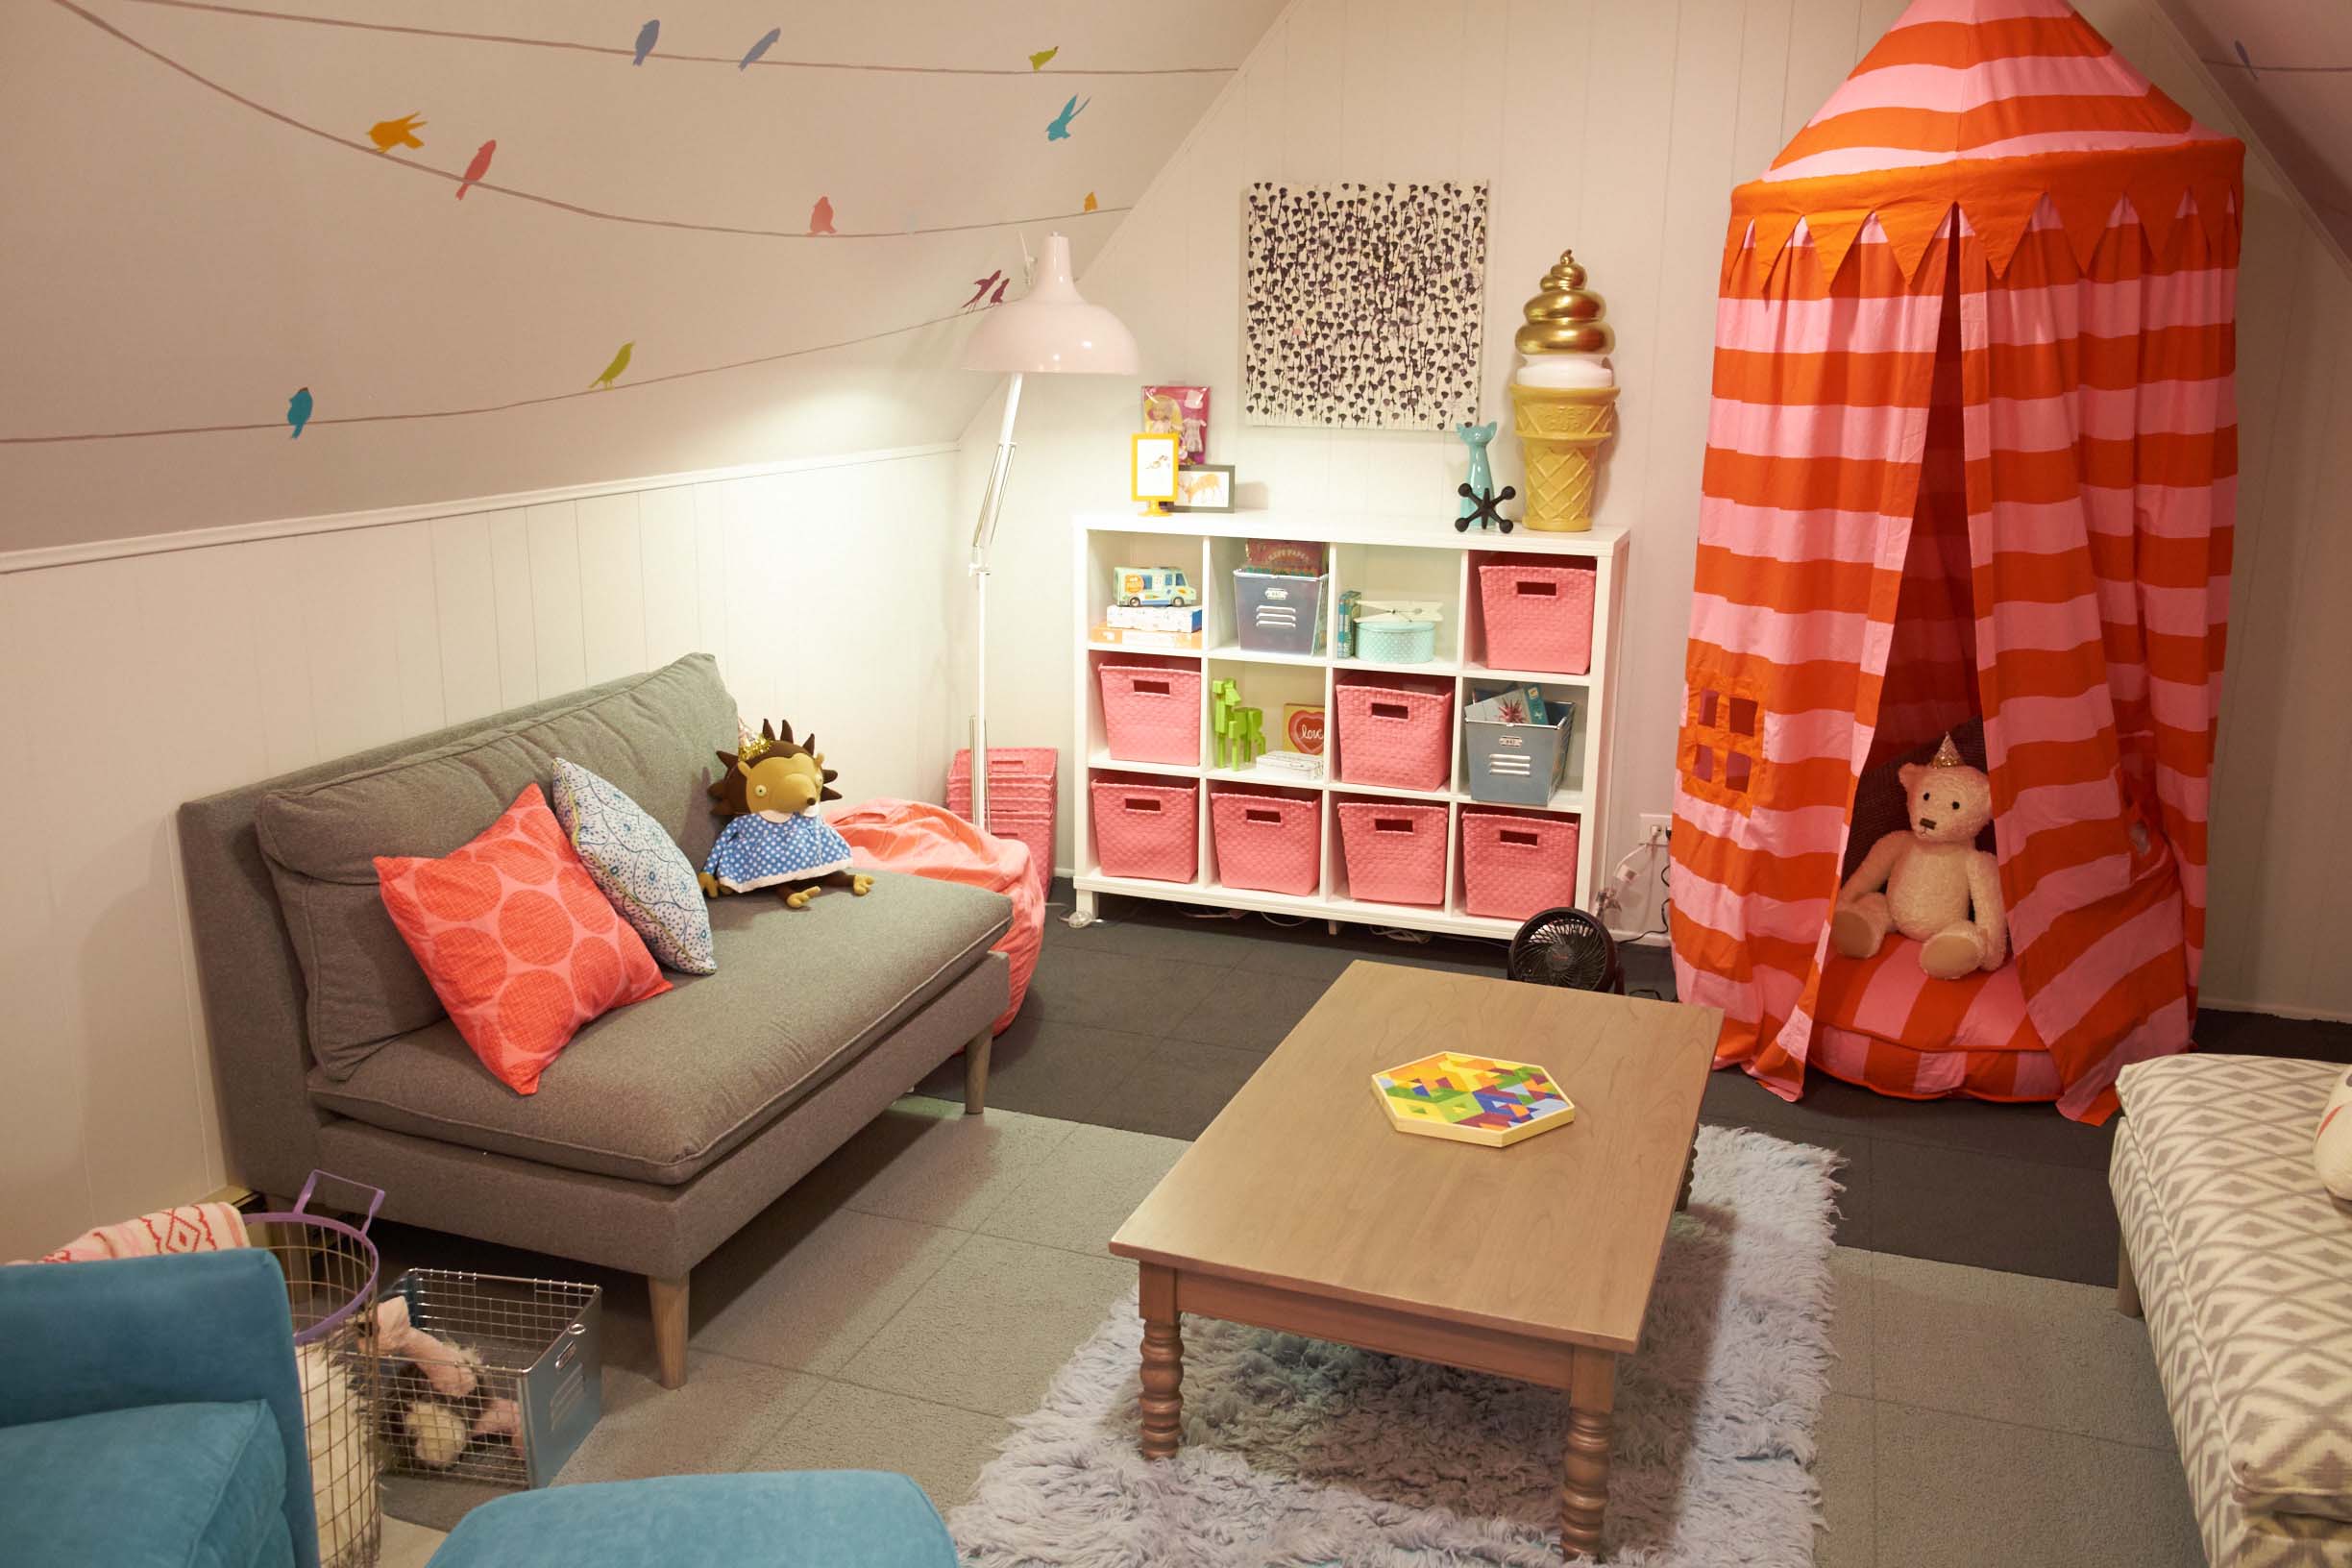
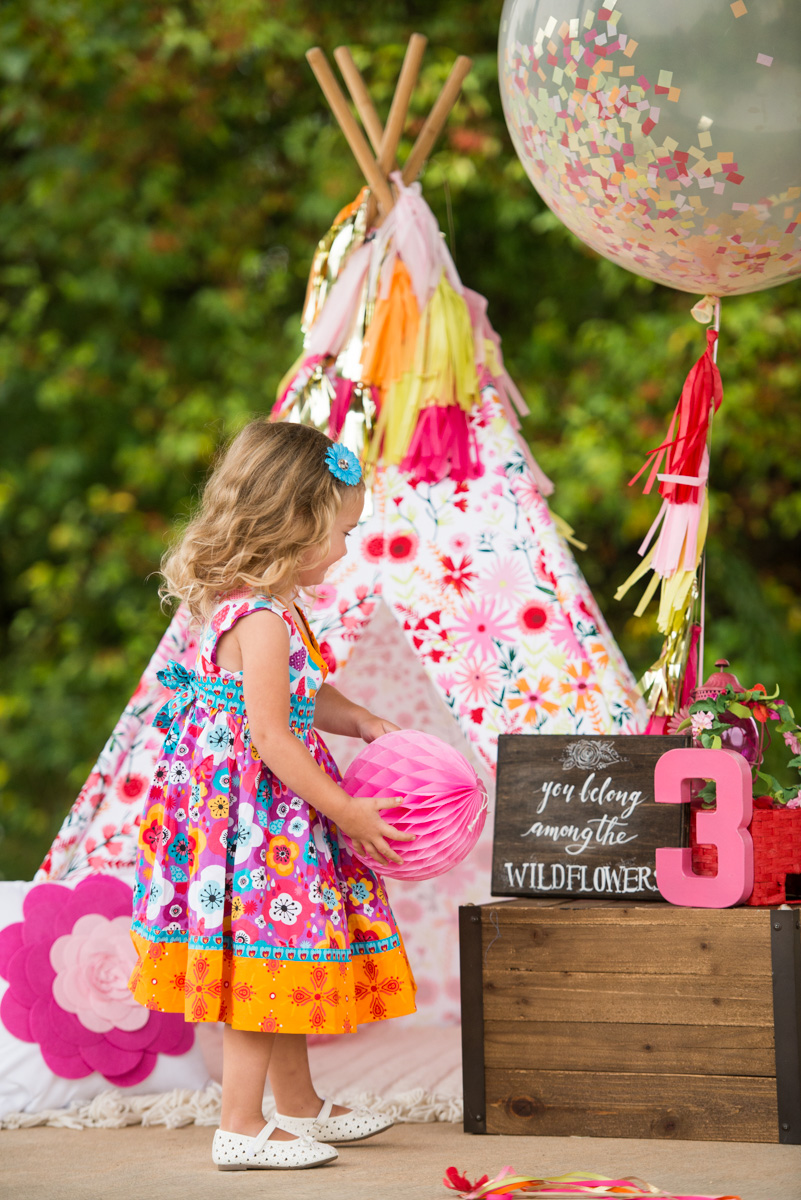
Inspired by the birthday girl’s love of flowers and tea parties, my goal was to capture her vibrant personality with a whimsical and colorful celebration. Once we decided on the wildflower theme birthday party, I immediately set out to find the perfect party props and stumbled upon the Floral Teepee and Flower Love Poster Decal (no longer available online) from Land of Nod which served as the jumping off point for the color scheme and party decorations.

Wildflower Themed Kids Birthday Party - 6 
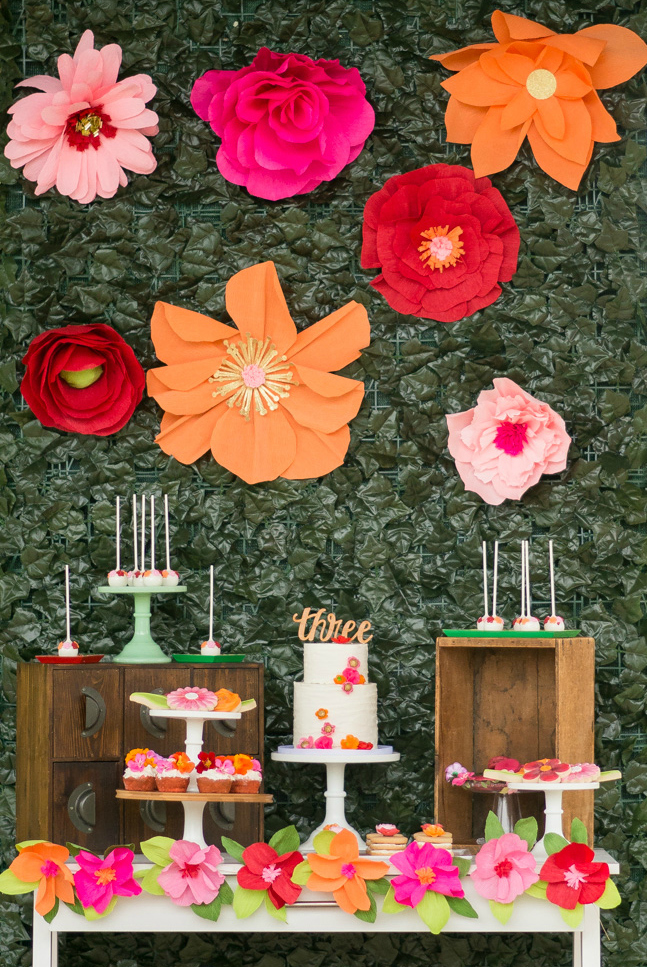
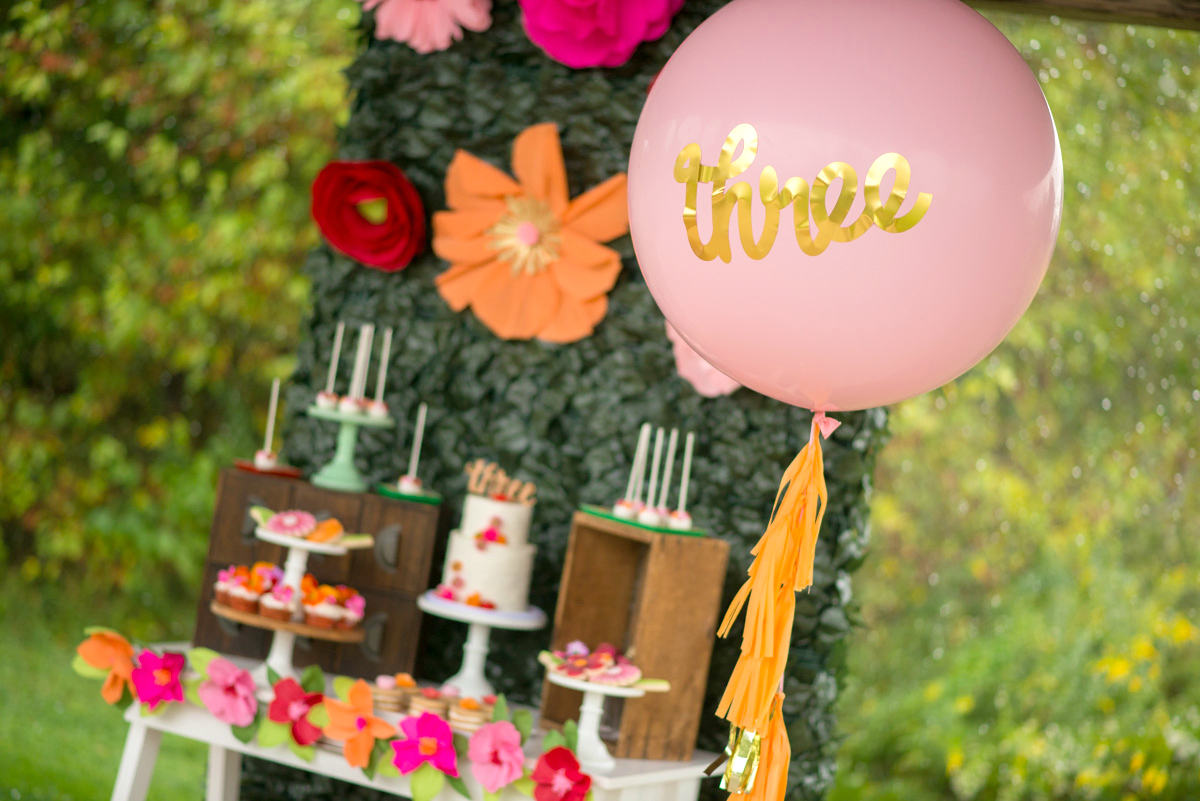
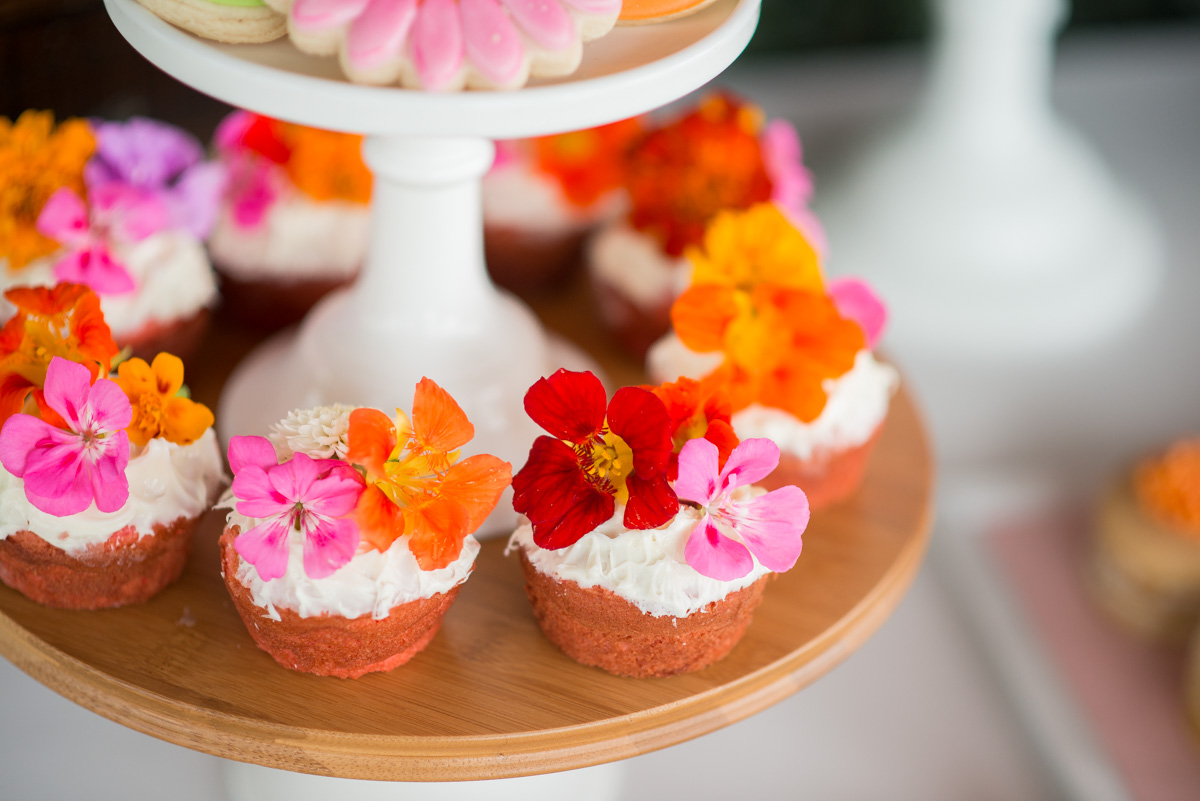
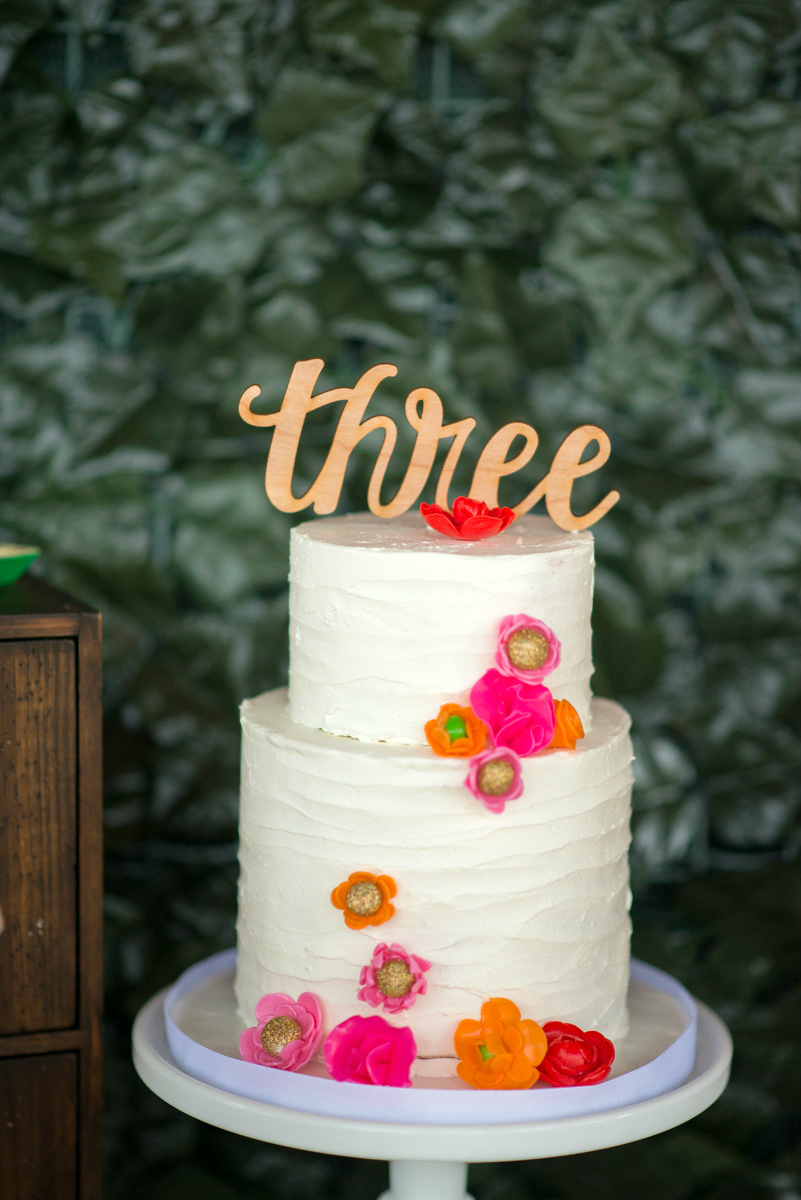
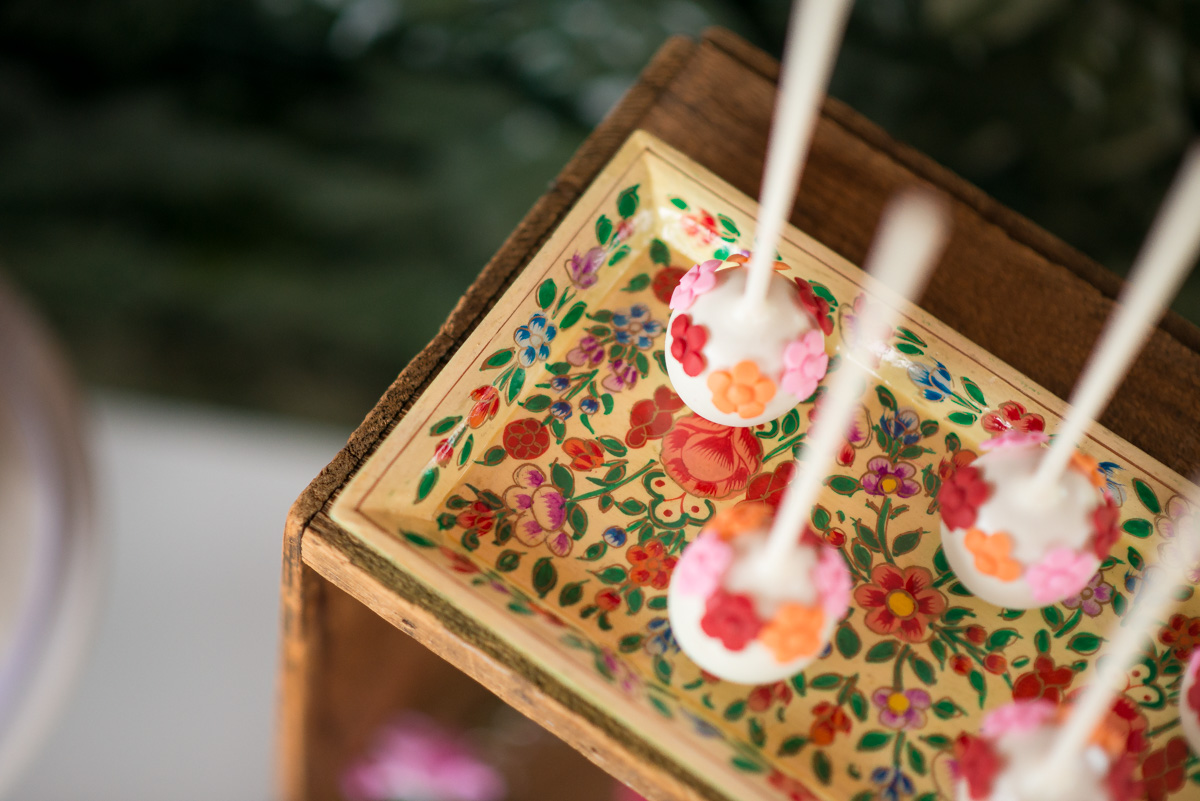
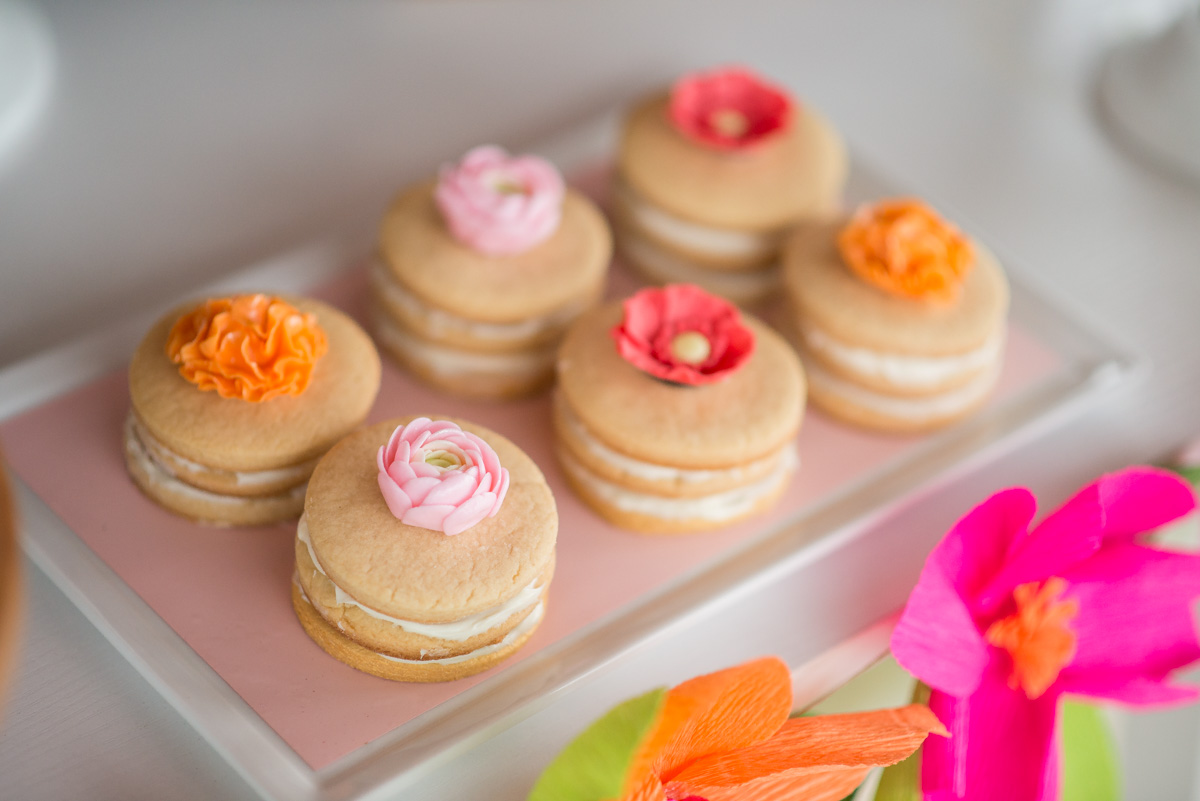
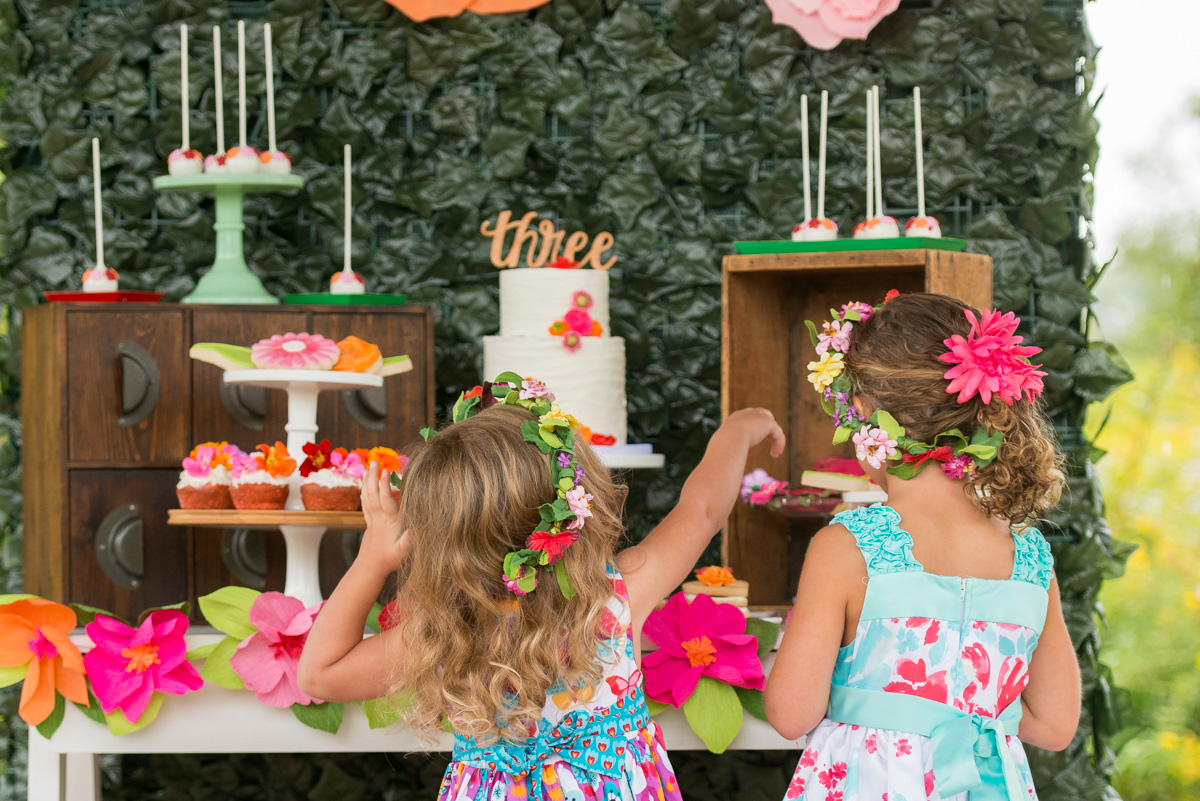
For the dessert table, I tapped a few of my favorite vendors to bring the wildflower party theme to life in the form of beautiful edible creations. Desserts included a rustic buttercream cake adorned with glittery fondant flowers, red velvet macarons, wildflower sugar cookies, floral crown cake pops, stacked sugar cookies with fondant flower toppers and homemade strawberry cupcakes with edible flowers.

The ivy backdrop with handmade crepe paper flowers served as the focal point of the dessert table and I incorporated several wooden vintage props to give the table varying heights. Along with my go-to milk glass cake stands, I also incorporated a few ethnically sourced floral trays from The Little Market, which complimented the theme perfectly.

Wildflower Themed Kids Birthday Party - 11 Wildflower Themed Kids Birthday Party - 12 Wildflower Themed Kids Birthday Party - 13 Wildflower Themed Kids Birthday Party - 14 Wildflower Themed Kids Birthday Party - 15 Wildflower Themed Kids Birthday Party - 16 Wildflower Themed Kids Birthday Party - 10

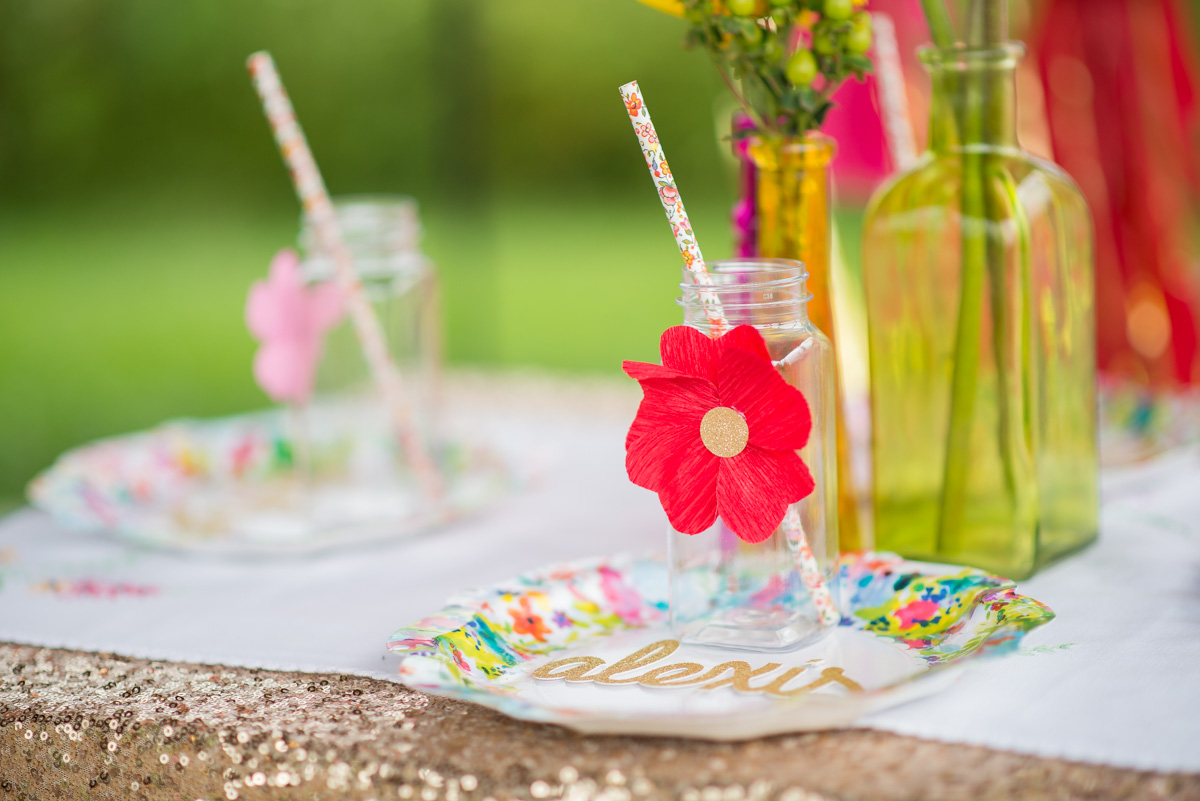
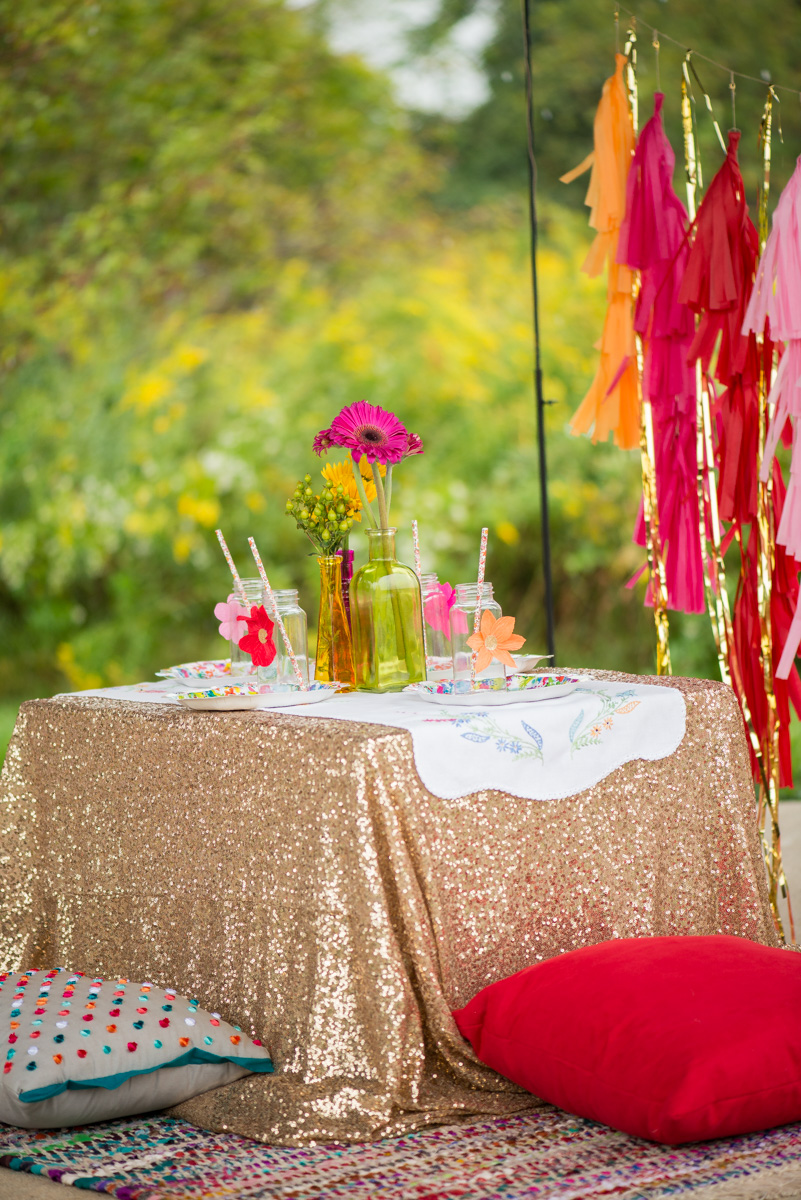
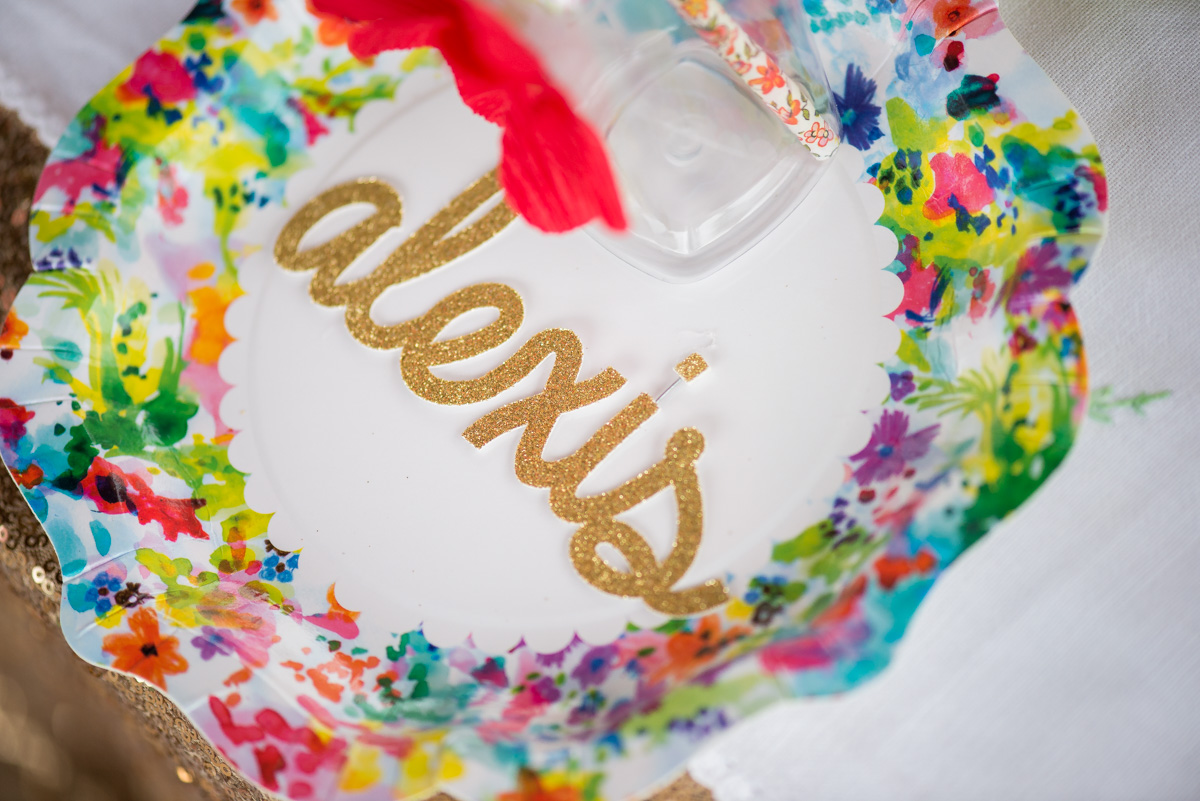
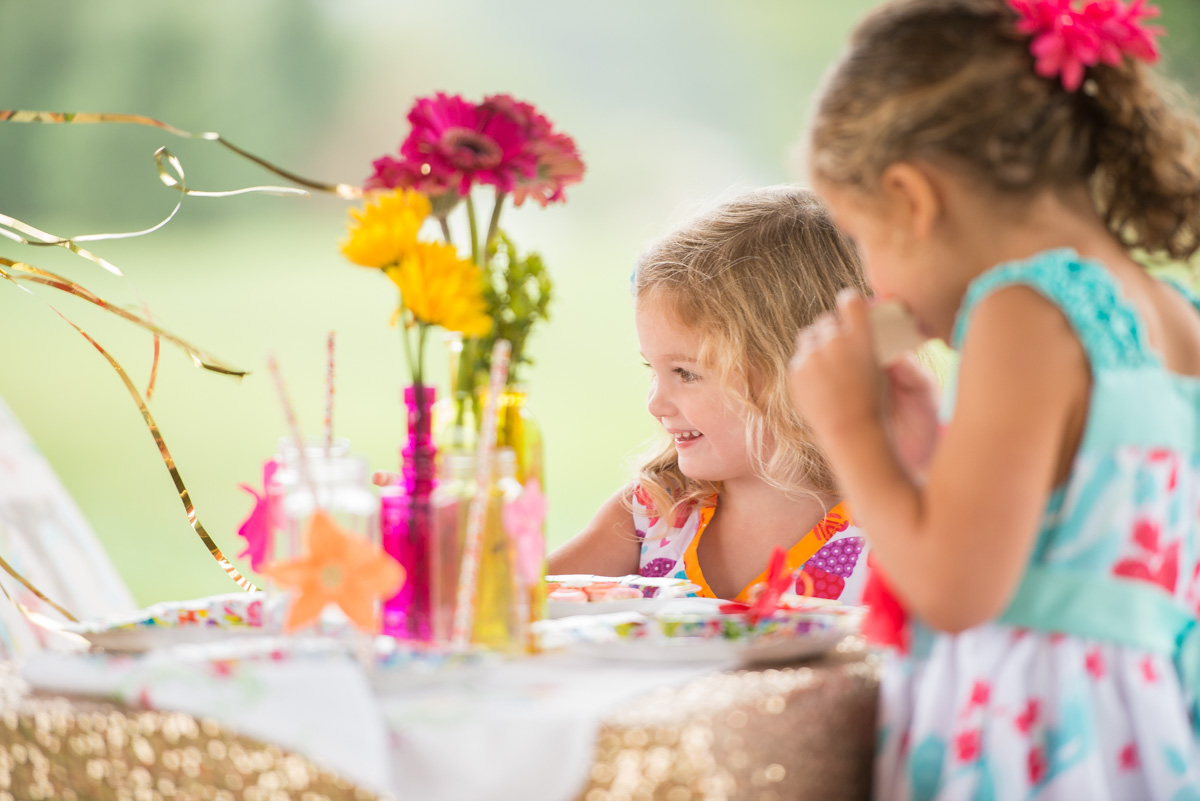
The tea party table included a gold sequin table cloth with a vintage floral table runner, fresh flowers and an age appropriate place setting for each little girl. The woven rag rug, throw pillows, tassel backdrop and Love Poster were a few of the other elements that helped bring the tea party table to life.

Wildflower Themed Kids Birthday Party - 3 Wildflower Themed Kids Birthday Party - 2

Wildflower Themed Kids Birthday Party - 4

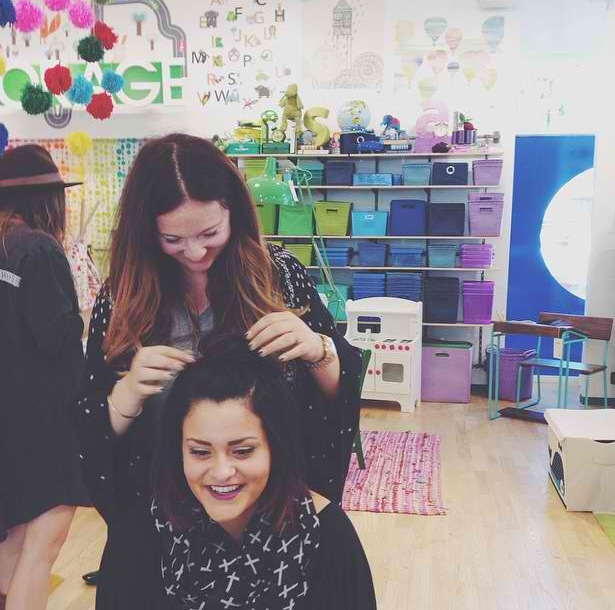
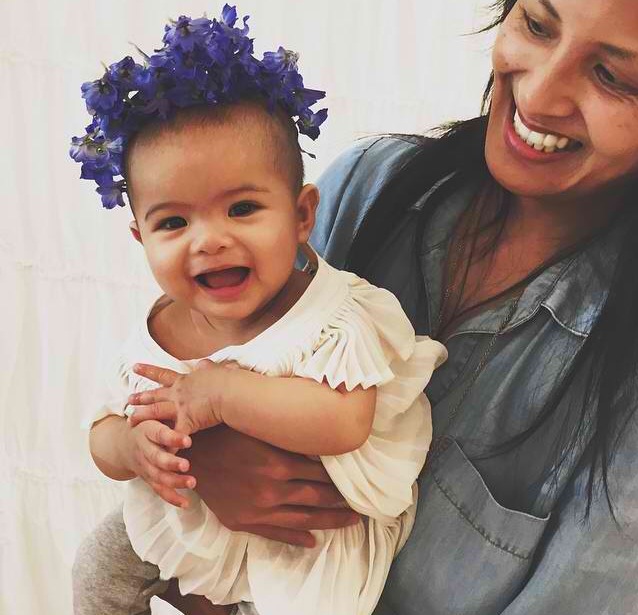
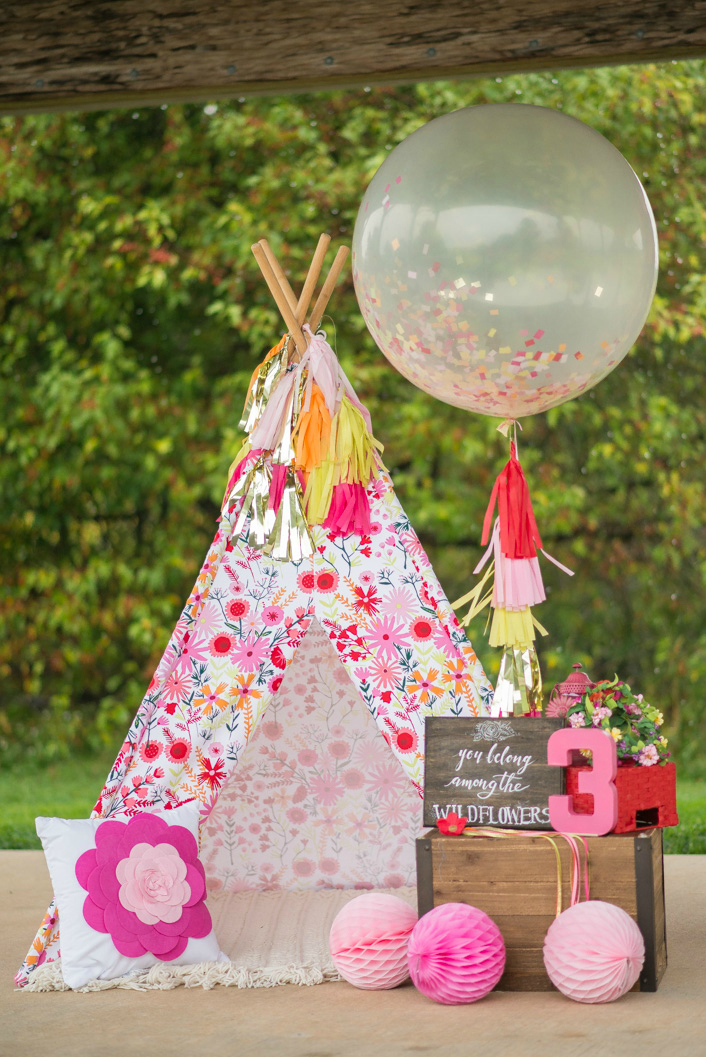
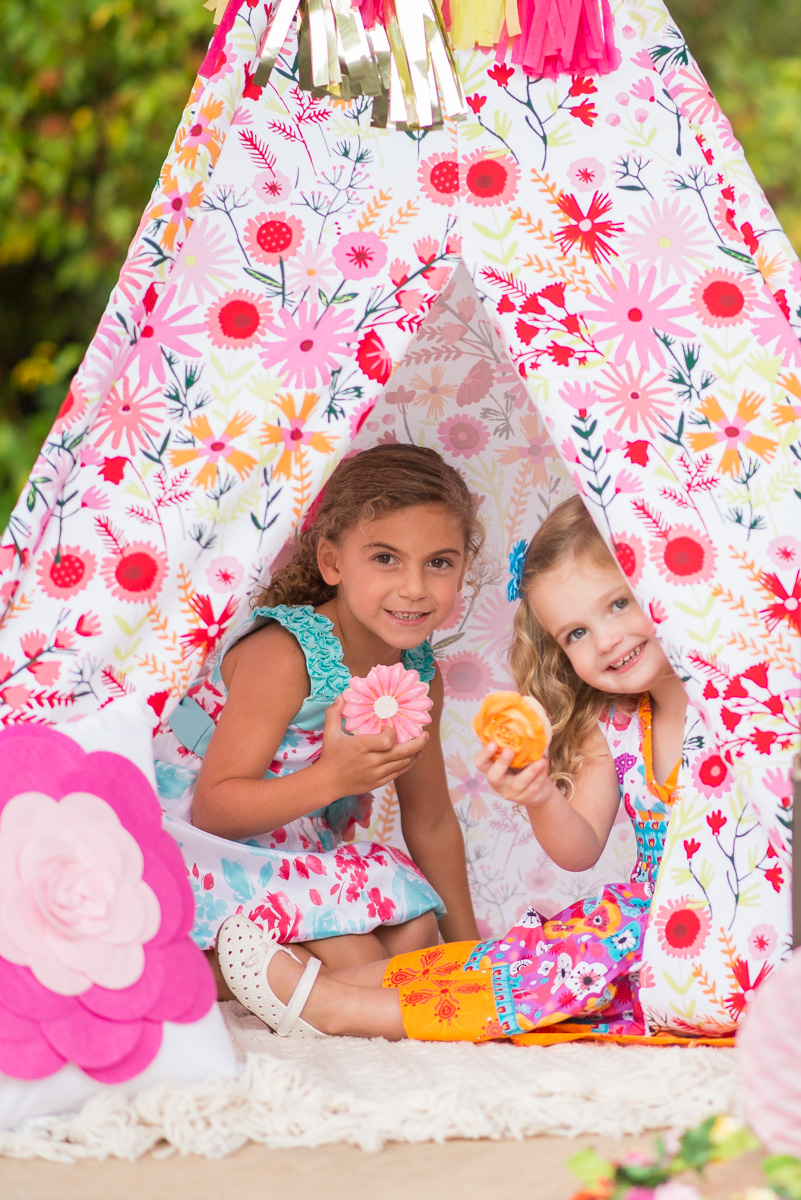
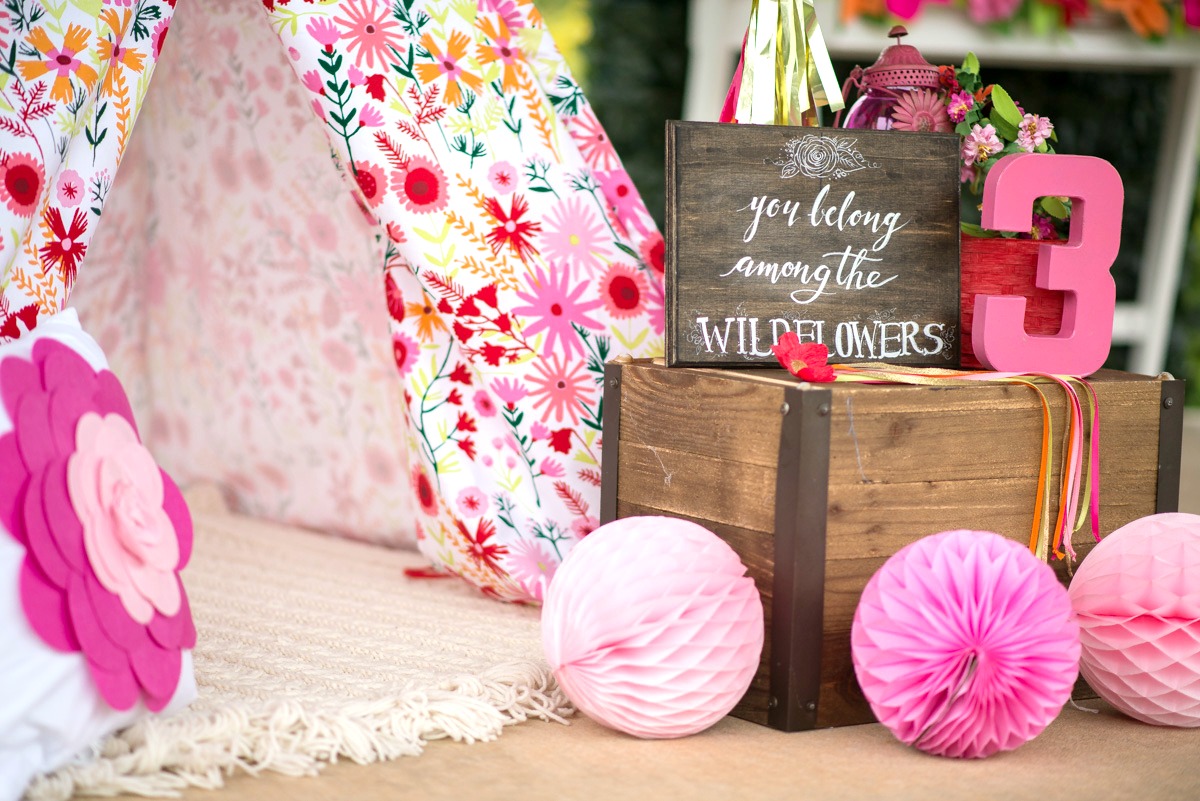
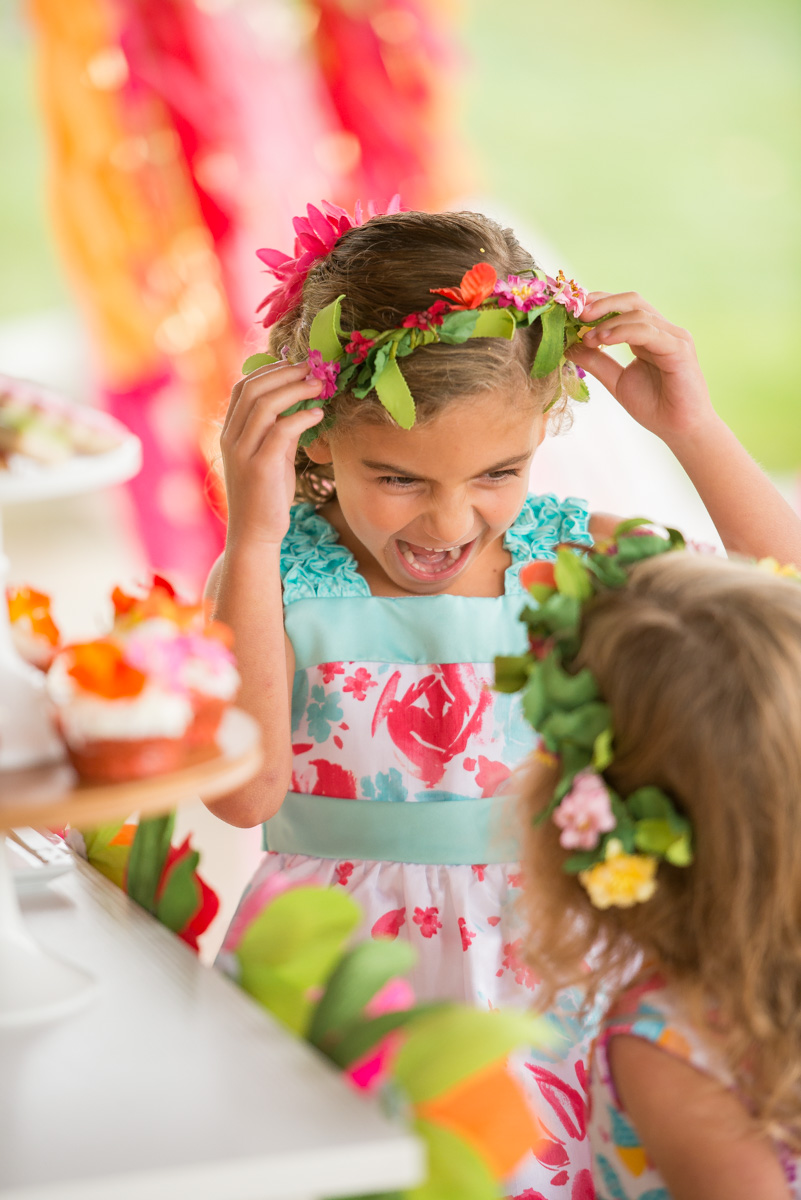
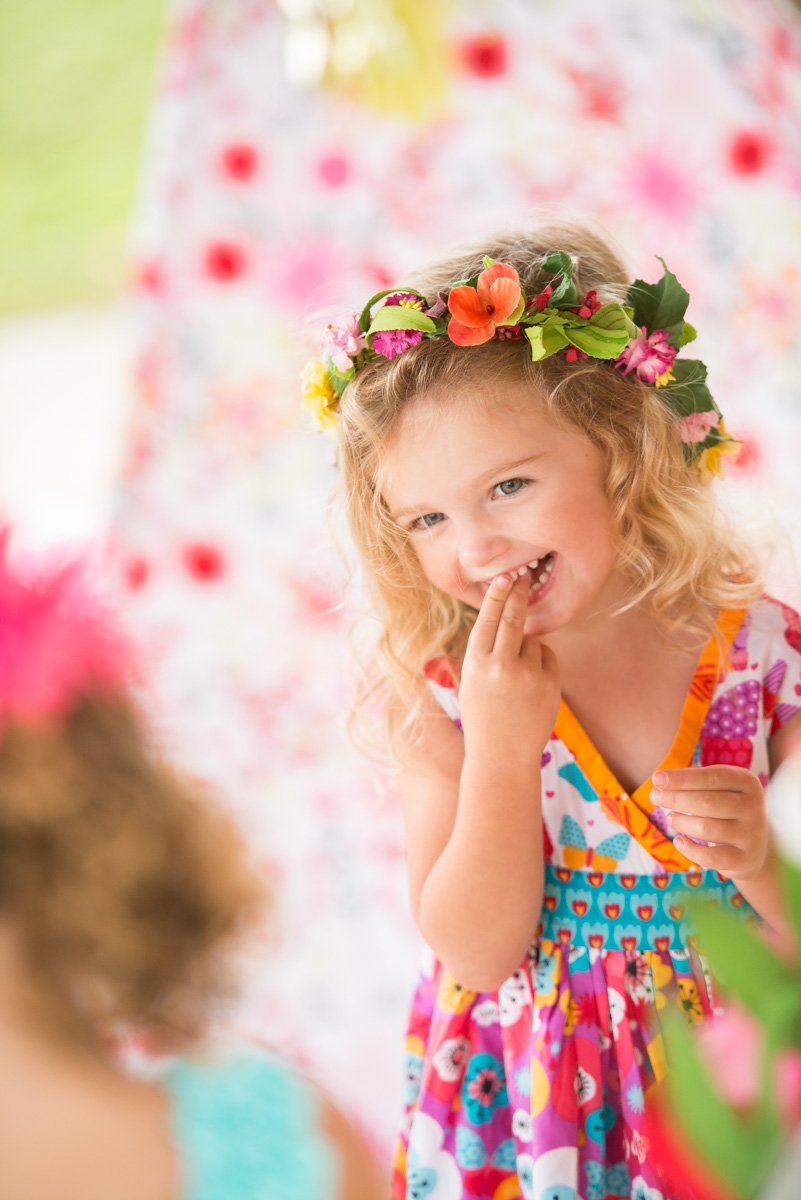
And last but not least, the teepee play area was a hit among the girls at the party. The Floral Teepee was accessorized with plush blankets, throw pillows, colorful tassels, a jumbo balloon and a custom wooden calligraphy sign that read “you belong among the wildflowers” which couldn’t have been more fitting for the party theme. Outside of the teepee, I included custom floral crowns and ribbon wands for the girls to play with during the party.

Wildflower Themed Kids Birthday Party - 17 Wildflower Themed Kids Birthday Party - 5

Wildflower Themed Kids Birthday PartyYou’d never know it from the pictures, but on the day of the party it POURED down rain, so we made a quick location switch from a backyard party to a pavilion at a local park. Thankfully we were able to still be outdoors and stay dry and the birthday girl and her guests still had every bit as much fun despite the weather!

Wildflower Themed Kids Birthday Party - 9 Wildflower Themed Kids Birthday Party - 8 Wildflower Themed Kids Birthday Party - 7Photography: Natasha Esguerra Photography / Event Concept and Design: One Stylish Party / Floral Teepee and Love Sign: Land of Nod / Floral Trays: The Little Market | Floral Crowns: Peckled / Wooden Wildflower Calligraphy Sign: Kate Farley Design / Cake: Divine Cakes, Inc. / Cake pops: Bella’s Bakery and Bowtique / Fondant Flower Toppers: Frog Prince Cake & Cookie Design / Wildflower Sugar Cookies: Natsweets / Gold Sequin Tablecloth: Koyal Wholesale / Balloons, Tassels, Paper Flowers: One Stylish Party

Tara is the owner of One Stylish Party, an online party boutique and creative studio featuring designs and inspiration for entertaining in style.

Get The Look: Happy Camper

October 17, 2014

Written by Anna Passadori, Nod’s resident trend expert

It’s fall again, and you know what that means! Snuggling up with cozy textiles and your favorite pumpkin-spiced beverages! It is also a good time to refresh your home for the season with nature-inspired décor such as wildlife motifs and earthy colors, or what we at Nod call, elements of the ‘Happy Camper Trend’. Incorporating a few camping elements and woodsy themes will make you long for a campfire to roast some marshmallows on!

This wall has the perfect green color! The wolf print and the log bench add the perfect fall touch:

Get the Look: Happy CamperImage

Hang up your favorite wildlife prints and try a fun wall storage idea like this wooden crate:

Get the Look: Happy Camper 3Image

Even this toddler room gets into the spirit with textured fabric and wood accents:

Get the Look: Happy Camper 2Image

What a fun idea to frame a vintage rucksack, or string small driftwood pieces to make a garland:

Get the Look: Happy Camper 4Image


It’s easy to incorporate a few touches to get the campy look.

Get the Look: Happy Camper Mood Board

For more inspiration, click here.

Anna develops and designs exclusive product for The Land of Nod. She hails from the west coast and has traveled the world to source product. She loves anything Marc Jacobs, Sofia Coppola or stripes! (So, if anyone can get a photo of Sofia Coppola wearing a striped outfit by Marc Jacobs, please send it along.)

DIY Kids Halloween Class Party Crafts & Games

October 16, 2014

Post by Christina of Christina Williams Blog

A couple years ago, I got roped into doing the class Halloween party for the entire first grade. This was for my oldest child, so I was inexperienced with class parties back then. I really could have used a “recipe” for a Halloween class party. I looked high and low and couldn’t find anything that fit my needs, so I’m putting one together for you. The next time you have to do a Halloween party, you’ve got everything you need right here!

Class parties are typically one hour long, and I planned activities that are A) easy to explain, B) easy to prepare and C) inexpensive. So here’s how it works, I divided the kids into four groups and the kids rotated between four stations: a pumpkin craft, a bean bag toss, a haunted house project and a bingo game.

Activities

Craft: Halloween Pumpkins

Just grab some orange paper plates, some different colors of construction paper, scissors and glue. The kids can cut out simple shapes to make a silly jack-o-lantern face on their paper plate.

Kids Halloween Craft: Halloween Pumpkin PlatesActivity: Beanbag Toss

I filled dollar store knit gloves with beans for some cheap, funny beanbags. Toss them in a cauldron (or several different cauldrons) to win prizes. I stocked up on cheap Halloween-themed carnival prizes: erasers, pencils, spider rings, etc.

Halloween Bean Bag TossProject: Roll A Haunted House

All you need for this game is chalk, black construction paper, foam stickers and a couple dice. I explained the process in depth on my blog, so go there for complete instructions and a few helpful tips. But basically, the kids roll a die and earn a sticker to decorate their haunted house. Easy as pie.

Kids Haunted House GameGame: Halloween Bingo

What would a Halloween party be without a bingo game? Thankfully there are all ready so many cute printable versions I didn’t even have to make my own. I used this cute free printable Halloween Bingo from Artsy Fartsy Mama and the kids loved it. We used paper circle as markers, since the kids would be eating candy all day long, but candy corns would be cute, too.

Kids Halloween Bingo

Kids Halloween Party Ingredients:

  • Orange paper plates (one for each child)
  • Construction paper (scraps would work great!) Yellow, purple, white, black, green.
  • Glue
  • Kid Scissors
  • Beanbags (or cheap gloves filled with beans)
  • Witches’ cauldrons (or plastic jack-o-lantern buckets)
  • Tall black construction paper
  • White chalk (10-12 pieces)
  • Foam Halloween Stickers
  • Dice
  • Printable Halloween Bingo Cards (enough for 1/4 of the class)
  • Bingo markers (candy corn, paper circles, etc.)
  • Cheap carnival-type prizes (spider rings, vampire teeth, etc.)
  • Timer
  • Bell
  • Stickers


Before the Party

Gather/buy all the ingredients listed above. Some of the stuff (chalk, glue, scissors, etc.) should be available at the school. Don’t be afraid to ask for help. Send out a sign-up sheet for the parents to donate items from the list, or enlist a few of your friends to be on the party committee. After you have the supplies, separate them by station. Prep anything you can ahead of time to make things run as smoothly as possible. If you want, you can always get some fun Halloween decorations, too!

Party Time

Step 1. Divide the class into four groups. (I used stickers – candy corns, spiders, ghosts, and pumpkins). Each sticker represents a different group.

Step 2. Each group rotates to a different station every 12 minutes. (That leaves 3 minutes to clean up and rotate to the next station.) I brought a timer so we could keep track of the time, and a bell to signal it was time to change stations.

Step 3. There’s a set of parent helpers at each station that remains with that activity for the entire party.


So there you have it! A recipe for an easy, fun Halloween party. Happy Haunting!

Christina Williams is a blogger and graphic designer living in Salt Lake City, Utah. She’s a night owl and a bookworm, as well as a mother to three children ranging in age from two to eight. She shares her latest DIY and design projects along with her adventures in parenting on self-named blog, Christina Williams.

Shop Land of Nod Halloween Decorations

October Nod Notes

October 15, 2014

Post written by Rachel, our PR & Social Media Lead

‘Tis the season for some ghoulish fall fun.

We were lucky enough to be a part of a recent Halloween party with The Effortless Chic. We’re a little jealous we weren’t able to physically be there though after seeing the table setting and the ghost grilled cheese. See more from the party on Jen’s blog.

The Effortless Chic - Halloween Party

If you’re looking for a way to entertain your kids during snack time, look no farther than this monster juice box tutorial from Christina Williams. Yes, there are juice boxes under there!

DIY Kids Craft: Monster Juice Box Tutorial

Here’s a few of our favorite links that are inspiring us this month:

Ever wonder who’s behind The Land of Nod social media accounts? That’s Rachel! When she’s not telling anyone who will listen that she’s not meant to live in cold, snowy Chicago, you will  probably find Rachel binge-watching Netflix, reading blogs or in her kitchen making guacamole. Or starting crafting projects that never get finished.

Pumpkin Pie Gelato Parfaits

October 14, 2014

Blog post by Rebecca of Not-So-SAHM

Pumpkin Pie Gelato ParfaitsWe developed a serious thing with gelato this past summer — trying out every gelato shop, truck and cart we came across. I love that it packs so much flavor and richness, that just a little bit is enough. And even though the weather has started to turn cooler, we’re not ready yet to give up our favorite dessert. So we thought we’d try our hand at mixing up a yummy gelato treat full of seasonal flavors. There are plenty of recipes out there for making pumpkin gelato from scratch, but we chose to keep it simple and doctor up one of our favorite local gelatos with pumpkin. Add in our other favorite pumpkin pie ingredients and we had a huge win. Delicious!

(And super super cute when topped with one of our Jack O’Lantern macarons, if I do say so myself)

Pumpkin Pie Gelato Parfaits
Makes 4 servings

Ingredients

  • 1 pint Cinnamon Gelato
  • 1/4 cup Canned Pumpkin (not pumpkin pie filling)
  • 1 cup Crushed Graham Crackers
  • 1 cup Whipped Cream
  • Pecans for garnish
  • Pumpkin Pie Sugar + Spice*

Directions 

  1. Let gelato sit at room temperature until it just starts to soften (about 5 minutes). Scoop gelato into a large mixing bowl and gently fold in canned pumpkin. Place mixture back in freezer until well frozen.
  2. Layer gelato, crushed graham crackers, and whipped cream into parfait glass. Press each layer gently with the back of a spoon.
  3. Top with pecans and sprinkle with pumpkin pie sugar + spice.

*To make pumpkin pie sugar + spice, combine: 1 tbsp ground cinnamon, 1/2 tsp ground ginger, 3/4 tsp ground allspice, 3/4 tsp ground cloves, 1/2 tsp ground nutmeg, and 1/2 tsp turbinado sugar.

Pumpkin Pie Gelato Parfaits 3 Pumpkin Pie Gelato Parfaits 5Rebecca is a mom to two young kiddos and, in her spare time (ha!), likes to pretend she’s a back-up dancer, craft cocktails, and run long distances. A relatively recent SAHM, she blogs family-friendly activities, DIYs and celebration fun at Not-So-SAHM

Mad Science Kids Game

October 13, 2014

Post written by Paging Supermom

Your kids will get a kick out of this Pop-Up MAD LABORATORY kids game for Halloween.

Mad Science Kids Game

In this game, kids try to guess the contents of several spooky specimens jars. This Laboratory is surprisingly easy to construct using free printables. It all begins with a Mad Laboratory Backdrop. You can print this is a black-and-white, engineering print at a local copy center for less than $10. Download, print and tape into place. Add inexpensive test tubes filled with a mysterious, green potion (just neon food coloring + water) to bring the lab to life.

Mad Science Kids Game 2Recycle jars, spray-painted black are used to hold the specimens. Download and print the Mad Lab Specimen Jar Labels.

Mad Science Kids Game DIY Specimen Jar

Mad Science Kids Game 2TO PLAY: Fill the prepared jars with items recommended below, feel free to substitute. Have your Mad Scientists take turns reaching in to feel each jar’s contents, trying to determine what each specimen really is. Have them record their findings on the Mad Lab Experiment Forms.

Mad Science Kids Game 3

Mad Science Kids Game: What to Use In Mad Lab SpecimensFor younger kids that may not be able to identify the specimens by touch, have them describe each one with words like “slimey” or “squishy” etc. The labels and jars could also be used to hold spooky treats on a Halloween Party food table.

Mad Science Kids Game 10Grab the free printables:
Mad Laboratory Backdrop
Mad Lab Specimen Labels
Mad Lab Experiment Forms

Paging Supermom is written by “Sometimes Supermoms” Aimée and Bettijo, and came to be after many discussions with each other sharing their best insights on homemaking, parenting, party planning, teaching, playing and sometimes simply surviving. They soon discovered that although they can’t claim to be super all the time, each had their own moments. By sharing successes (and some of the funny moments when they fell flat on their faces), they hope to inspire others to find their inner superhero a little more often.

Fox & Sparrow Photo Workshop

October 10, 2014

Written by Lauren Baker, our fearless marketing events manager

We couldn’t help but notice all the amazing magic the ladies of The Fox and the Sparrow have been making on the Instagram universe with their modern take on photographing women and children. We were so excited to see that they were headed to Chicago in September to shoot some sessions, and had to ask them if they would be interested in hosting an event at our flagship store in Chicago. To our amazement, they said YES!

So a few weeks ago, the ladies set up a free mini-workshop for our customers to come in and learn tips on how to style and take beautiful pictures of their own kiddos with just a camera phone.

The Fox and the Sparrow WorkshopRachael Lunghi from Siren Floral Co. taught our customers how easy it is to make beautiful flower crowns (Who don’t love a flower crown?).

The Fox and the Sparrow Workshop 3Erika Beukelman from 1011 Makeup chatted with the ladies on ways to style their hair and makeup. And she also worked her magic on some of their hair with top knots and braids (Lucky ladies!).

The Fox and the Sparrow Workshop 2Lastly, Rachel Castillero from Studio Castillero gave the workshop attendees tips on shooting with their camera, including some awesome tutorials on the VSCO application.

The Fox and the Sparrow Workshop 1This was such a lovely event for our customers, and we loved having these ladies in store! Check out the Fox and the Sparrow on Instagram for upcoming dates of their sessions and to see their amazing work.

When Lauren isn’t planning ridiculously awesome #nodevents for The Land of Nod, she spends her time putting up with the crazy antics of her English Bulldog, Lola. She also loves searching for treasures in vintage stores and summer antique markets. Due to her previous adventure living in Canada, she has a strong obsession to Hudson Bay stripes, as well as the fine cuisine of poutine (Don’t make her choose between the two…that’s like choosing between Ryan Gosling and Jason Bateman for her!).

Special Spaces Makeover: Designing a Room for Ashley

October 9, 2014

Post written by Rachel, our PR & Social Media Lead

We partnered with Special Spaces Chicagoland, a non-profit organization that creates dream bedrooms for children with life-threatening medical conditions, to make over a room for Ashley, a determined 11 year old battling cancer.

Ashley was diagnosed with a rare form of Acute Lymphoblastic Leukemia after Christmas last year. She experienced many compilations during her months of treatment and reached remission in late April after over 70 nights in the hospital. She received a bone marrow transplant in June.

Ashley’s parents wanted to give Ashley an inviting, organized space where she could find peace and comfort. Since her diagnosis, she has been afraid to sleep in her room and often sleeps in her brother’s room or is found asleep on the couch in her parent’s bedroom room.

We spoke with Ashley about what she wanted for her bedroom and attached sitting room. Ashley wanted a pink and teal room with a large sparking chandelier. She has a love of birds which was incorporated into the room through accessories and wall art.

Our Design Services team worked hard to bring Ashley’s vision to life, first creating a moodboard of all the elements.

Special Spaces Makeover: Moodboard

Moon Decal / Pink Velvet Sham / Well Trained Sheet Set / Bonjour Throw Pillow / Quilted Aqua Sham / Circle Cork Board / Polka Dot Blackout Curtains / Turquoise Half Shell Rug / Monarch Three Drawer Dresser / Butterfly Wall Art / Cloud Throw Pillow / Pink Knit Pouf / Pink Velvet Quilt / Gold Wall Hook / Black Wall Hook / Bird Wall Art / Owl Lamp / Teal Jenny Lind Nightstand

To create the perfect bedroom space, our designers incorporated a number of fun elements, including:

  • Ashley’s room was painted in Benjamin Moore Jack Frost and the bright pink and teal color scheme was carried throughout the space with contrasting textiles and patterns
  • We played with patterns on Ashley’s bed and window bench, bringing in different pillowcases and fabrics to create a fun, relaxed space
  • Ashley loves displaying photographs and mementos so we used our circle cork boards to create a fun display space
  • Adorned crafty letters (decorated with chalk paint, yarn, glitter) create a statement wall art that adds dimension and a focal point to the room

Special Spaces Makeover: Bedroom Before 2 Special Spaces Makeover: Bedroom Before 1Ashley’s Bedroom Before

Special Spaces Makeover: Bedroom After 2 Special Spaces Makeover: Bedroom After 1Ashley’s Bedroom After

Ashley is lucky enough to have a sitting room, which was previously used for storage, off of her bedroom. It’s the perfect space for Ashley to hang out with her friends. We brought in the teal and pink theme and brightened up the space with paint.

  • The room offered very little natural light, so we painted the entire room in Benjamin Moore Graytint, which opens the room and warms the space
  • Special Spaces works with an amazing muralist who painted birds that Ashley loves along the ceiling
  • Carpet tiles, which were generously donated by Flor, were used to cover the playroom floor in an ombre pattern using several gradations of gray
  • The playroom was outfitted with two settees and an Everlasting Play table at 15” which acts as a coffee table

Special Spaces Makeover: Playroom Before 1Ashley’s Playroom Before

Special Spaces Makeover: Playroom After 2 Special Spaces Makeover: Playroom After 1Ashley’s Playroom After

Ashley’s face when seeing the room for the first time says it all!

Ashley: Special Spaces MakeoverLearn more about Special Spaces and the amazing work they do for kids in need at http://specialspaces.org/

Ever wonder who’s behind The Land of Nod social media accounts? That’s Rachel! When she’s not telling anyone who will listen that she’s not meant to live in cold, snowy Chicago, you will  probably find Rachel binge-watching Netflix, reading blogs or in her kitchen making guacamole. Or starting crafting projects that never get finished.

How to Create a Kids’ Book Nook

October 8, 2014

Written by Chassity Evans of Look Linger Love

With the temperatures dropping it’s time to think about more indoor family activities. One of my kids’ most favorite pastimes is reading. How special would it feel to have an adorable nook for the sole purpose of story time?

This past summer I, with the assistance of The Land of Nod, helped my friend Jane Pope and her family create the cutest kids’ book nook. Here’s how we got the look!

Start with a cozy rug since you’ll likely spend a lot of time on the floor. We chose the Flokati Fluff Rug. A soft rocking chair like this one by Joya will take up little space and will provide a cozy spot to rock. The knitted pouf can serve as secondary seating or a soft place to rest your feet. A side table will come in handy for drinks and to place a reading lamp. I love this neon table! As far as book storage goes, I love The Land of Nod’s straight and narrow peg rails. They conserve space and showcase the book in both a functional and beautiful way. Add some cute artwork to the walls like these day and night pieces.

Looking for more book nook inspiration? I also pulled together this fun green, white, and brass space.


Check out all the details from the Pope family Nod makeover here.

Chassity Evans is a blogger, Charleston, SC dweller, wife, and mother. She launched Look Linger Love in September of 2010 and it is a daily lifestyle blog where she explores her passion for style in fashion, interiors, and entertaining.

Halloween DIY Yarn Craft

October 7, 2014

Written by Jeran of Oleander and Palm

Hi friends! I’m thrilled to be here to share a Halloween version of my simple yarn art.  A couple months ago, I had the privilege of hosting a Craft Event and installing a window display at the South Coast Plaza Land of Nod store. Now the time of year to add a little spook to your home. I’ve made a simple yarn piece with orange, black, white and peach yarn and added a couple plastic spiders to get in the Halloween spirit.

Halloween DIY Yarn Craft Halloween DIY Yarn Craft 2 Halloween DIY Yarn Craft 3Supplies:

  • Yarn is a few different colors
  • Scissors
  • Painters tape
  • 1/4″ dowel cut to a 12″ length
  • Craft paint and paint brush
  • Plastic spiders

Halloween DIY Yarn Craft 4Start by taping off the ends of the dowel and paint the tips one of the colors from your selection of yarn.  I chose to paint the coral/peach color because it’s not often a Halloween color and I like that unexpected element.

Halloween DIY Yarn Craft 5This is a really simple process and the pictures should explain how you attach the lengths of yarn to the dowel.  Cut the yarn twice as long as you’d like it to be for the finished piece.  Fold the yarn in half and place the folded loop behind the dowel.

Halloween DIY Yarn Craft 6Now, loop the ends of the yarn through the loop, bringing the loop to the front of the dowel.

Halloween DIY Yarn Craft 7Pull the ends of the yarn tight.

Halloween DIY Yarn Craft 8And repeat, over and over and over. Be sure to push the looped yarn snug together to get a nice full look to your finished yarn art piece.

There’s a lot of different things you can do with the ends of the yarn. This off centered inverted V is my favorite. You can see a lot more example here on some of the samples I created for the Nod window display.

Halloween DIY Yarn Craft 9 Halloween DIY Yarn Craft 10 Halloween DIY Yarn Craft 12I displayed my yarn piece grouped with an felt EEK banner I made last year after seeing this post, some twigs I painted black, a couple of owls from my collection, I mannequin hand I bought at the flea market and a few more plastic spiders.  It’s creepy but not over the top scary. Just the right amount of spook.

Also be sure to check out my girl’s amazing bedroom that was featured in the June catalog.

A former elementary school teacher, Jeran has added her unique voice to the modern maker culture through her blog Oleander and Palm. She loves helping people find attainable beauty in the lives they live. Her creativity and industriousness were honed through years of living in third world countries, that challenged her to find novel solutions for creating livable spaces. Now a mother of three, settled in sunny California, her skills and styles are evolving in exciting new ways. Her focus is Simple California Living, designing and making livable spaces that incorporate vintage finds, handmade/DIY pieces and global inspiration.

Children’s Book: The Odd One Out

October 6, 2014

Post by Michelle Sterling of Avery and Augustine

Just as its name implies, Britta Teckentrup’s latest children’s book is a delightful visual exercise in finding “the odd one out.”  With its brilliant design, playful patterns and clever text, The Odd One Out will be enjoyed by adults as much as children.

Children's Book: The Odd One Out Children's Book: The Odd One Out 2 Children's Book: The Odd One Out 3 Children's Book: The Odd One Out 4 Children's Book: The Odd One Out 5“Elegant penguins stand around in a huddle. All black and white, they are easy to muddle! One has a secret stowed under its wing. Who is protecting a little fledgling?”

You can see Michelle’s work and read about her two young children and their first forays in cooking, art and everything in between at Avery and Augustine.

Boys Bedroom Design: Bright Blue Bedroom

October 3, 2014

Post by Tim Whitworth of The Land of Nod’s Design Services Team.

This boys bedroom design was created for a 5-year-old boy. The key furniture pieces can grow with him as the room evolves over the years.

A few different shades of blue were chosen to add dimension and contrast. We broke up the blue color scheme by adding in hints of lime green and orange. Accessories are a low cost way to add color and change the look of the room. To bring it all together, we added a few vintage touches to soften the modern feel. The Aviation banner and rustic car print and frame help achieve this and contrast well with the graphic rug and bed.

Boys Bedroom Design: Bright Blue Bedroom

Airplane 101 Banner / Police Car Framed Wall Art / Blue Floor Lamp / Green Origami Wall Shelf / Silver Rock Lamp / Blue Ink Spot Rug / Twin Blue Metal Primary Bed / Blue Plaid Sham / Letter Pillow / Bears Day Off Quilt / Blue Plaid Sheet Set / Midnight Blue Uptown Dresser

Design by Tim Whitworth of The Land of Nod’s Design Services Team. Our Design Services team offers free one-on-one design advice, mood boards and space planning. You have a room to decorate? They’d love to hear from you.

Chicken Tacos with Cilantro Slaw + Avocado Cream

October 2, 2014

Post by Rebecca of A Feteful Life
Chicken Tacos with Cilantro Slaw + Avocado CreamLooking for a simple recipe to spice up your dinner menu? These Chicken Tacos with Cilantro Slaw + Avocado Cream are a must try. Fabulous, authentic flavors in a super simple package. Enjoy!

Rebecca and Suzanne are bloggers, graphic designers, and event stylists living in Washington, DC.  Rebecca is a mom to two young kiddos and, in her spare time (ha!), likes to pretend she’s a back-up dancer, craft cocktails, and run long distances. Suzanne is a big fan of good design, good wine, and her two rambunctious little boys. They share DIY lifestyle and event styling projects at A Feteful Life. Rebecca also blogs kid-friendly projects at Not-So-SAHM

A Meri Meri Halloween Party

October 1, 2014

Written by Giulia Doyle of Audrey’s 74

I grew up in Europe and Halloween was not a holiday we celebrated, but when I moved to Canada 11 years ago I embraced it. My kids also look forward to it, the decorations, the treats and the costumes. When the Land of Nod asked me if I wanted to try their Meri Meri Halloween kit I was excited. The Halloween decoration collection is charming, uses lovely quality paper, fun motives and isn’t cheap looking. My favorite is the gold foil on many of the items and my kids loved picking different cup cake toppers and creating their own scenes. The garlands and pinwheel decorations are easy to assemble and I know they’ll be featured prominently on our fireplace come October. I also love the motives on the gift bags (more gold!) and we all thought the party cups were a fun craft.

A Meri Meri Halloween Party 2 A Meri Meri Halloween Party 4I decided to set up a Halloween party table to use the full spectrum of party supplies available and today I’m also sharing two recipes with you. Crêpes, which are a big crowd pleaser and simple chocolate cupcakes with mascarpone frosting. We also made sugar cookies from a mix and used the great Halloween cookie cutters.

A Meri Meri Halloween Party 5 A Meri Meri Halloween Party Crêpes with Whipped Cream, Pecans and Maple Syrup

Prep Time: 45 minutes
Cook Time: 20 minutes
Yield: 8-10 crêpes depending on how thin you can get them.

Ingredients

  • 200 g flour
  • salt
  • 4 eggs
  • 200 ml milk
  • 200 ml water
  • vegetable oil
  • 1 cup chopped pecans, toasted in pan
  • whipping cream
  • maple syrup

Instructions

  1. Combine flour and pinch of salt in a medium sized bowl. Mix eggs, milk and water in a measuring cup and mix with flour, starting with a well in the centre of the flour. Mix until well combined and there are no lumps. Let rest about 30 minutes at room temperature.
  2. While waiting, whip as much cream as you think you’ll need (I used one cup) until you have firm, but soft tips. Mix in a table spoon of maple syrup. Set aside.
  3. Chop your pecans and toast them on low heat for a couple of minutes. Set aside and let cool.
  4. Once batter has rested, heat a medium frying pan on medium-high heat with a teaspoon of oil. Add a ladle of batter and tilt pan until the bottom is covered evenly and thinly with batter. Let cook until batter looks almost set on top. Use a silicon spatula and gently lift crêpe and flip. Cook another minute or so or until other side is golden. If the crêpe doesn’t release easily to flip, wait a little longer as it’s not yet done. You can also flip the crêpes with the pan if you dare.
  5. Keep the crêpes on a plate and put in warming oven until all are done. Serve with whipped cream, sprinkled with chopped pecans and a generous drizzle of maple syrup.

*Note how my cream looks messy in the pictures. The hot crêpes will make the whipped cream liquefy again, so serve immediately for prettier serving.

A Meri Meri Halloween Party 3Chocolate Cupcakes with Mascarpone Frosting

Prep Time: 30 minutes
Cook Time: 30 minutes
Total Time: 1 hour
Yield: Two dozen

Ingredients

  • 1 1/2 cups unsweetened cocoa powder
  • 1 1/2 teaspoons salt
  • 3 cups all-purpose flour
  • 1 tablespoon baking soda
  • 1 1/2 teaspoons baking powder
  • 3 cups sugar
  • 3/4 cup vegetable oil
  • 1 1/2 cups buttermilk
  • 1 1/2 teaspoons vanilla extract
  • 3 large eggs, lightly beaten
  • 1 1/2 cups hot water
  • Mascarpone Frosting (See recipe below)
  • Sanding sugar for decor

Instructions:

  1. Preheat oven to 350 degrees. Line cupcake pan. I used white liners in order for the pretty ones not to get greasy.
  2. Sift cocoa, flour, baking soda, baking powder, salt, and sugar into bowl. Beat in oil, buttermilk, vanilla, eggs, and hot water one at a time, using a mixer set at low. Beat until smooth, about 2 minutes. The batter will be quite liquid.
  3. Pour batter into cupcake pans. Bake 25 to 35 minutes, or until a toothpick inserted into the centers comes out clean.
  4. Let cupcakes cool in pans on wire racks, 20 minutes, before removing. Cool completely on racks.
  5. Fill frosting into a piping bag with large frosting tip of your choice. Frost each cupcake, starting from the outside in and finishing off by pulling the frosting up into a tip.
  6. Sprinkle with orange sanding sugar.

A Meri Meri Halloween Party 8

A Meri Meri Halloween Party 10

Mascarpone Frosting

Ingredients

  • 1 tub of mascarpone
  • 1 cup of powdered sugar
  • 1 teaspoon of vanilla
  • 2.5 cups of whipping cream

Instructions

  1. Combine mascarpone, sugar and vanilla with a mixer until smooth and creamy. Add whipping cream and whip at medium-high speed until the cream turns to a whipped cream consistency. Don’t over-whip the mixture. This frosting pipes very easily.


Giulia Doyle blogs at Audrey’s 74. She loves to share the sweet and savory, be it in the kitchen or travels. She juggles a family and a full-time job – they cook, travel and often paint a wall a new color.

Shop all Land of Nod Halloween Decorations

Celebrating our Seattle Store’s Grand Reopening

September 30, 2014

A few weeks back, we celebrated the Grand Reopening of our University Village Store. We were so excited to share its new look with our customers, that we just had to throw a big bash to celebrate the occasion.

Our customers were first treated to mini cupcakes from our good friends at Trophy Cupcakes. The cupcakes were not only delicious, but also adorably decorated with artist Michelle Romo‘s bear design on top.Celebrating our Seattle Store’s Grand Reopening Cupcakes

We also had an in-store face painter, Melissa from Happy Go Lucky, painting her amazing face art on the kids.

Celebrating our Seattle Store’s Grand Reopening 1

Magician John London performed a hilarious magic show for the partygoers and treated them to awesome balloon twisting throughout the day.

Celebrating our Seattle Store’s Grand Reopening Magic Show

Our final performer was Caspar Babypants, one of our favorite kids musicians, playing a show for a full house!

Celebrating our Seattle Store’s Grand Reopening 3

Thanks to everyone who attended our big day. And if you missed it, be sure to stop by and check out our new exciting look at the University Village Mall in Seattle.

Celebrating our Seattle Store’s Grand Reopening 2

Get the Look: California Dreamin’

September 29, 2014

Written by Anna Passadori, Nod’s resident trend expert

For this look, I am going for a 1970’s palette mixed with the laid back culture of Southern California. Inspired by beachy sunsets, bohemian details, modern elements and natural materials, the California Dreamn’ look is unexpected for a kid’s room. However, the happy color palette and carefree elements make it super kid-friendly and fun.

The laid back, 70’s vibe of this room has a sunny, relaxing feel:

Get The Look: California Dreamn' 2image

A sunset inspired color palette:

Get The Look: California Dreamn' Colors

 1 / 2 / 3

Mix bright modern elements with vintage pieces:

Get The Look: California Dreamn' 4image

Great colors are shown here including tangerine and raspberry:

Get The Look: California Dreamn' image

The grid pattern wallpaper contrasts nicely with the graphic, abstract pop art:

Get The Look: California Dreamn'  3image

Try it yourself!

Get The Look: California Dreamn' Board

Aviary Pendant Lamp / Farmer’s Market Bedding / Tracy Walker Animal Wall Art / Color Fill Floor BinShaggy Pouf / Paint Palette Rug / Teacher’s Pet Backpack / Farmer’s Market Bedding

For more trend inspiration, click here!

Anna develops and designs exclusive product for The Land of Nod. She hails from the west coast and has traveled the world to source product. She loves anything Marc Jacobs, Sofia Coppola or stripes! (So, if anyone can get a photo of Sofia Coppola wearing a striped outfit by Marc Jacobs, please send it along.)

Small Space Storage Ideas

September 26, 2014

Post written by Emily Prawda Weiss of Big City Moms

We moved apartments approximately a year ago–during that time I have been strategizing how I wanted my daughters’ room and creative space to play out. Both of my girls are obsessed with pink and I knew that rosy color would be thread throughout whatever we chose to enhance their room and beyond.

I took my time to select bunk beds and a dresser (not pink) that would complement the room and not overtake it (we are talking about a Manhattan apartment). What was more pressing was their toy situation. I had stuff on the floor, stuff in bags on the floor — it wasn’t pretty and it didn’t reflect our apartment style as a whole.

I’ve always been enamored with The Land of Nod — even before I had kids! I used to travel for work to Chicago and I would find myself in ‘Nod stores picking up items for my friends’ kids. I was SO happy when The Land of Nod hosted a pop-up store in New York City two years ago. Since then, I have attended seasonal previews and sneak peeks and I get inspired at each event.

Recently, a colleague of mine, Lauren Jimeson of A Mommy in the City moved and designed a play and creative space that I was drooling over (see it HERE). The best part of the play/creative space was the Storagepalooza! I knew they would solve my toys on the floor issue and make the room look more aesthetically pleasing — not to mention encourage streamlined clean-up. Since reading Lauren’s re-design, I consulted with The Land of Nod to solve my storage solutions.

Small Space Storage Ideas | Honest to NodAs I mentioned, we had bags on the floor — one contained my daughters’ play jewelry. Now we have a pink canvas cube with clear ziplocs inside to separate rings, necklaces and bracelets — the canvas cube also holds six pairs of dress-up shoes too!

I love to do my daughters’ hair and we have a lot of hair bands, hair ties, headbands and barrettes. This before and after shot is amazing to me–the pink shelf basket is so deep that I can select what I need for their outfits without making a mess of our newly color coordinated hair accessories organization.

My girls were using a Princess table to create, paint, draw, stamp and entertain play dates. The square table was getting too small for their needs so my extremely handy and creative father-in-law designed and constructed a stunning chevron wood table with drawers and chairs to match. The girls were thrilled. However, where their art supplies were stored did not reflect the chic table design. I rightfully chose the I Could Have Been An Art Caddy (in pink) and we receive tons of compliments on it. Stickers, markers, pencils and twistable crayons all have an easy and accessible home.

Lastly, there is an empty space in our hallway. I love white space. However, my husband was always looking for a spot to put his shoes on before he leaves for work — since most New York City apartments don’t have a mud room — I decided to fill the space with a fun pink pouf. I know that one day we might be in a different living space and the girls’ would love it for their room so that I why I chose pink!

I have my eye on several other The Land of Nod pieces to further enhance their room and personalized areas. So far, everything we selected has been utilized just the way I imagined it would be. Below are some additional small space organization ideas for kids rooms and playrooms.

Small Space Storage Ideas | Honest to Nod

Red Radial Wall Shelf / Birdwatcher Wall Hooks / Take Five Wall Bin / Grey Three-Bin Storagepalooza / Bon Voyage Suitcases / Grey Stripes Cube Bin / Pink Cube Bin / Black Houndstooth Bin

Shop Storage at The Land of Nod

Emily Prawda Weiss is in charge of Business Development and Marketing for Big City Moms. She has two redhead daughters that she dresses primarily in pink and schleps them around New York City. Emily’s daily goal is to keep her family happy, healthy and active so bedtime is super easy.  

Looking for even more playroom inspiration? Check out our Playroom Board on Pinterest.

Baby2Baby Playroom Design Reveal

September 25, 2014

Written by Rachel, Nod’s resident PR & Social Media Lead

Our team was lucky enough to help redesign Baby2Baby’s Los Angeles headquarters. Baby2Baby is an organization that provides low-income children with diapers, clothing and other basic necessities.  They distribute to non-profit partner organizations including homeless and domestic violence shelters, Head Start programs and other social service agencies, serving over 75,000 Los Angeles-area children each year.

Baby2Baby was redesigning their office space, which includes a playroom for the children they serve, and asked our Design Services team to provide their expertise.

The space was large and underutilized so Tim, one of our designers, decided to make it a zoned playroom to allow for multiple play focus points. We worked through design elements using a Pinterest board to pick all the right pieces for the space. Then we created a room layout to help visualize the final space.

Baby2Baby Playroom Design Reveal Pinterest Board Baby2Baby Playroom Design Reveal Room layout

The playroom is playful, welcoming and perfect for kids of all ages. We achieved the look using vibrant, unique rugs, bright colors, and tons of toys, bins, books and plush animals.

Baby2Baby Playroom Design Reveal Baby2Baby Playroom Design Reveal 2 Baby2Baby Playroom Design Reveal Baby2Baby Playroom Design Reveal Baby2Baby Playroom Design Reveal Baby2Baby Playroom Design Reveal

A few key design elements you can use for your playroom design are:

  • Zone the Space – Create different areas for kinds of play, including crafts, reading, imaginary play, etc. Area rugs are a great way to ground each zone and help to visually separate the different areas.
  • Patterns – Notice each rug has a similar pattern. We used different size circles to give it continuity throughout the space.
  • Mix of Elements – We added a natural element with our Jute Canvas bins. This helps to break up the bright rainbow colors in the space, and adds texture and dimension.  This is easy to incorporate at home, try using a textured throw pillow or blanket.

Design by Tim Whitworth of The Land of Nod’s Design Services Team. Our Design Services team offers free one-on-one design advice, mood boards and space planning. You have a room to decorate? They’d love to hear from you.

Looking for even more playroom inspiration? Check out our Playroom Board on Pinterest.

Kids Halloween Dress Up Ideas

September 24, 2014

Written by Lidy Dipert of Hello Lidy

Kids Halloween Dress Up Ideas

Holidays are something our family always looks forward to each month, or basically anything that involves treats! When The Land of Nod asked if I would be interested in trying out some of their darling dress up gear, I was absolutely delighted! To be honest, it’s pretty scary (no pun intended) how awful the choices are out there now-a-days. But for the first time ever I cannot wait to go out trick-or-treating with my kids and show off their classy costumes!

Kids Halloween Dress Up Ideas 2 Kids Halloween Dress Up Ideas 3

This year we have The Knight: our four year old son, Holden. He is a quiet boy, with an adventurous spirit! As soon as I put his outfit on, he was already swinging his sword and slaying imaginary monsters!

Kids Halloween Dress Up Ideas 4 Kids Halloween Dress Up Ideas 5

We have The Ballerina: our three year old daughter, Violet. She is boisterous and outgoing! Yet, she always wants to play dress up and roll in the dirt with all her pretty dresses. Go figure! She absolutely adored her outfit and her new little companion, the Ballerina Mouse.

Kids Halloween Dress Up Ideas 6 Kids Halloween Dress Up Ideas 7

Lastly The Dress-a-saurus Rex: our almost two year old son Sebastian. He is exactly like his older sis, just all boy! He is constantly terrorizing something or someone, so this outfit seemed quite fitting!

Kids Halloween Dress Up Ideas 8

Each costume is made with such precision and of highest quality, I love that they are all knit and have that very handmade feel. You can really see how each one suits our kids personalities perfectly!  What I love most is that these pieces will be loved on long after Halloween has come and gone! They will be great additions to their dress up closet so that they can play “Halloween” all year long, as Holden would call it. Don’t you love how these outfits almost work as a theme? The knight, a princess and the dragon!

Lidy is the face behind Hello Lidy: a blog focusing on creating and cultivating unique spaces that integrate original handmade designs and vintage pieces while keeping up on current trends and designs. Lidy and her husband have three adopted toddlers.

Shop Land of Nod Halloween Costumes & Dress Up

Acorn Cookies

September 23, 2014

Post written by Corri McFadden of Glitter & Bubblesacorn-cookie-recipe

What would Fall be without all the yummy treats and delicious snacks that come with it! If you’re in need of a simple kid-friendly recipe idea, look no further than to this adorable acorn cookie snack. Mixing a beloved classic, Hershey kisses, with yummy mini Nutter Butter cookies, and chocolate chips, this delectable cookie treat is sure to get you and your family in the mood for Fall! The recipe only takes 5 minutes to make and will cost you about $10. Just follow these easy steps and you’ll be on your way to a Fall–inspired snack!

You will need the following ingredients: mini Nutter Butter cookies, Hershey’s chocolate kisses, and chocolate chips.

Acorn Cookies Recipe

First, warm the bottom of the Hershey kiss, using a small lighter. Hold the Hershey kiss under flame for about 4-5 seconds until slightly melted, as it will make it easier to attach to the middle of your mini Nutter Butter cookie.

Using the same process, hold the chocolate chip under the flame, this time for about 1 second.  Attach the chocolate chip to the flip side of the mini Nutter Butter cookie.

Acorn Cookies Recipe 3Repeat until your have your desired amount of acorn cookies. Enjoy!

image005

Corri McFadden is the owner and founder of eDrop-Off Luxury Consignment.  As a Style Expert and successful blogger, she hosts a weekly fashion segment on Chicago’s “You and Me This Morning”,  and features “Style Recipes”, videos and Fashion “Must Haves” on her self-titled lifestyle website Corri McFadden.  Most recently, she launched Glitter and Bubbles, a modern day moms guide for those looking for inspiration through fashion, food and décor.