Close

Blog

Lentil Stew with Spinach and Red Potatoes

February 18, 2014

untitled (3 of 32).jpg

With a forecast of freezing rain for the new few days, we need something warm to eat this week. Lately, we can't get enough of this stew. It's pretty hearty for a vegetarian dish, perfect for the cold days ahead.

LENTIL STEW WITH SPINACH AND RED POTATOES

Ingredients:

* 1/2 cup olive oil

* 2 garlic cloves, minced

* 1/4 teaspoon cayenne pepper [ground red pepper also works]

* salt

* 4 cups chicken or vegetable broth

* 1 cup brown lentils

* 4-5 red-skinned potatoes, scrubbed clean and cut into 1/2 inch pieces

* 8 cups baby spinach

* 1 tablespoon lemon zest

* 1 tablespoon lemon juice

* 4 tablespoons feta cheese

1. Heat the olive oil in a soup pot over medium-low heat, stir in the garlic and cook until golden, but not brown.

2. Add the cayenne pepper and cook for another minute.

3. Add the broth and lentils. Bring to a boil, then reduce heat. Cover and simmer for 10 minutes.

4. Add the potatoes and cook, uncovered, stirring occasionally for about 15 minutes (until the potatoes and lentils are tender).

5. Stir in the spinach, lemon zest, and lemon juice, cook 5 more minutes.

6. Sprinkle with feta and eat. – from the The Pink Ribbon Diet (lots of wonderful recipes in here).

Post by Darcy : bedtimemonsters.blogspot.com


Creating a Shared Room for Brother + Sister

February 17, 2014

1

A few weeks ago we welcomed the newest member of our family!  Baby Theo (short for Theodore … aka Teddy), was born on January 6th, weighing in at just under 9 pounds. We're over the moon. He's cute as can be, and actually looks a lot like his big sister Caitlin did when she was born. I've been posting pics to instagram occasionally if you want to take a peek.

When I started my Maternity leave over the holidays, I realized I still needed to think through how I was going to handle our living space with a new baby in the mix.  We currently rent a small two bedroom apartment, so room sharing is a must.  Our plan is to keep Theo in our room until he's old enough to sleep through the night, but it won't be long before he'll be moving in with Caitlin.

I've loved Caitlin's room since designing it as a nursery before she was born (you can see the old room pictures here), but I wanted to update the space to something more gender neutral and functional for both a baby and active pre-schooler.

 
2
 
While searching for crib bedding, I found my inspiration in the Beaucoup de Fraises crib bedding set from The Land of Nod.  The sheet has a sweet, gender neutral vintage pattern, and the navy blue in the quilt adds a friendly touch of 'boy' to the original aqua, pink and yellow color palette.
 
In order to make space for both a crib and a twin bed, we had to move out the dresser and changing station into our bedroom, but this opened up room for an additional bookcase.  It was originally a dark wood color, but I painted it white with a cheerful pop of yellow on the backing.  It's great added storage for books and toys.  Caitlin's bed has a pale pink quilt cover, so I added a navy and white striped throw to tie it together with the crib bedding.
 
3
 
4
 
With Theo being a winter baby, I thought it would be fitting to add some woodland details to his side of the room.  Earthquake safety is an issue in California, so I created a gallery area in the space above the toy chest, and left the wall above his crib simple- just a wooden 'hello' sign purchased from Oh Dier on etsy and a handmade owl mobile gifted to us by a friend.  The large fox print and ceramic reindeer were more great finds from the Land of Nod. The print is titled 'Theodore Collects Firewood' and designed by blogger Ez Pudewa at Creature Comforts. When I saw it I knew it would make a special addition.
 
5
 
I designed the 'B is for Baby' print myself and it's available as a download in my etsy shop with custom color options also available.  The remainder of the artwork and items you see in the room are things we already owned, some of which are even handed down from my own childhood.
 6
 
7
 
8
 
9
 
If you're having a similar challenge designing a space for two genders or ages, I highly recommend using simple accents of color for a fun and cohesive space. Trying to divide up the space up can often make the room smaller, so instead think about using eccletic mix of gender neutral decor and toys.  If you're on a budget, scour your home for found objects and consider adding paint to make old items new again.

Post by Becca: CAKE

Hudson’s Room Inspiration

February 14, 2014

The minute I started working on his sister's room, my eight-year-old has begged me to start his room makeover. Well, it's finally his turn. I've had this plan floating around in mind for quite some time now, and the second I laid eyes on that Meteorite Quilt the whole room fell into place. Take a look:

Hudson's Room-01

Hudson's favorite color is red, he loves outer space and science, and he specifically requested the red gummy bear night light. I painted the walls Silver Gray by Benjamin Moore–see that swatch in the upper left? I think it should be a pretty great backdrop for all the fun stuff happening here. 
 
Like most guys his age, Hudson is reeeeally into Legos. So my game plan centers entirely around his Lego storage and display needs. Santa was kind enough to DIY him a Lego work table of his very own. If I can get ahold of my contact at the North Pole, maybe we can share the quickest tutorial ever with you. I'd like to fit in a large bulletin board somewhere above the workstation so he can hang up his construction plans.
 
I think this room is going to fit his needs perfectly. Can't wait to see how it comes together.


Signature

Christina Williams is a blogger and graphic designer living in Salt Lake City, Utah. She's a night owl and a bookworm, as well as a mother to three children ranging in age from two to eight. She shares her latest DIY and design projects along with her adventures in parenting on her blog, Just Call Me Chris.

Things to Make – 20 (Easy) Painting Projects With Kids

February 13, 2014

We’ve had a lot of snow this winter, so if you’re looking for some easy art projects to keep the kids entertained while indoors – here are 20 suggestions for easy painting projects to try with your kids (click on each project’s title for more detailed instructions):

april12 (38 of 48).jpg

I. PROJECTS USING LIQUID WATERCOLORS (OR FOOD COLORING)

1. Tissue Paper Tie-Dye – Fold the tissue paper into triangles and wrap with rubber bands (click here to see how to fold). Dip into different colors of paint then unwrap and watch the designs form.

2. Salty Watercolors – This is one of our favorite super easy projects. Use glue to draw designs on thick watercolor paper. Next, sprinkle salt on the glue. Finally “paint” over the salty glue, the color travels slowly through the designs – both fun to watch and fun to look at.

3. Watercolor Nature Prints – Collect interesting items outside (old leaves, acorns, branches, etc). Pour liquid watercolors onto a stamp pad (or use a regular stamp pad) and stamp the natural materials to make fun quirky designs.

4. Marbleized Paper Using Shaving Cream – Combine liquid watercolor paint and shaving cream in a pan, make designs using popsicle sticks or a fork. Press thick watercolor paper into the shaving cream and then wipe off. Voila, art.

5. Marbleized Paper Using Oil – Mix watercolor paint and vegetable oil (click here for the correct ratios). Fill the bottom of a pan with water and using eyedroppers add the oil/paint to the pan, swirl to create designs. Press thick watercolor paper into the designs, then let your oil and water painting dry.

6. Winter Trees – Pour brown liquid watercolor paint into a small container. Use paintbrushes to draw a tree trunk on the page. Then add a few drops of paint at the top of the trunk. Use straws to blow the paint away from the trunk, thus making branches. Fun.

painting1

II. PROJECTS USING ITEMS FROM THE PANTRY

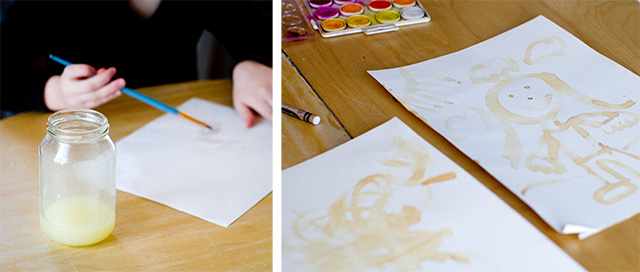
7. Secret Agent Messages with Lemon Juice – Try painting with lemon juice on paper. The lemon juice dries clear, but if you cook the paper at 350 degrees for a few minutes, your super secret spy message “magically” reappears.

8. Condensed Milk Paintings – Combine condensed milk and liquid watercolors/food coloring. Paint. The colors will look super glossy and thick.

9. Saran Wrap Painting – Paint with watercolor paints on thick paper. Cover with saran wrap and move the saran wrap around to make designs. Let dry, then remove the saran wrap. Lovely.

untitled (1 of 3).jpg

III. PROJECTS USING SOLID WATERCOLOR PAINTS

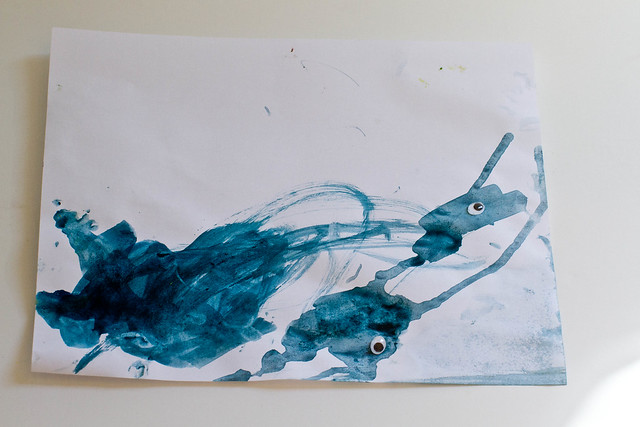
10. Toddler Googly-Eyed Monster Art – Ask a toddler to paint. Then have him/her attach two google eyes to their painting. All of a sudden abstract art becomes a monster.

11. Painted Snow Scenes – Use oil pastels or crayons to create a snow scene (my kids drew snowmen). Then paint over the sky with watercolors. You can also add salt to create the illusion of falling snow.

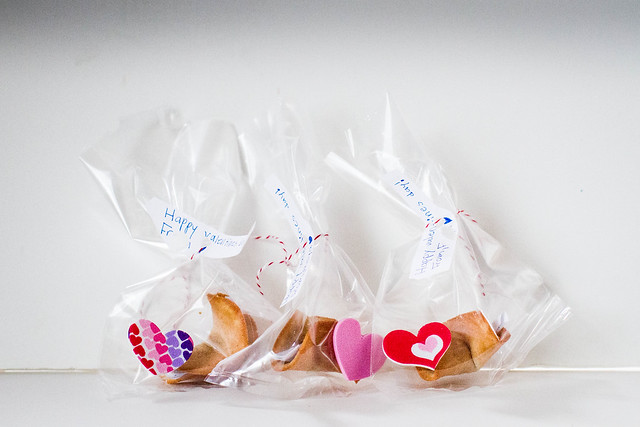
12. Valentine’s Day/Heart Banner – Cut out a series of hearts from construction paper. Have the kids decorate the hearts using paints/markers/crayons, etc. Tape the hearts to a string and hang somewhere. Celebrate.

untitled (23 of 39).jpg

IV. PROJECTS USING TEMPERA OR BIOCOLOR PAINTS

13. Q-Tip Printmaking – Use a roller brush to thinly spread paint on a pan. Draw designs using q-tips. Then press a sheet of (thick) paper onto the design. Voila – a print.

14. Potato Stamp Prints – Carve a stamp out of a potato. Dip in paint. Create.

15. Paint Photographs – You can also use Sharpies to draw in details.

16. Paint a Cardboard Box – Create a castle. Or a boat. Or whatever you want.

17. String/Kitchen Painting – Dip the strings in paint, then use the painted strings to create designs of paper. Once your child tires of the strings you can also use: sponges, forks, superhero figurines and whatever else you find around the house.

18. Firework Painting – Twist four pipe cleaners to create a star shape. Dip in paint. Add glitter to make the night really sparkle.

untitled (39 of 49).jpg

V. ETC.

19. Suminagashi Marbleized Paper – Purchase a sumingashi kit (Amazon sells one for $13.50, just click here). The effect is very similar to liquid water colors and cooking oil (#5 above), but with the kit the colors are much more vivid and the designs are more pronounced.

20. Watercolor Pencils & Crayons – For a change of pace, Watercolor Pencils and Watercolor Crayons can be so fun to create with. Draw as you normally would and then paint with water.

Post by Darcy : bedtimemonsters.blogspot.com

DIY Heart Stamp

February 12, 2014

Post by PJ of A Girl Named PJ

DIY Heart Stamp
I’m not a crafty person. I consider myself creative, yes, but not DIY-inclined. So when Levi’s teacher asked each student to bring in a decorated shoe box or bag for their upcoming Valentine’s Day celebration, I began brainstorming the easiest way we could complete this arts-and-crafts project together.

Knowing I’d be too lazy to cover a shoe box in construction paper and that Levi would be too distracted to decorate such a large container, I decided to use a plain white paper bag we already had in the house. My thought was that we’d use leftover paint from Halloween to make hearts and swirls and other pretty designs.

But Levi doesn’t know how to draw hearts. He is, after all, only 2-1/2. He also doesn’t have the attention span to finish a lengthy art project, so whatever we were going to do would have to be quick and simple.

DIY Heart Stamp - 1

Inspired by a painting Levi recently brought home from school, I created a DIY heart stamp using a toilet paper roll. It was so ridiculously easy that I almost feel silly sharing this how-to:

  1. Flatten the paper roll to form two creases
  2. Invert one of the creases
  3. Slightly manipulate the cardboard on both sides of the inverted crease to create the curved top of the heart
  4. Lightly wrap paper roll with rubber band to help keep its shape

So simple, right?

DIY Heart Stamp Valentine's Day Goodie Bag

Levi was excited to “stamp, stamp, stamp!” the heart-shaped paper towel roll onto the plain gift bag — for a few minutes. Then all he wanted to do was mix different colors of paint onto the plate. But with a little bit of coaxing encouragement (and some literal hand-holding) he stamped all four sides of the bag. We added polka dots with oversize paint markers (similar to these) to fill in some of the white space, and I later used a metallic Sharpie to write his name on either side.

DIY Heart Stamp Valentine's Day Goodie Bag 2

Is it the prettiest bag for collecting Valentine’s Day cards? No, it looks like a toddler painted it. But that’s the point! Levi was so proud of his artwork, and I was pretty proud of myself for coming up with a quick arts-and-crafts project that involved minimal clean up.

Classroom Valentine’s Day cards c/o Minted
PJ Feinstein is the author of A Girl Named PJ, a lifestyle blog offering fashion and beauty tips, design inspiration, commentary on pop culture, thoughts on personal growth, and honest talk about motherhood. She lives just outside Washington, DC, with her husband, two young sons, and stubborn (but adorable!) small white dog.

DIY Fortune Cookie Valentines

February 11, 2014

Post by Darcy of bedtimemonsters.blogspot.com
DIY Fortune Cookie Valentines

DIY Fortune Cookie Valentines 2A few weeks ago, our neighbor brought us fortune cookies. According to the cookies, we all had rather uninteresting destinies (except for T’s “you are not a person who can be ignored”), so the kids started talking about the predictions they would draft. And then I (rather randomly) said, “Well, let’s try baking our own fortune cookies.” And now we can’t stop. Turns out fortune cookies make for a great “team” baking experience – one kid writes and cuts out the crazy fortunes (this would be F), while another child (P) helps fold and insert the fortunes before the cookies harden (basically “speed” baking). Plus, I’ve found the 4-5 minute baking time allows me to help with homework and/or cook dinner without becoming overly distracted (i.e. I can’t read a whole article in 4 minutes). Anyways, we like them so much that we’re handing some out for Valentine’s Day. The best part was coming up with the fortunes – from “you will travel to all 7 continents” to “you will dance with an elephant”, I’m hoping we’ll make the second grade smile.

DIY Fortune Cookie Valentines Recipe:

Ingredients:

  • 1 egg white
  • 1/4 tablespoon vanilla extract
  • 1 pinch salt
  • 1/4 cup all-purpose flour
  • 2.5 tablespoons white sugar
  • 1 tablespoon of water
  • Empty egg carton (or muffin tin)

1. Preheat oven to 400 degrees. Write fortunes on strips of paper approximately 4 inches long and 1/2 an inch wide.

2. Butter two baking sheets. Lots of lots of butter (otherwise the cookies will stick).

3. Mix the egg white with the vanilla extract until foamy but not stiff. Add flour, salt, and sugar to the egg mixture. Add the water. If the mixture is too thick add 1 more tablespoon of water.

4. Place batter (measured out as 1 teaspoon per cookie) four inches apart on the cooking sheet. Only bake 3 at a time (if this is easy for you, then you can try to bake more in the next batch).

5. Tilt the baking sheet around to assure that the batter is in a circle.

6. Bake 4-5 minutes or until the outer edge of the cookie turns a golden brown (JUST the outer edge).

7. Remove cookies from the cooking sheet using a spatula (I slowly pushed them off the sheet) and place on a wooden cutting board. QUICKLY, place the fortune in the middle of the cookie and fold in half. SUPER QUICKLY fold the cookies again by putting them into the empty egg carton (which I found to work much better than a muffin tin).

– Makes 12 cookies. (adapted slightly from this allrecipes.com)

DIY Fortune Cookie Valentines - FinishedPost by Darcy  of bedtimemonsters.blogspot.com

Avery’s Toddler Valentines

February 10, 2014

Post by Michelle Sterling of Avery and Augustine
Avery's Toddler Valentines

Avery's Toddler Valentines 2

Avery's Toddler Valentines 3

Avery's Toddler Valentines 4

Avery's Toddler Valentines 5
When she was two, Avery was old enough to help make her own toddler valentines.  The valentines were inspired by this blog post.  Avery had a fun time scribbling on different shades of red and pink paper, then I cut out hearts using this Marvy craft punch, printed a little message and pasted some patterned wrapping paper on the back.  Each valentine went into a glassine envelope with some bits of beautiful hand-pulled candy from Papabubble in NY.  The last step was sealing each envelope with washi tape.  It was such a fun process!  Thanks to lovelydesign for your inspiration.

Post by Michelle Sterling of Avery and Augustine. You can see her work and read about her two young children and their first forays in cooking, art and everything in between at Avery and Augustine.

Valentine Donut Flags

February 8, 2014

Post by Christina Williams of Just Call Me Chris

Valentine Donut Flags

I couldn’t resist adding a little donut humor to one of my 12 Days of Love surprises for the kids. My kids go crazy over the little powdered sugar donuts, and so these Valentine donut flags made for a quick, simple breakfast surprise.

I found these cute heart straws at Target. They’re the perfect size for this project: a little bit shorter and chubbier than your average paper straw. I’m also going to use them to make the scroll letters in the 12 Days list. Photos coming soon.

But for these little donut flags, just download and print my little printable flags, cut them out and glue ’em onto a straw. When you’re ready for breakfast, stack up a few donuts, push the straw through the donut holes and you’re all set. Bonus points for serving fruit along with the donuts. That’ll definitely make you feel like SuperMom.

Download the free printable flags here.

Christina Williams is a blogger and graphic designer living in Salt Lake City, Utah. She’s a night owl and a bookworm, as well as a mother to three children ranging in age from two to eight. She shares her latest DIY and design projects along with her adventures in parenting on her blog, Just Call Me Chris.

DIY Heart Crayons

February 7, 2014

DIY Valentines Heart Crayons

DIY Valentines Heart Crayons 2

DIY Valentines Heart Crayons 3I made these heart-shaped crayons to pass out for Avery’s birthday one year using chopped up crayons and heart-shaped molds.  Here is a link to the how-to for making your own DIY Heart Crayons.  They were a hit and I loved how they turned out.  Avery has loved coloring with her heart crayons over the years.  There are endless color combinations, too!  You can find different kinds of molds to use depending on the occasion or holiday, and they can be packaged up simply in a cellophane or glassine bag.

Post by Michelle Sterling of Avery and Augustine. You can see her work and read about her two young children and their first forays in cooking, art and everything in between at Avery and Augustine.

Queen of Hearts

February 6, 2014

This room is partially inspired by Alice in Wonderland, and made for the most girlie-girl you know. She might look something like this (not afraid of a little drama):

6c2843c3ae41a297988c32e47365cda3

image

So her room should be equally feminine:

7b10f18b5d728f7cc81f12546f870e75

image

And a little over-the-top:

3419af2ed472721a3b60487ecc7a5a0c

image

Don’t listen to your Mom; red and pink really do go together:

5e8422f9cfb9278d367e7efc105a46d0

image

Give her the room you know she’ll love…

QUEEN OF HEARTS

Clockwise from top left:

Surprise Party Bedding, $32-229
Real Light Wire Table Lamp, $119
Swan Couple Poster Decal, $39
Heart of Gold Wall Shelf, $49
Ginormous Beanbag, $139
Rosy Chic Rug, $379-$629
Love Struck Storage Collection, $32-49

By Anna Passadori 

Anna develops and designs exclusive product for The Land of Nod. She hails from the west coast and has traveled the world to source product. She loves anything Marc Jacobs, Sofia Coppola or stripes! (So, if anyone can get a photo of Sofia Coppola wearing a striped outfit by Marc Jacobs, please send it along.)

Worksheet Wednesday: Cupid’s Heart Math

February 5, 2014

Post by Aimée Lowry & Bettijo B. Hirschi from PagingSupermom.com

We’ve done a couple of these math riddle worksheets during the past year, and my second grader absolutely loves them. So here is one for Valentine’s Day.

Cupid's Heart Math Worksheet

The hardest part of designing these worksheets is coming up with the actual riddle — did you know Aimée and I usually write the riddles ourselves? Might seem simple, but it can sure take a lot of head scratching to create a riddle. I guess that’s why I’m particularly proud of this week’s worksheet. Download our Cupid’s Heart Math Worksheet to find out the answer for yourself!

Reposted with permission by Aimée Lowry & Bettijo B. Hirschi from PagingSupermom.com

Preschool Valentines

February 4, 2014

Post by Michelle Sterling of Avery and Augustine
Preschool Valentines

Preschool Valentines 2

Preschool Valentines 3Avery is officially a preschooler and has many Valentines to give out this year to new (and old) friends.  Her birthday falls right around Valentine’s Day, so whatever she gives out usually serve as both birthday and Valentine’s treats.  Her little preschool Valentines gifts are diamond ring erasers and pirate erasers (not pictured) from Target, encased in red vending capsules from Bake It Pretty.   Vending capsules are always a fun surprise for kids to open, and can be used to store little treasures later on.  I printed a simple Valentine’s message on 1 1/4″ round labels from Paper Source, stuck them to red hearts (made using this Marvy heart punch) and attached a little bit of red and white twine from Crate and Barrel.  The red paper was also from Paper Source (one of my go-to stores for paper goods).  Avery can’t wait to give these out!

Post by Michelle Sterling of Avery and Augustine. You can see her work and read about her two young children and their first forays in cooking, art and everything in between at Avery and Augustine.

Valentine Chocolate Spoons

February 3, 2014

Post by Giulia Doyle of Audrey’s
Valentine Chocolate SpoonsWe like to make something small for Valentine’s Day – something sweet preferably, but also something the kids can make themselves. This year I decided to make Valentine Chocolate Spoons – a great activity – fun and easy to make.  I’ve seen a few examples on Pinterest and here. You  can imagine that anything involving  messy sprinkles will be a hit!

Valentine Chocolate Spoons 2Valentine’s Chocolate Spoons with Sprinkles

What You’ll Need:

  • Plastic spoons
  • Chocolate – milk, dark, white – I used semi-sweet chocolate I had left over

Directions:

  1. Arrange your spoons on a baking sheet or tray and rest the back of the spoons on spatulas to keep them level.
  2. Melt chocolate in 15 seconds intervals in the microwave and stir after each cycle until you have smooth, melted chocolate.
  3. Next, an adult should carefully add a spoonful of melted chocolate to each plastic spoon. *Try not to overfill to allow room for sprinkles. Once you’ve filled each spoon, go back and smooth the chocolate a little with your spoon.
  4. Once all the spoons are filled with chocolate, have the kids gently sprinkle smaller sprinkles over each spoon, then let them add larger ones. *If you add larger candy,such as jelly beans, make sure you wait a few minutes for the chocolate to harden a bit, or else the heavier candy will sink to the bottom of the chocolate.
  5. Let the chocolate dry and harden in a cool area. Once firmer, transfer to fridge so they completely harden.

*The baking sheet will catch some of the falling sprinkles, but you’ll find them all over your floors regardless. 🙂

Valentine Chocolate Spoons 4We packaged each spoon into cake pop wrappers available at Michael’s. We attached a sticky label to each package and closed them with decorative tape.

We made some that were very pink and red, and others that included rainbow colors – the options are limitless.

Valentine Chocolate Spoons 5Post by Giulia Doyle of Audrey’s

Twelve Days of Love

February 1, 2014

Post by Christina Williams of Just Call Me Chris

My kids are so excited to pull out our Valentine’s Day mailboxes. I thought I’d make things a bit more exciting this year by starting a Twelve Days of Love tradition. For twelve days surrounding Valentine’s Day, I have a simple (and inexpensive!) surprise planned for them. I want to do a better job of showing them how much I love them, and creating memorable experiences. This is a good way to start.

Kids Valentine's Day Activity: Twelve Days of Love

I’m so excited to start our new tradition! I always intend to do a Twelve Days of Christmas, but the holidays get so hectic and over-scheduled that it falls through the cracks every year. Valentine’s Day is the perfect time to bust out some extra love. And this is a fun activity to do anytime during the month of February. You can download the Twelve Days of Love checklist here and play along. Or just use my list as a starting point to plan some surprises your family will love.

Kids Valentine's Day Activity: Twelve Days of Love 1

I created a free printable Tic Tac Toe card, as well. So get it here.
Also, here’s a link to the Secret Message Valentines (Day 4) if you need instructions.

Happy February!

Christina Williams is a blogger and graphic designer living in Salt Lake City, Utah. She’s a night owl and a bookworm, as well as a mother to three children ranging in age from two to eight. She shares her latest DIY and design projects along with her adventures in parenting on her blog, Just Call Me Chris.

The Best Kid Stuff, For Adults!

January 31, 2014

I’m going to let you in on a little secret… you can find lots of great finds for your entire house at kid stores, even if you don’t have kids! These are my top 10 picks from The Land of Nod that could work in any room and will blend in seamlessly with your existing décor. 

Grown ups (5)

1)       NOIR STRIPE SHEET SET, $59-109  I am beyond obsessed with these black and white striped sheets! Black & white stripes are so classic that they will never go out of style. Best of all, they are available in full and queen sizes!

2)      GOLD FOUR-LEAF MIRROR, $69  Our classic four leaf clover mirror gets a chic update in gold. You can’t go wrong putting this in your bedroom, bathroom or living room. Also don’t miss the new Kelly green color!

3)      DOBBY DOT CURTAIN PANELS, $29-49  Look closely… these white curtains have neon pink stitched dots that are sooo right now.

4)      MARITIME BATH TOWEL COLLECTION, $8-20  A cute way to update the bath is with these nautical inspired jacquard towels. Soft and well made, these can easily fall under any adult’s wish list.

5)      CHARMING BASKETS, $45-89  The best part of these baskets is you don’t have to hide them in the closet or laundry room- they make a great décor statement on display in your bedroom.

6)      SIMONE DOWNEY ART PRINT, $19.95 The watercolor tones are so beautiful in this abstract print; I’d love to add it to my office for a touch of sophistication. 

7)      GARDEN TRELLIS RUG, $299-$799 This pretty rug adds a preppy touch to any living room or bedroom.

8)      PRESSED PETAL TABLE LAMP, $149  Add a textured accent to your home with this artfully designed ceramic lamp. 

9)      PARROT THROW PILLOW, $30  This throw pillow would fit right in on your favorite chair.

10)   ORB PENDANT, $199  Create a moody, sophisticated look with this gold & black combo.  

By Anna Passadori 

Anna develops and designs exclusive product for The Land of Nod. She hails from the west coast and has traveled the world to source product. She loves anything Marc Jacobs, Sofia Coppola or stripes! (So, if anyone can get a photo of Sofia Coppola wearing a striped outfit by Marc Jacobs, please send it along.)

What’s Different, Valentine?

January 30, 2014

Post by Aimée Lowry & Bettijo B. Hirschi from PagingSupermom.com

Yay! My boys are SO excited to pass out their Valentines in a few weeks! We have love notes on our doors, breakfast ideas ready, dinner plans made… so I thought I’d sneak in a Valentine-themed worksheet.

What's Different? Kids Valentines Worksheet

I made this one with your preschooler in mind–it’s a simple worksheet to help you teach the concept of same and different. Look carefully–can your little one spot the odd object in each set?

Download our What’s Different, Valentine? worksheet.

Reposted with permission by Aimée Lowry & Bettijo B. Hirschi from PagingSupermom.com

A Rustic Italian Luncheon

January 29, 2014

Hello again from Becca of CAKE.

I designed this classic Italian lunch as a pre-wedding celebration for a co-worker. The party was held at the office so we kept it on a budget with some simple details. A checkered oilcloth was laid over the conference table and linen curtains backed the garlands of pasta and rustic fabric bunting. I also potted fresh basil plants in tomato sauce cans for guests to take home as favors, which added a nice pop of green appropriate for the traditional Italian setting. Food was provided potluck style, and in great abundance… highlights included spaghetti & meatballs, garlic bread, bruschetta, 3 layer dip, olive oils and cheese straws, with Pelligrino to drink. To top it off, dessert included biscotti, chocolates, a raspberry tart and a tiramisu cake. Needless to say we had a fairly unproductive afternoon while nursing our food comas, but it worked out beautifully and our guest of honor was both surprised and thrilled.

1

2

3

4

5

6

7

8

9

10

11

12

Post by Becca: CAKE

Color Crush: Red & Grey

January 28, 2014

Let color do the decorating for you! This bold red & grey combination is a striking mix of clean and modern. Start with a grey wall and add in just a few red accessories to make the room pop. Keep other pieces in the room simple and neutral (warm it up with white or a wood tone). This can be a great gender neutral option as well.

A fun option for nursery, this palette could easily be turned into a nautical look:

9f1d0afb0a6f90594d6abeffc3d184c0

image

Boys will love the graphic boldness of this look:

2d3867ffcfda11c6ceabc60e73b289c9

image

Keep it eclectic and warm by mixing in a few patterns and wood finishes:

60a2243b7a544fb70e08d35f05123840

image

Try it yourself!

GREY RED

Clockwise from top left:
Two-Tone Teak Play Chair, $99
Prints of the Jungle Wall Art, $24.95
Honeycomb Wall Shelf, $59
Hooks and Laterals Wall Rack, $19.95
Light Years Floor Shade, $35
Checkmate Floor Lamp Base, $159
Emotirug, $299-$399
Entry Level Nod Chair, $79
Stripes Around the Cube Bin, $12.95

By Anna Passadori 

Anna develops and designs exclusive product for The Land of Nod. She hails from the west coast and has traveled the world to source product. She loves anything Marc Jacobs, Sofia Coppola or stripes! (So, if anyone can get a photo of Sofia Coppola wearing a striped outfit by Marc Jacobs, please send it along.)

Pasta with Baked Tomato Sauce

January 27, 2014

Baked-Tomato-Sauce-Pasta-Audreys-1

Yes, we are still working on our supply of tomatoes and this baked tomato sauce is a yummy addition to our rotation. The first time I made it was three years ago when my friend Suzy gave me the link to The Wednesday Chef blog. I’ve made the recipe many times since and Luisa’s blog is a steady source of great recipes and stories. 

Baked-Tomato-Sauce-Audreys-2

What I like about this recipe is the use of cherry tomatoes or grape tomatoes. It lends a different flavour to your sauce than larger tomatoes do and we tend to get large batches of them in September. Adding breadcrumbs just elevates everything – the smell coming from your kitchen will make you want to dive into the pot of pasta immediately. These are basic ingredients that let the tomatoes shine – try it and you’ll make it over and over again.

Pasta with Baked Tomato Sauce – from The Wednesday Chef
 

Ingredients

  • 1/3 cup extra-virgin olive oil
  • 1 pound very ripe cherry tomatoes, halved
  • 1/3 cup plain dry breadcrumbs
  • 1/4 cup freshly grated Parmigiano
  • 2 tablespoons freshly grated pecorino (or, if you don't have this, just more Parmigiano)
  • 2 garlic cloves, finely chopped
  • Salt and freshly ground pepper
  • 1 pound dried penne or spaghetti
  • 1/4 cup loosely packed fresh basil leaves, torn

Instructions

  1. Preheat the oven to 400 F. Grease a 13-by-9-inch baking dish with one-third of the oil. Place the tomatoes cut side up in the dish.
  2. In a small bowl, combine the bread crumbs, cheeses, and garlic and toss with a fork to mix well. Sprinkle the bread-crumb mixture over the tomatoes, making sure that each cut side is well covered with the crumb mixture. Sprinkle with salt and pepper. Bake until the tomatoes are cooked through and starting to brown on top, about 20 minutes.
  3. Meanwhile, bring a large pot of salted water to a boil. Add the pasta and cook for 8 to 10 minutes, or until al dente. Time the pasta so it finishes cooking about the time the tomatoes are ready to come out of the oven.
  4. When the tomatoes are done, add the basil and stir vigorously to mix everything into a sauce. Drain the pasta and immediately transfer it to the baking dish. Add the remaining olive oil and mix well. SERVE AT ONCE.

Notes

To cut a large amount of cherry tomatoes fast: Place a bunch of them on a large Tupperware lid, cover with a second lid, hold down and slice with a large knife from the side all the way through. You'll be done in no time.

Baked-Tomato-Sauce-Audreys-802x1164


Post by Giulia Doyle : Audrey's

Q&A with Jennifer Vallez

January 24, 2014

JenVallez

Hometown: Rockville Centre, NY

Current city: Ellington, CT

Would you rather travel by plane, train, car or ship?

Terrified of flying, so I would say train. I can’t reIax in a car and a ship would be a little extreme to go the supermarket in. I look forward to long train rides so I can catch up on reading, watch a movie or binge watch a new TV show.

You can find me eating __for breakfast.

Breakfast is my favorite meal.  If I have time, I will make an egg white omelet, toast and fruit. If I am in rush…Irish oatmeal or Special K.

On the weekends, you can find me… 

I work FT during the week, so the weekends are for doing errands with the family, toting my kids to gymnastics and bday parties. I wake up early both days and paint my custom portraits & pack orders before the kids wake up.

How many times do you usually hit the snooze button after your alarm goes off?

Never. I don’t even need an alarm. I am usually up about 6 am.

If you were a crayon, what color would you be?

My kids would probably say Black or Gray because of my wardrobe, but I am drawn to Cerise (pink).

How long can food be on the ground and still be fair game for eating? 

Hah! We usually chuck it if it fell on the floor. But MAYBE 2 seconds depending on what it is!

Your dream vacation would be…

Traveling to a great city with tons of shopping, art, good design, food – London, Amsterdam, Paris. I am not a huge fan of the beach or hot weather. So definitely in the the Spring or Fall.

Do you have a current celebrity crush?

Probably too many…Idris Elba & Jamie Dornan to name a few. 😉

Got any pets? Tell us about them.

Not yet! We just looked at a Siberian cat that is ready to have babies this week. My husband & daughter have allergies, but had no reaction when we met the momma cat. We may have a kitten VERY soon!

Tell us about your personalized wall art for The Land of Nod, how you made it or your inspiration behind it.

I design a line of soft dolls for little girls – inspired by my two daughters (6 & 11). These four drawings are an extension of my Sophie & Lili brand & style. I sketched the girls with pencil and painted with watercolors. The process was so fun and the people I worked with at Land of Nod were great. I am very flattered and excited to be a part of the Spring launch!

Girls Night Personalized Wall Art