Close

Blog

Rainbow Spring Roll Recipe

September 11, 2017

I have been seeing fresh spring rolls popping up all over the internet this summer. And, as a lover of all things colorful, I knew I wanted to try out some rainbow ones. So, one afternoon last week my husband suggested that we stop over at a local Asian supermarket with our little ones to find some of the things we would need. I didn’t really expect it, but our oldest two loved the experience. It was fun to take them to a grocery store that had some different items and share with them a little about another culture. If you have some different markets in your area this is something I highly recommend doing.

Anyways, much to my four-year old’s dismay, we did not leave the Asian market with a blue crab (he wanted to bring one home as a pet!), but we did pick up some rice noodles and rice paper for our rolls, as well as some other fun finds. Combined with local produce we already had at home we were all set to test out our spring roll making skills! See below for the recipe/ instructions!
Rainbow Spring Roll Recipe

Ingredients:

  • 8-10 rice spring roll papers
  • 1 large red pepper, seeds removed, thinly sliced into sticks (I used two small peppers; 1 orange, 1 red)
  • 1 large carrot, thinly sliced, or about 3/4 cup matchstick cut carrots from the store
  • 1 ripe mango, thinly sliced into sticks
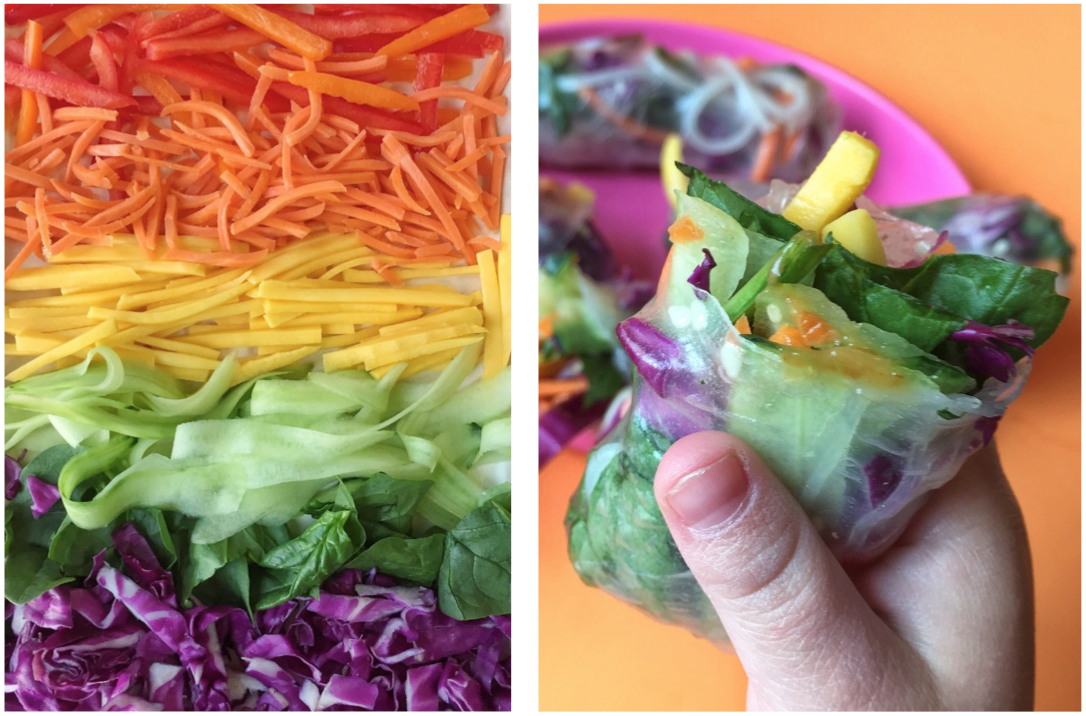
  • 1 cucumber, peeled, then thinly sliced into sticks, or peeled into ribbons (as shown above)
  • A large handful of greens of choice (we used spinach because that is what we had on hand)
  • 1 cup thinly sliced cabbage
  • 1 – 2 cups rice noodles
  • Sesame seeds (optional)
  • Anything else you would like to include!

Here is the really cool thing about these rolls: they are totally versatile! If you have something else on hand, add it in! If you are missing one of the things above, don’t stress; you can totally make them without it. With these rolls almost anything goes, so get adventurous and make them your own! Other great options/ add ins for these include: avocado, mint, yellow pepper, scallions, basil, cilantro, and shrimp! Yum!

Rainbow Spring Roll Recipe

Directions:

  1. Wash, peel, cut, prep, etc. all your produce as detailed above.
  2. Then, cook your rice noodles per package directions. Once cooked, run under cold water, drain, and set aside.
  3. On a large tray or in a large bowl combine all your ingredients, minus the rice papers (produce, cooked noodles, sesame seeds, etc.), mixing everything up so that it is all ready to go for your filling.
  4. Next, fill a large shallow dish with warm water and set wherever you will be working on the rolls. We set our water dish, and our produce tray on the table right where we were working. Yes – We! I made these rolls with the help of my four-year-old son!
  5. Once you are ready to start making your rolls, submerge your rice paper in the water for 8-10 seconds. (Note: This part can be a little tricky: you don’t want the paper to get too fragile by oversoaking, etc. so this may take a bit of practice!) Then, quickly remove from water and lay your rice paper on a flat surface and smooth out. We used a cutting board for this part.
  6. Next, put a small amount of your filling on your rice paper. Fold the bottom up and over the filling, then gently roll over once and fold in the side to seal, then roll until fully sealed.
  7. Repeat process above until all your filling is used up. For us, this made approximately 8 spring rolls. But, this will all depend on the size of your produce, how full you pack your rolls, etc.
  8. These are best when fresh, so I recommend that you serve immediately, but if you need to, you could store them, or any leftovers covered in the fridge for a couple of days.
  9. I also recommend serving these rolls up with a dipping sauce or two. Yum! And we all know that little ones just love to dip!
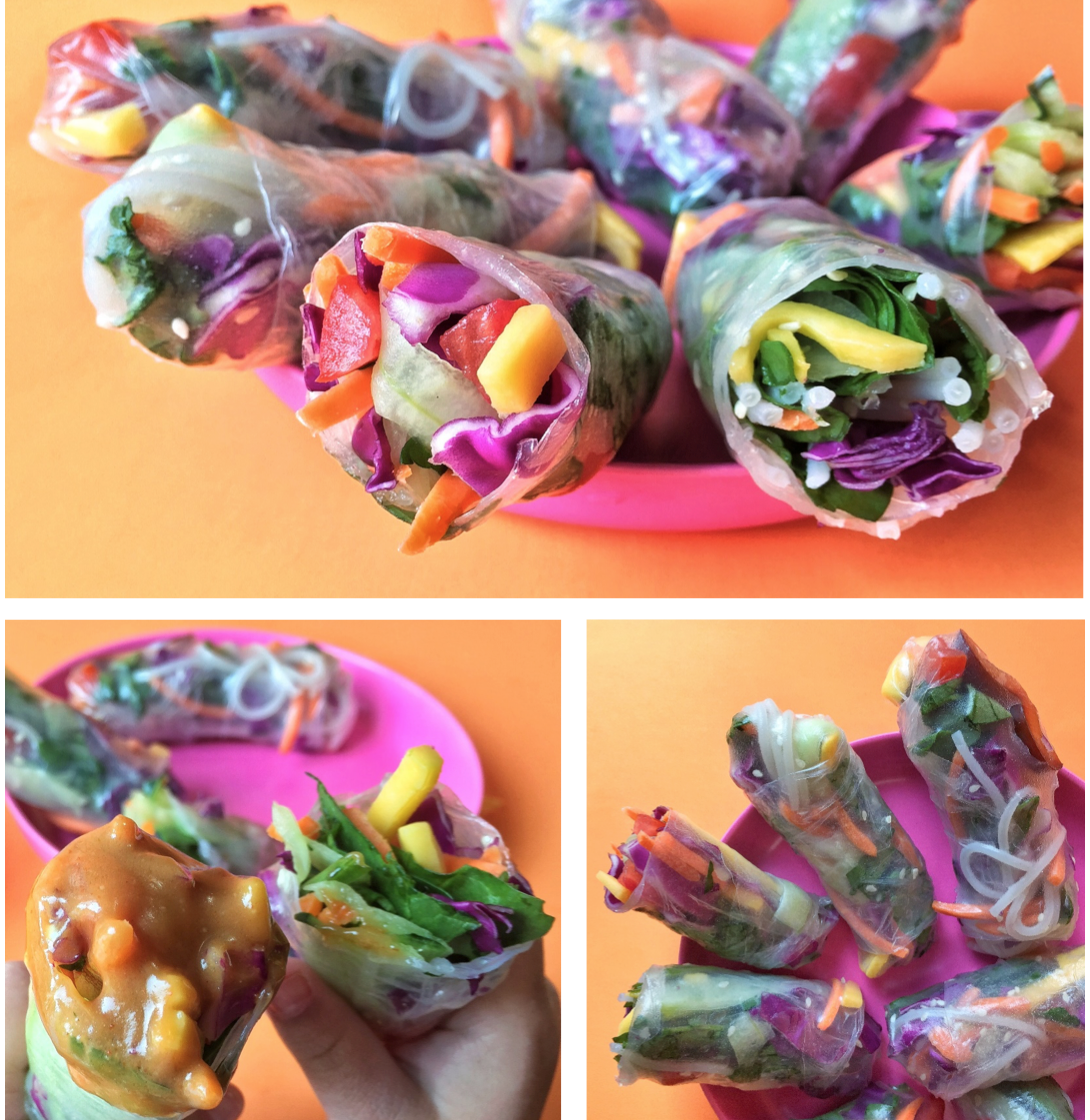
Rainbow Spring Roll Recipe

Aren’t these beautiful? They’re delicious too! When I set out to make them with my oldest son, I didn’t expect him to be too excited about eating them up. I was just hopeful that he would be willing to try them. However, him making them with me and my allowing him to be such a part of that process really won him over. He was so excited to roll them up “like tacos” as he said, and when we were about halfway through rolling, he was already asking, “Can I try them yet Mom?” Of course, my answer was YES! Packed with fruits and veggies, I loved that he was so excited to eat up such a healthy dish!

Healthy food really can be beautiful, fun and kid-approved.

POST BY LUNCHES + LITTLES

Lunches + Littles focuses on quick, healthy and fun meal options for little ones while sharing practical tips & tricks on how to make meals enjoyable, all the while keeping things simple. A lover of colorful plates, and an advocate for getting kids in the kitchen, Lunches + Littles is also a great resource for parents of picky eaters, parents looking for healthy family and toddler recipes and those mamas (dads too!) who are short on time. A mantra of sorts: Making meals fun doesn’t have to be hard! With 3 little ones (3 and under) it can’t be! Follow @lunchesandlittles for all of the above… And more!

Tween Girl’s Bedroom Ideas

September 6, 2017

If it isn’t happening already, the time may come soon when you realize that your little girl is no longer a little girl. Her style and interests have somehow ventured away from cartoon princesses and dress-up parties. She may be more aware of her fashion and music preferences, which most likely means it’s also time to redesign her bedroom.

A complete room makeover could be a great end-of-summer project for the two of you to tackle! Embrace this opportunity while you can—it’s only a short time before you have a teenager on your hands! The Land of Nod may have been your go-to for her nursery and “big-kid” room, but the fun doesn’t have to stop there. We have a ton of cool bedroom ideas for any age. From bedding to furniture and décor, your tween is bound to find something that she (and you!) will like.


There are so many versatile pieces in the Nod product assortment that would fit perfectly in a tween girl’s bedroom. The Gallery Wing bed and Radiant dresser are perfect examples of just that. These two timeless pieces are something that will grow with your almost-teen through high school (and probably college, first apartment, and so on).

The colors in our new Desert Flora bedding set are a perfect balance to the navy upholstery in the Galley bed. The soft pastel duvet cover and bolder, brighter sheet set go great with the Pixel rug. Throw up a corkboard so your tween can post pictures with friends, artwork, magazine cutouts and other fun little souvenirs she’s collected—maybe even a cute family photo! Complete the look with a beanbag chair and some wall art and she’s ready to have friends over! For an even more grown-girl look, try the Fringe Rug or Southwestern Rug in this room design!


This eclectic yet sophisticated room design, featuring the Latticework bed from our new Genevieve Gorder collection, is the perfect look for your soon-to-be teen. By throwing in some contrasting pieces like black and white wall art, vibrantly appliqued Cherry Blossom bedding, or this floral print Etsy wallpaper, you can pull away from an all-neutral, pastel room design, which can sometimes look a little too “kiddish”. To complete the look, I chose the simple yet chic Mirage rug in light pink to bring out the soft pink in the duvet cover.

If you’re feeling stuck on how to make the transition from kids room to tween domain, reach out to our Design Service team either at your nearest store or online. We’d love to help!

Enjoy!

Post by KJ Burkland, Retail Home Stylist (Seattle),  from The Land of Nod’s Design Services Team. Our Design Services team offers free one-on-one design advice, mood boards and space planning. You have a room to decorate? They’d love to hear from you.

VISIT THE LAND OF NOD’S DESIGN SERVICES PAGE
TO GET STARTED TODAY ON YOUR FREE DESIGN.

Five Tea Party Tips

September 5, 2017

If your little girls and boys are anything like mine… I bet they LOVE tea time!  My kiddos must ask for a tea party at least once or twice a month.  Every so often we put on an elaborate tea time with friends and family, but mostly we just grab our “tea party” box and set up something ultra simple.

Spontaneous or planned we are are making special memories.  I will forever hold tea parties in my heart as one of the most magical parts of childhood!

Here are Five Tea Party Tips!

1.  Dress Up!

Be on the look out for gloves, frilly hats, and fancy outfits!  Keep your eye out for holiday sales, antique shops (think vintage hats) and mom and dad’s closet.  Fairy and butterfly wings always add extra special magic!

2.  Add Fine China!

I know, I know, it might break, but there is something so special about painted porcelain tea cups and floral saucers.  They don’t even need to match!!  Check out garage sales and thrift shops for vintage tea party charm!

3.  Make a Ready-To-Go Tea Party Box!

I keep a medium sized plastic bin on hand that holds all our favorite tea party basics.  It’s so nice to have everything in one place and then whenever we are in the mood I just grab the box and we are ready to party.   My box is stuffed with all the fancy stuff–  pretty floral napkins, cups, plates, dress up clothes, etc.

4.  Invite Your Friends!

And by friends I mean teddy bears, stuffed animals, dolls and neighborhood buddies! Real or pretend… friends always make tea time special.  We even like to serve our guests their favorite foods— ie. a teddy bear might enjoy fresh berries or a stuffed giraffe might like leaves from a tree in our front yard.

5.  Get the Big Kids Involved!

If you have older kids who don’t want to sit for tea, perhaps they might like to serve tea? They might enjoy planning a menu and dressing the part, or maybe they might like to research the etiquette and history of a traditional afternoon tea!?

Elaborate or simple.  Fancy or silly.  Tea time is the BEST TIME!

POST BY KATHERINE MARIE.
YOU CAN FIND MORE OF HER MESSY, CREATIVE AND FUN PROJECTS ON INSTAGRAM AT KATHERINEMARIES 

Share Your Care Day! Printable Care Bears Coloring Pages

September 1, 2017

Celebrate National #ShareYourCare Day with our new #CareBearsforNod Collection.

Shop the whole collection here!

The #ShareYourCare movement aims to inspire people to generously share their love by showing someone they care – not only when we celebrate annually on September 9, but every day!

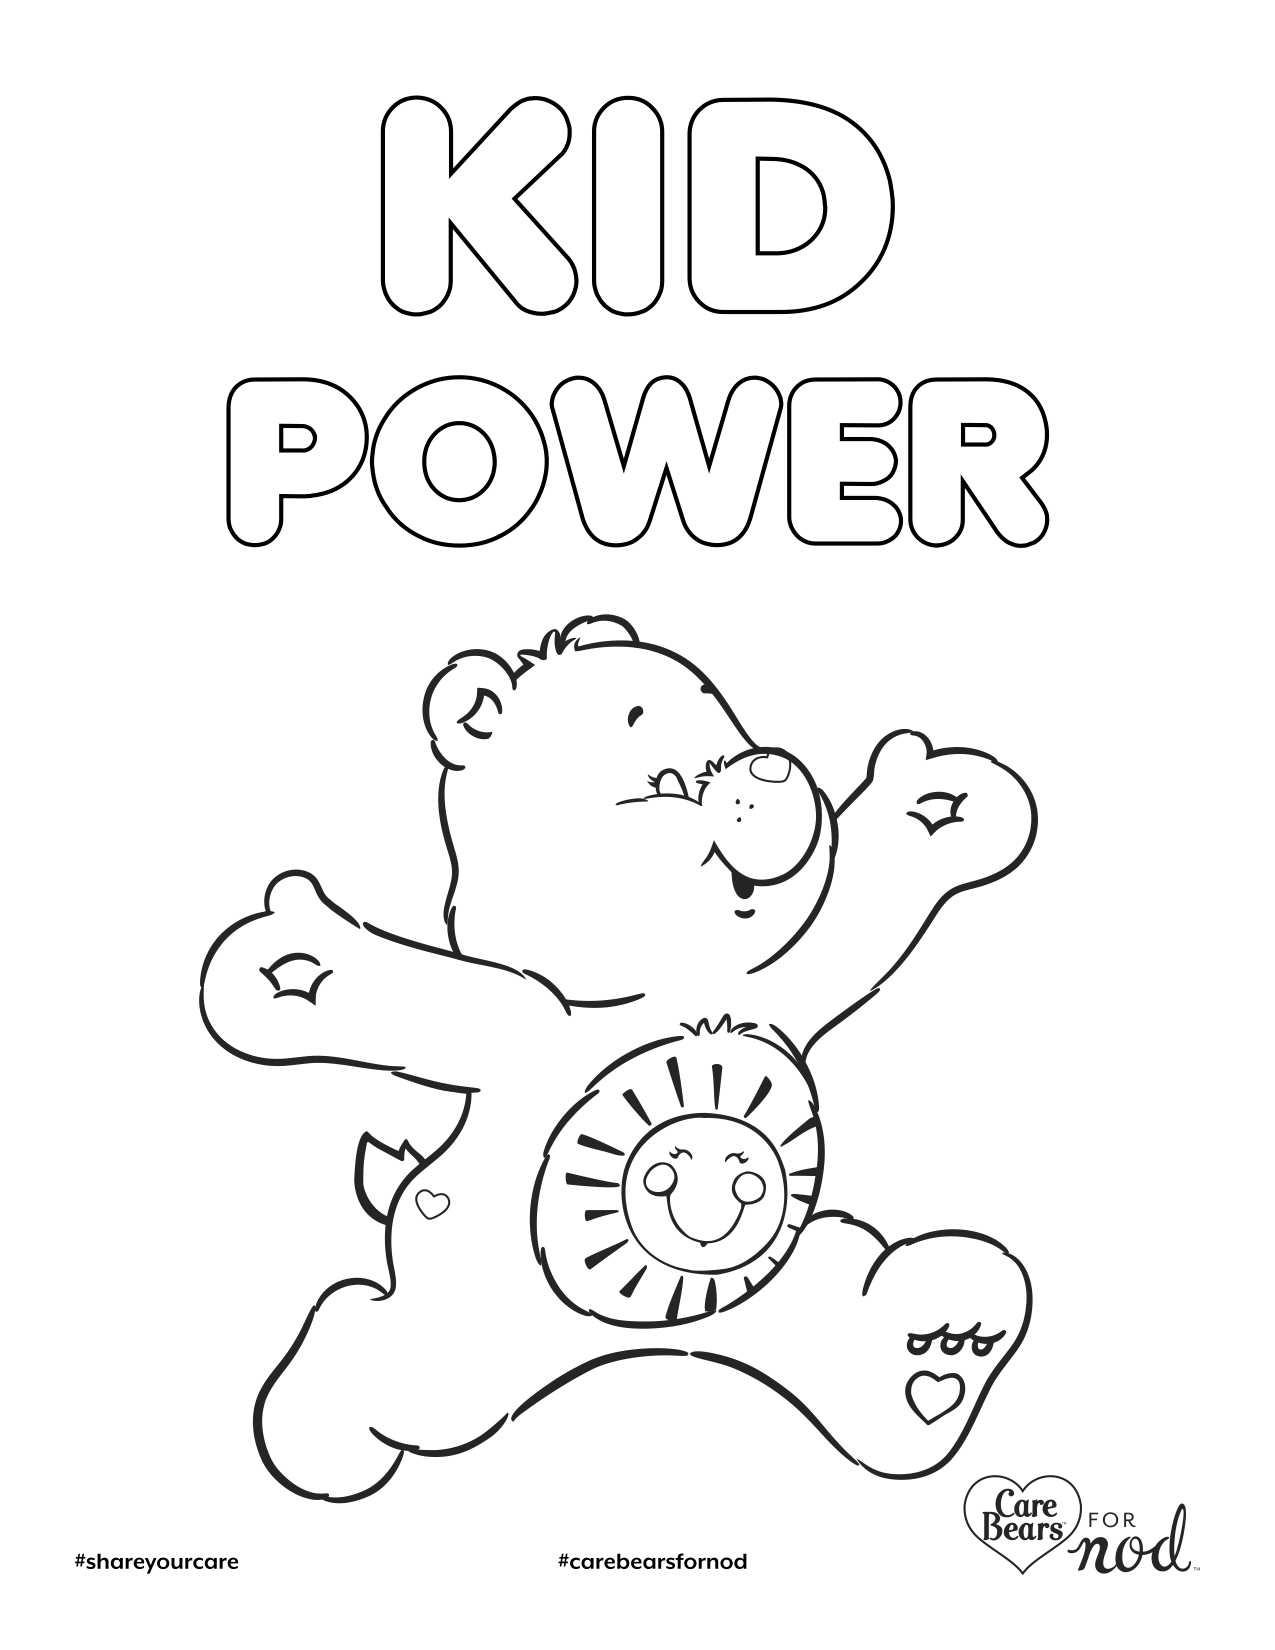
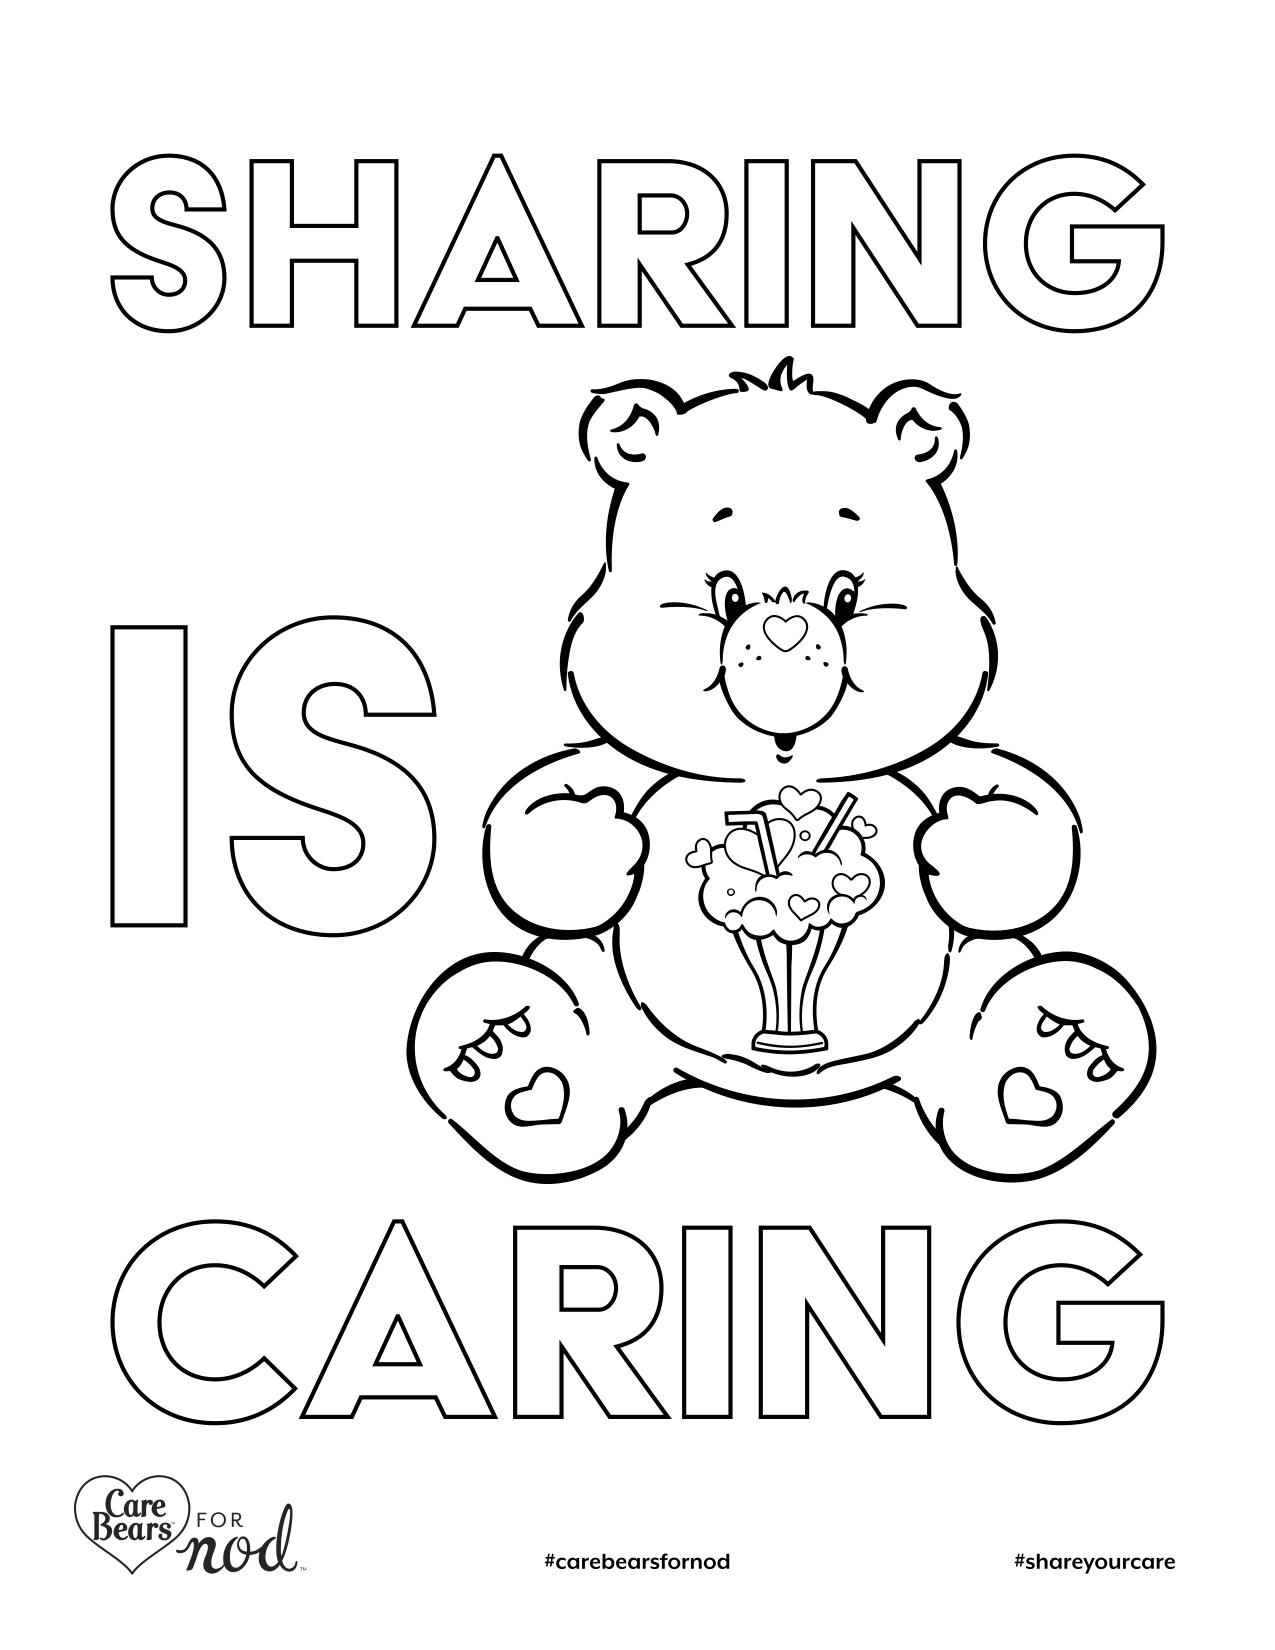
Printable Care Bears Coloring Pages

Share Your Care and join us on September 9th in our stores for concerts, face painting, crafts, and more! We will also be partnering with Changing the Face of Beauty, a charitable organization whose mission is to encourage the integration of individuals with disabilities into general advertising and the media, to celebrate the holiday.

Not near a store? Print off one of our Care Bears posters for your kiddo to color and share a picture of your little one with the finished product on Instagram (use hashtags #landofnod #ShareYourCare and #CareBearsforNod) or our Facebook page to celebrate this special day. We may just feature your child’s masterpiece!

Printable Care Bears Coloring Pages

Printable Care Bears Coloring PagesPrintable Care Bears Coloring PagesPrintable Care Bears Coloring Pages


Post by Lauren, Marketing Events Manager at The Land of Nod. When Lauren isn’t planning ridiculously awesome #nodevents, she spends her time putting up with the crazy antics of her English Bulldog, Lola. She also loves searching for treasures in vintage stores and summer antique markets. Due to her previous adventure living in Canada, she has a strong obsession to Hudson Bay stripes, as well as the fine cuisine of poutine (Don’t make her choose between the two…that’s like choosing between Ryan Gosling and Jason Bateman for her!). 

Eid ah Adha Ram Cupcakes

August 30, 2017

Eid al Adha is the second holiday on the Muslim calendar and the most important one! (There are only two holidays per year on the Muslim calendar; the first holiday was Eid al Fitr, the Festival of Breaking Fast).

Eid al Adha translates to “Festival of Sacrifice” because the holiday commemorates the story of Abraham’s ram sacrifice, a story that may be familiar to those of the Jewish and Christian faiths as well. Eid al Adha also marks the culmination of Hajj, an annual pilgrimage that takes place near Mecca.

For me, holidays are always a time to get together with family and as an aunt to three kiddos (ages 4, 9 and 11) I like to make use of these occasions to create special holiday memories for the kids.

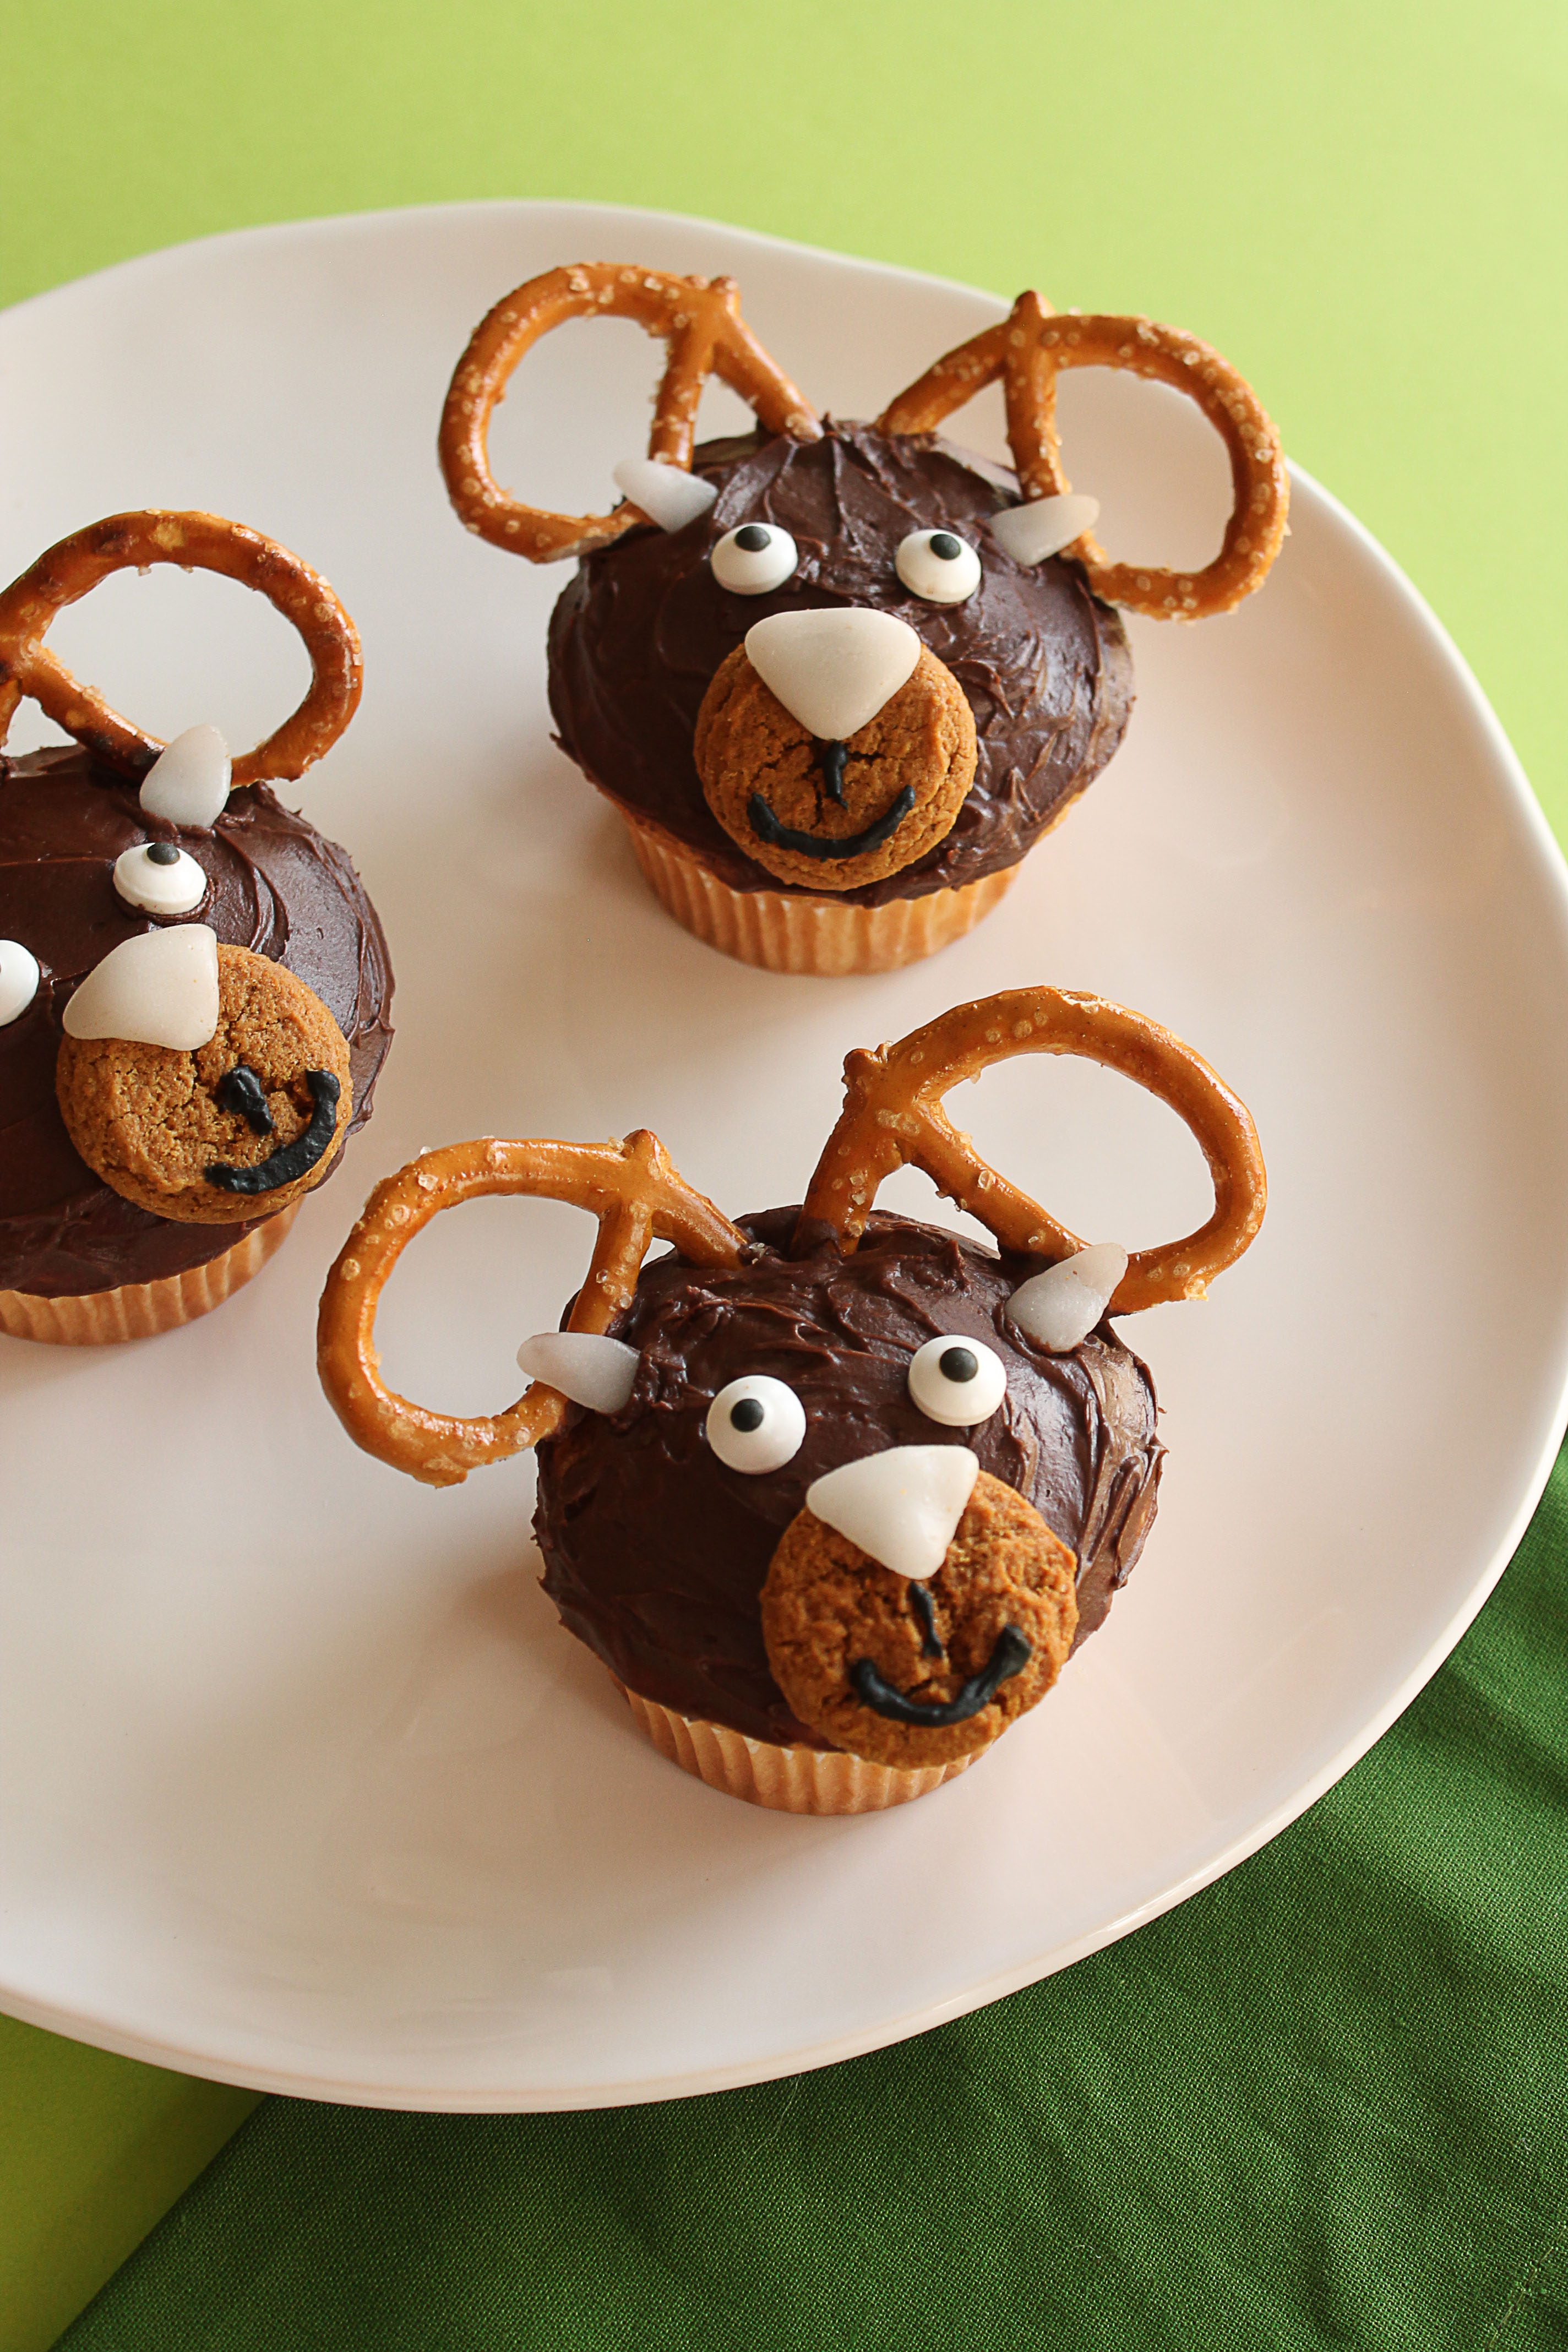
This year for Eid, I’ll be setting up a cupcake decorating station for the kids. Inspired by reindeer cupcakes for Christmas, I’ve come up with ram cupcakes for the kids to make on Eid al Adha! These are easy enough for the kids to decorate themselves and it’s the kind of activity that all the kids – from the youngest to the oldest – can enjoy!

Eid ah Adha Ram Cupcakes

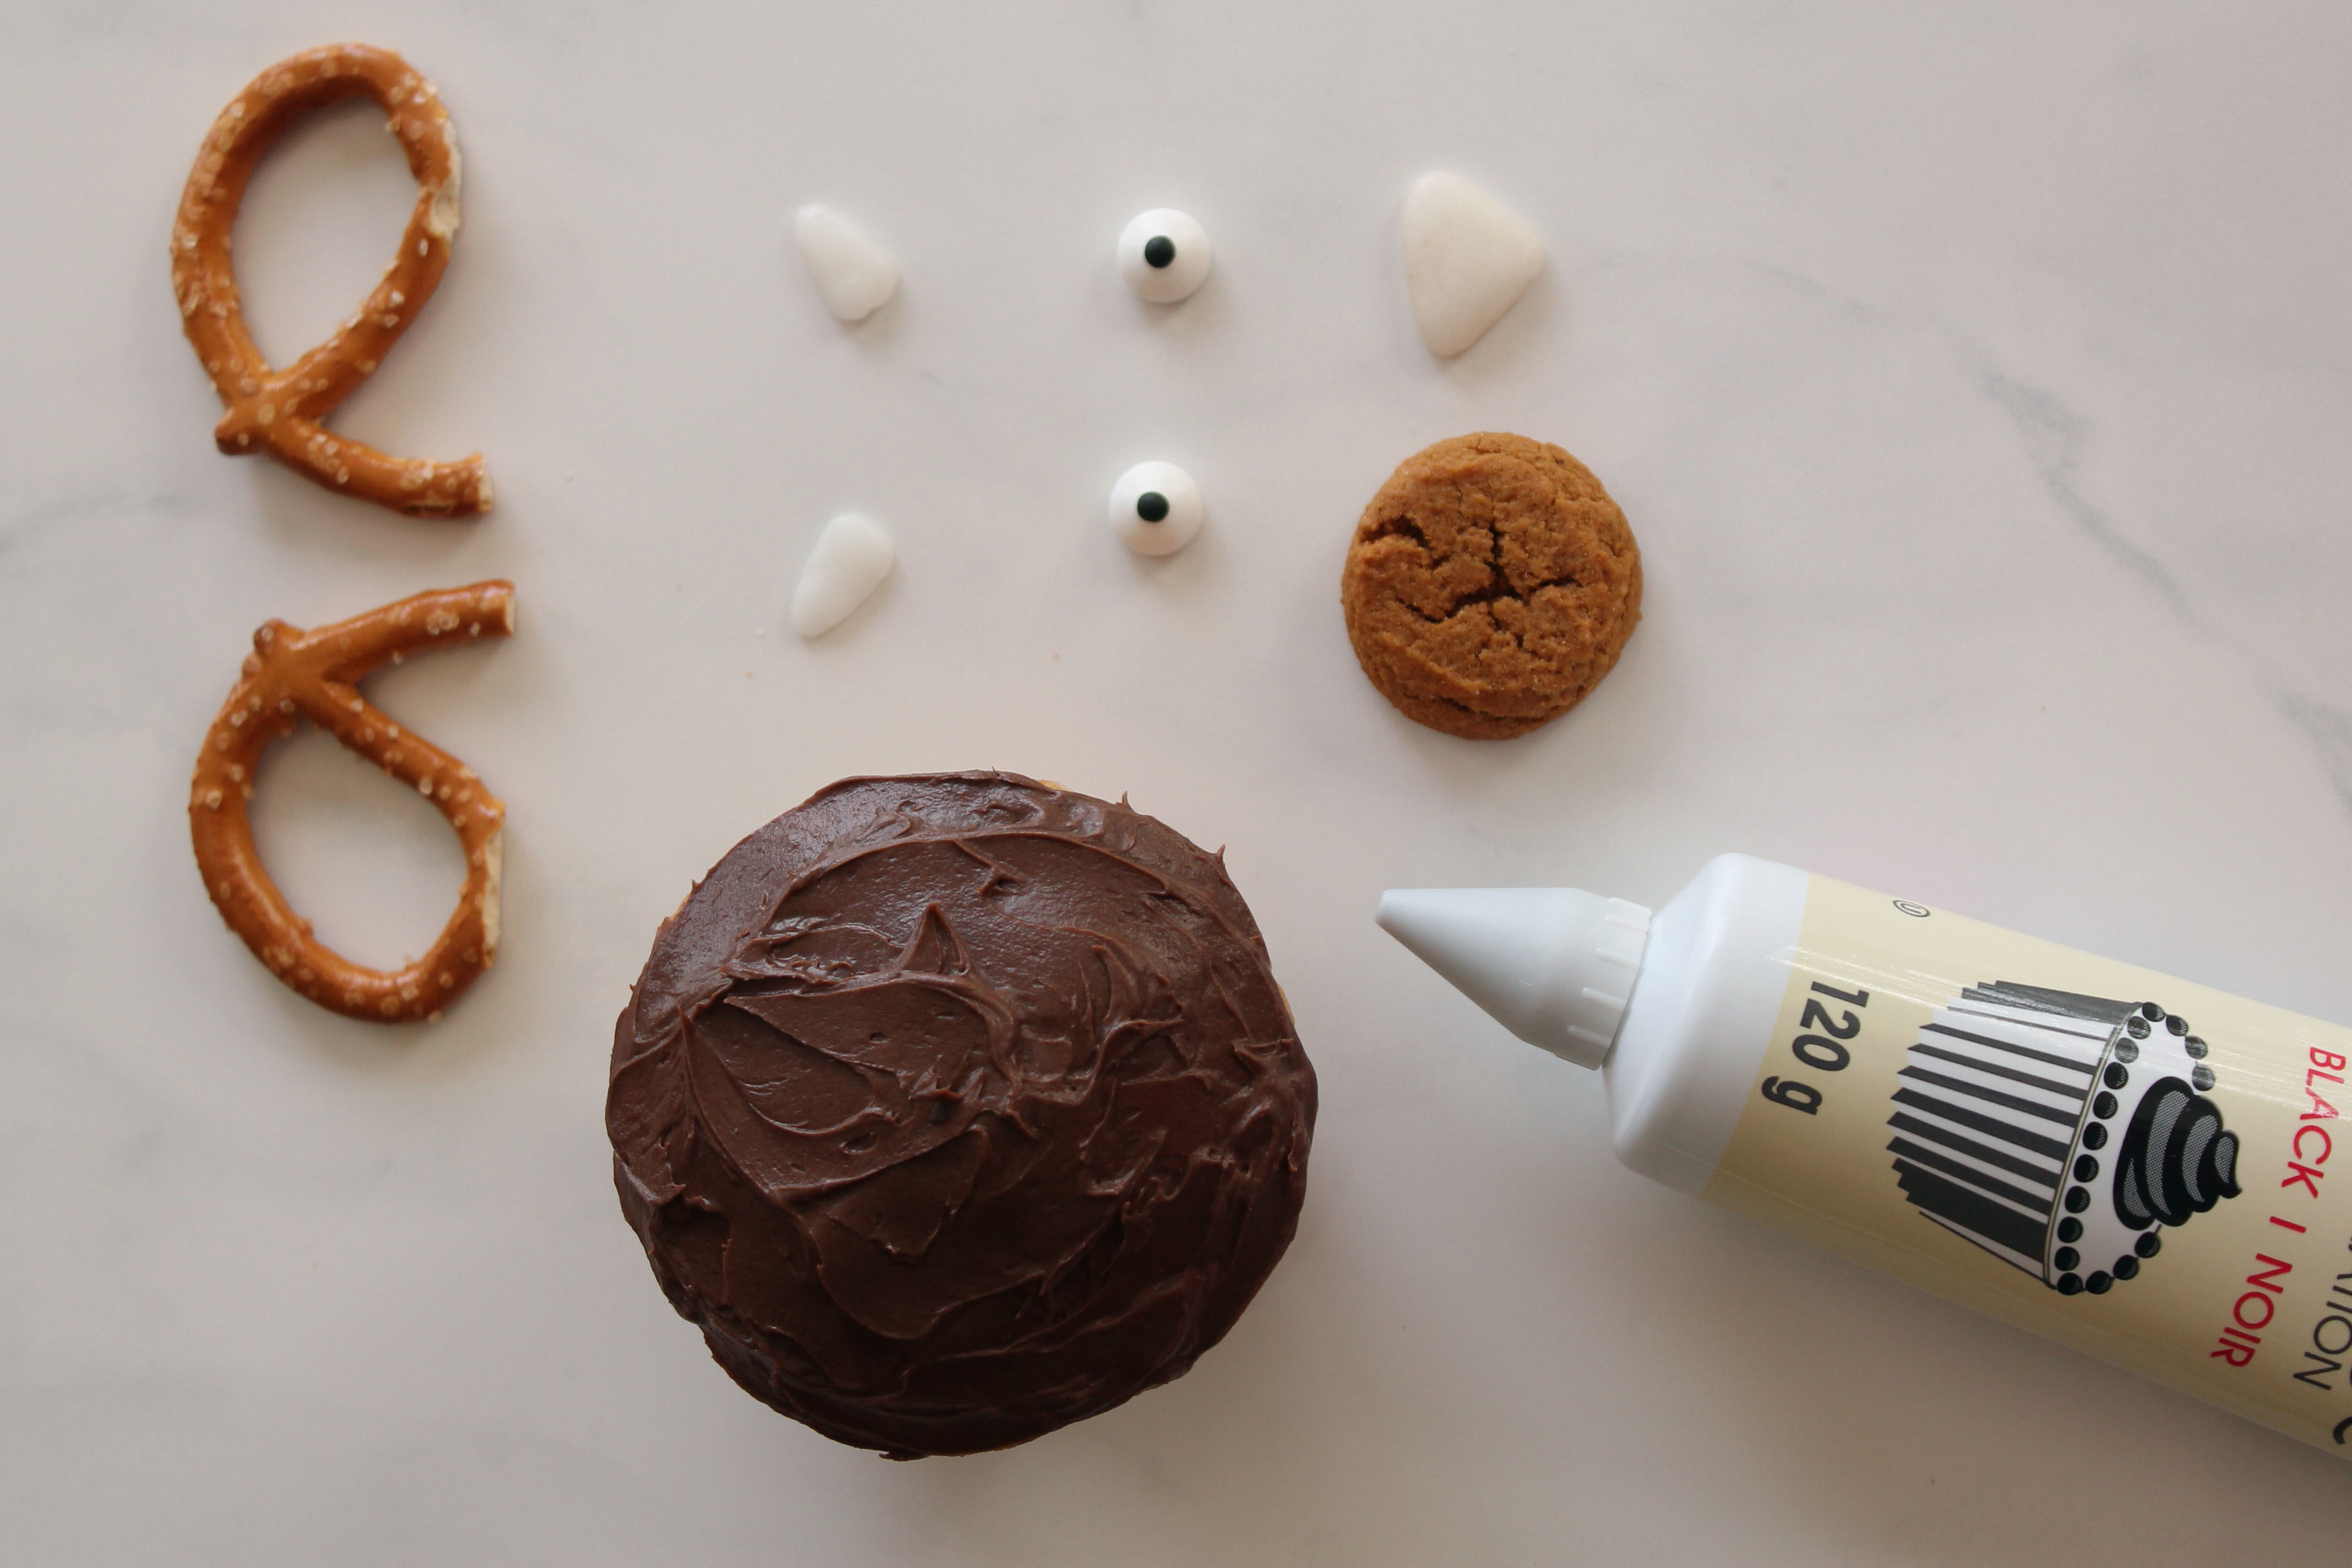
Supplies & Ingredients

  • Cupcakes
  • Chocolate frosting
  • Pretzels
  • Airheads candy, “white mystery” flavor
  • Mini ginger snap cookies
  • Candy eyes
  • Black decorator’s icing

Steps & Directions

1. Use your favorite recipe or box mix to prepare cupcakes. Let cool, and then frost the cupcakes with chocolate icing.

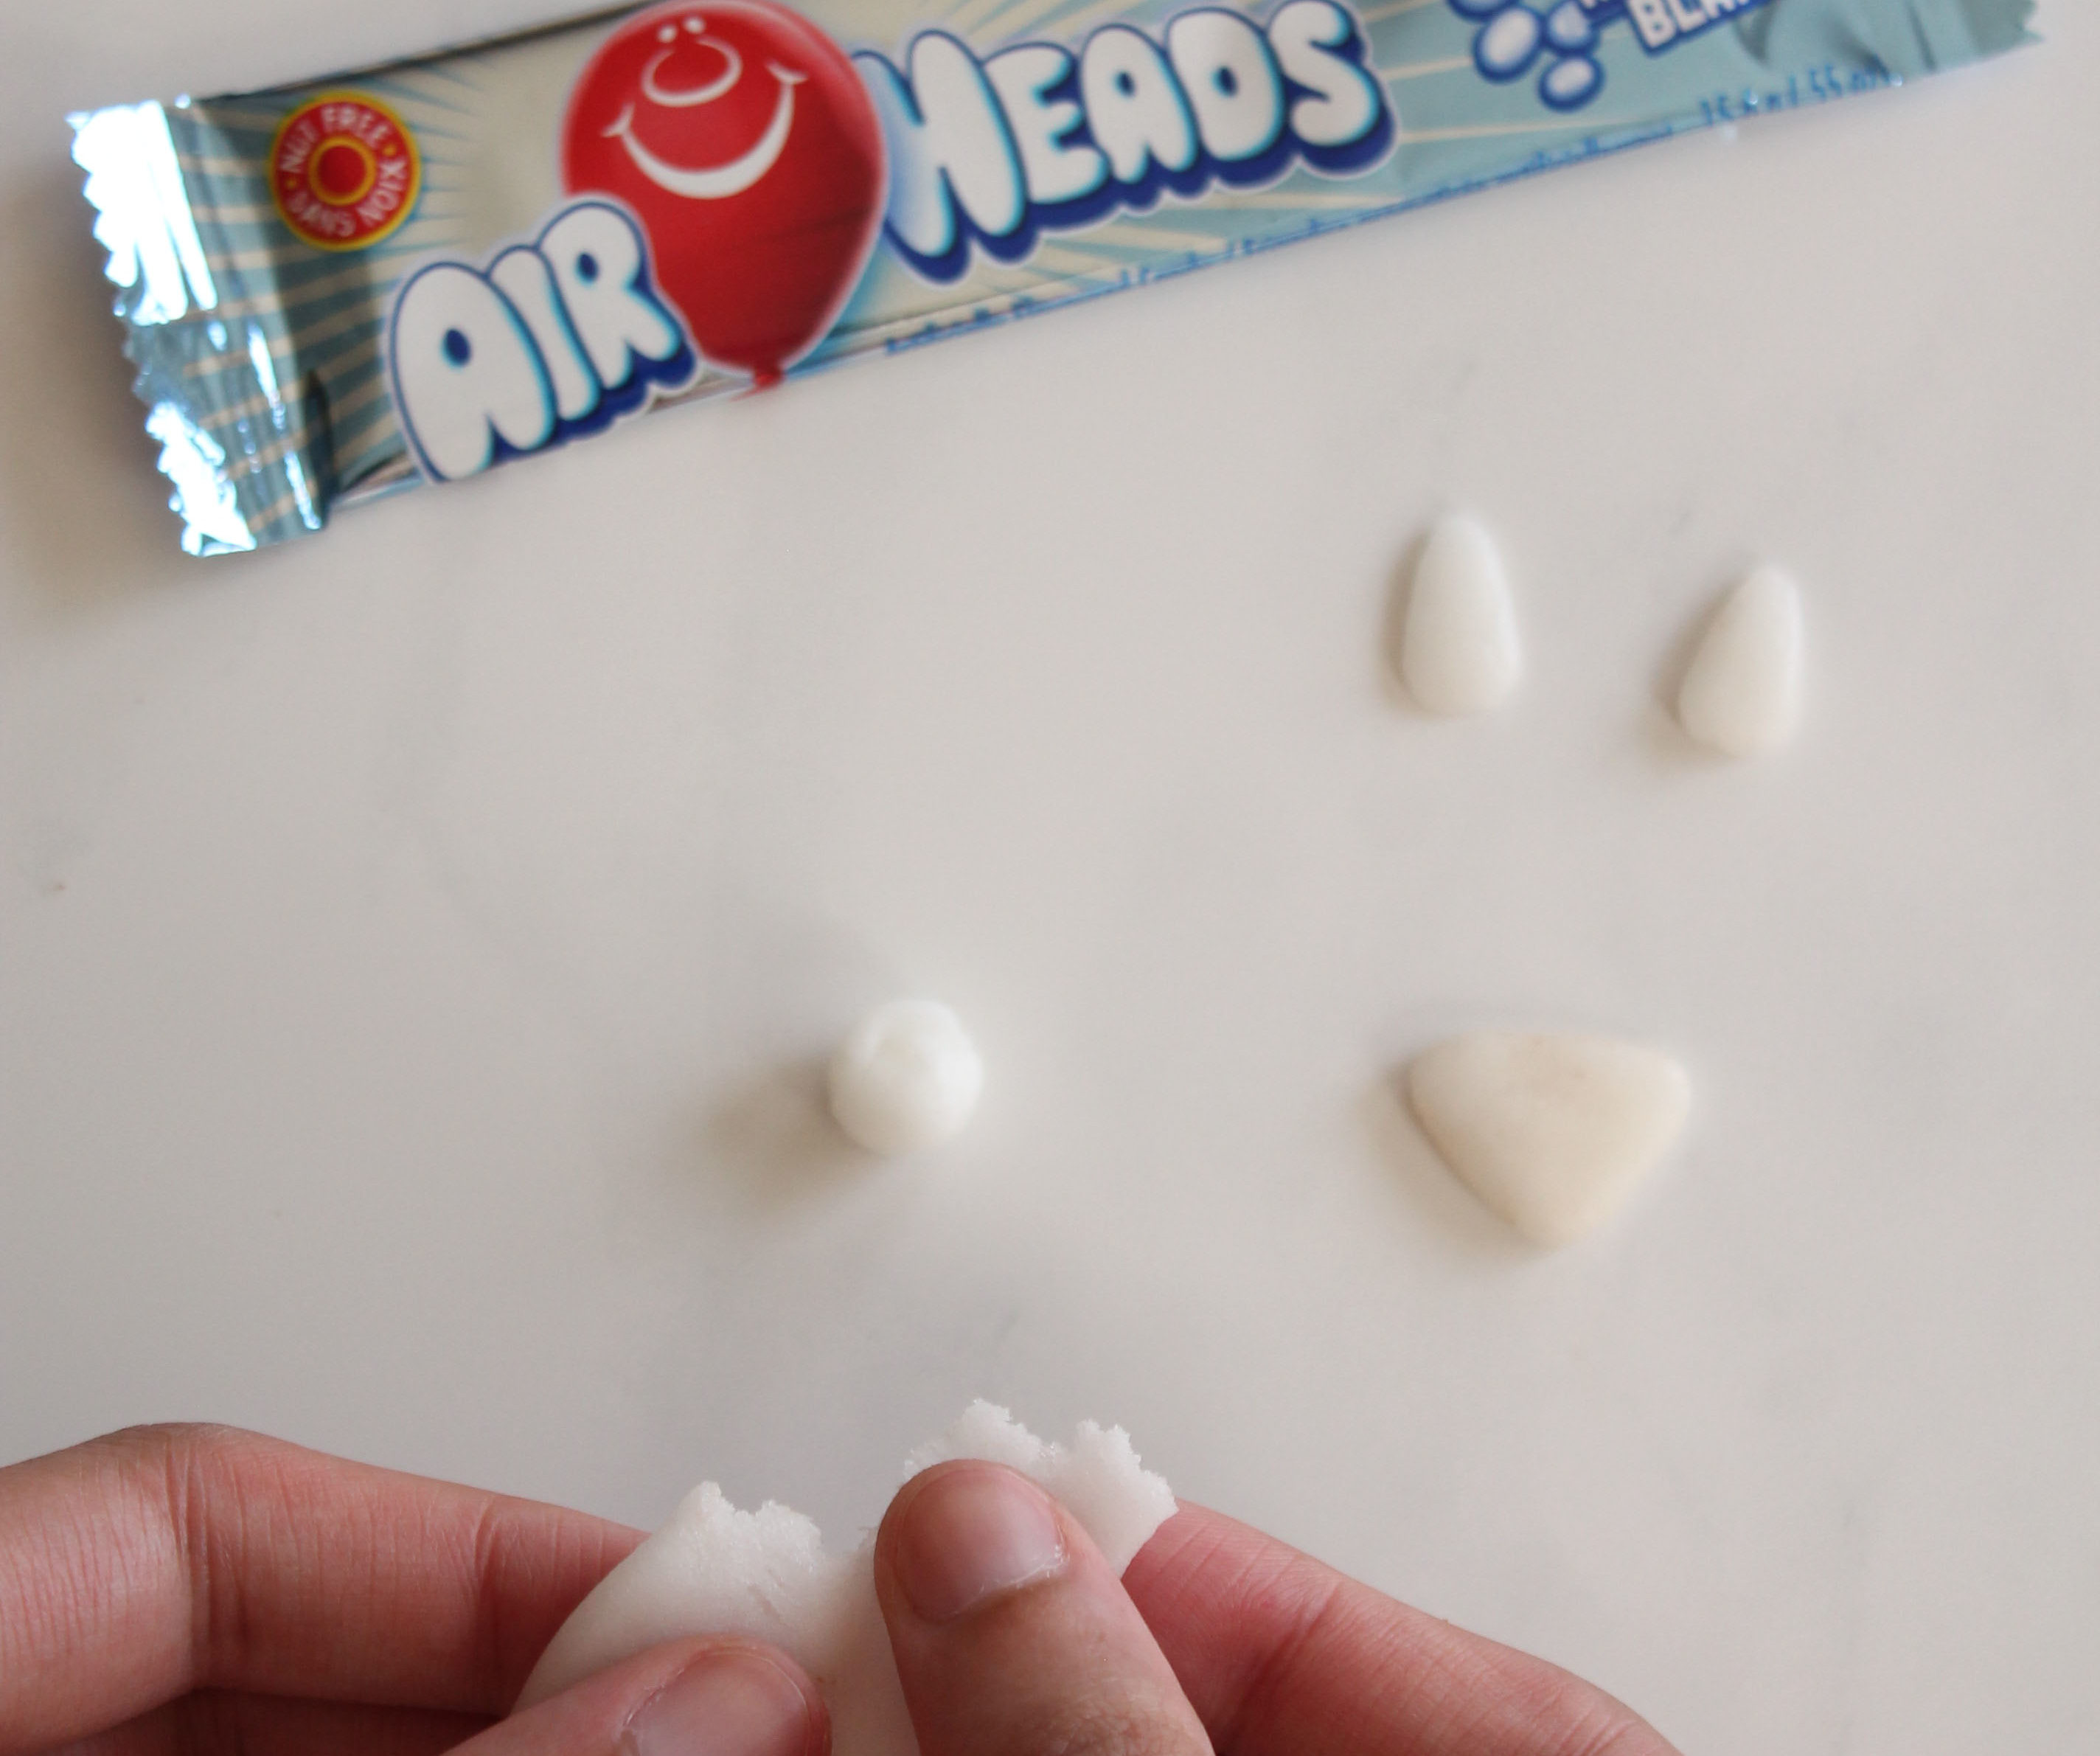
2. Break off a small piece of the Airheads’ candy and roll it into a ball. Push down with your fingers to make the ball into a petal shape. This will be the ram’s ear. Repeat to make a second ear.

3. Break off a slightly large piece of candy for the nose and again roll it into a ball; push down with your fingers and shape the candy into a triangle shape with rounded corners.

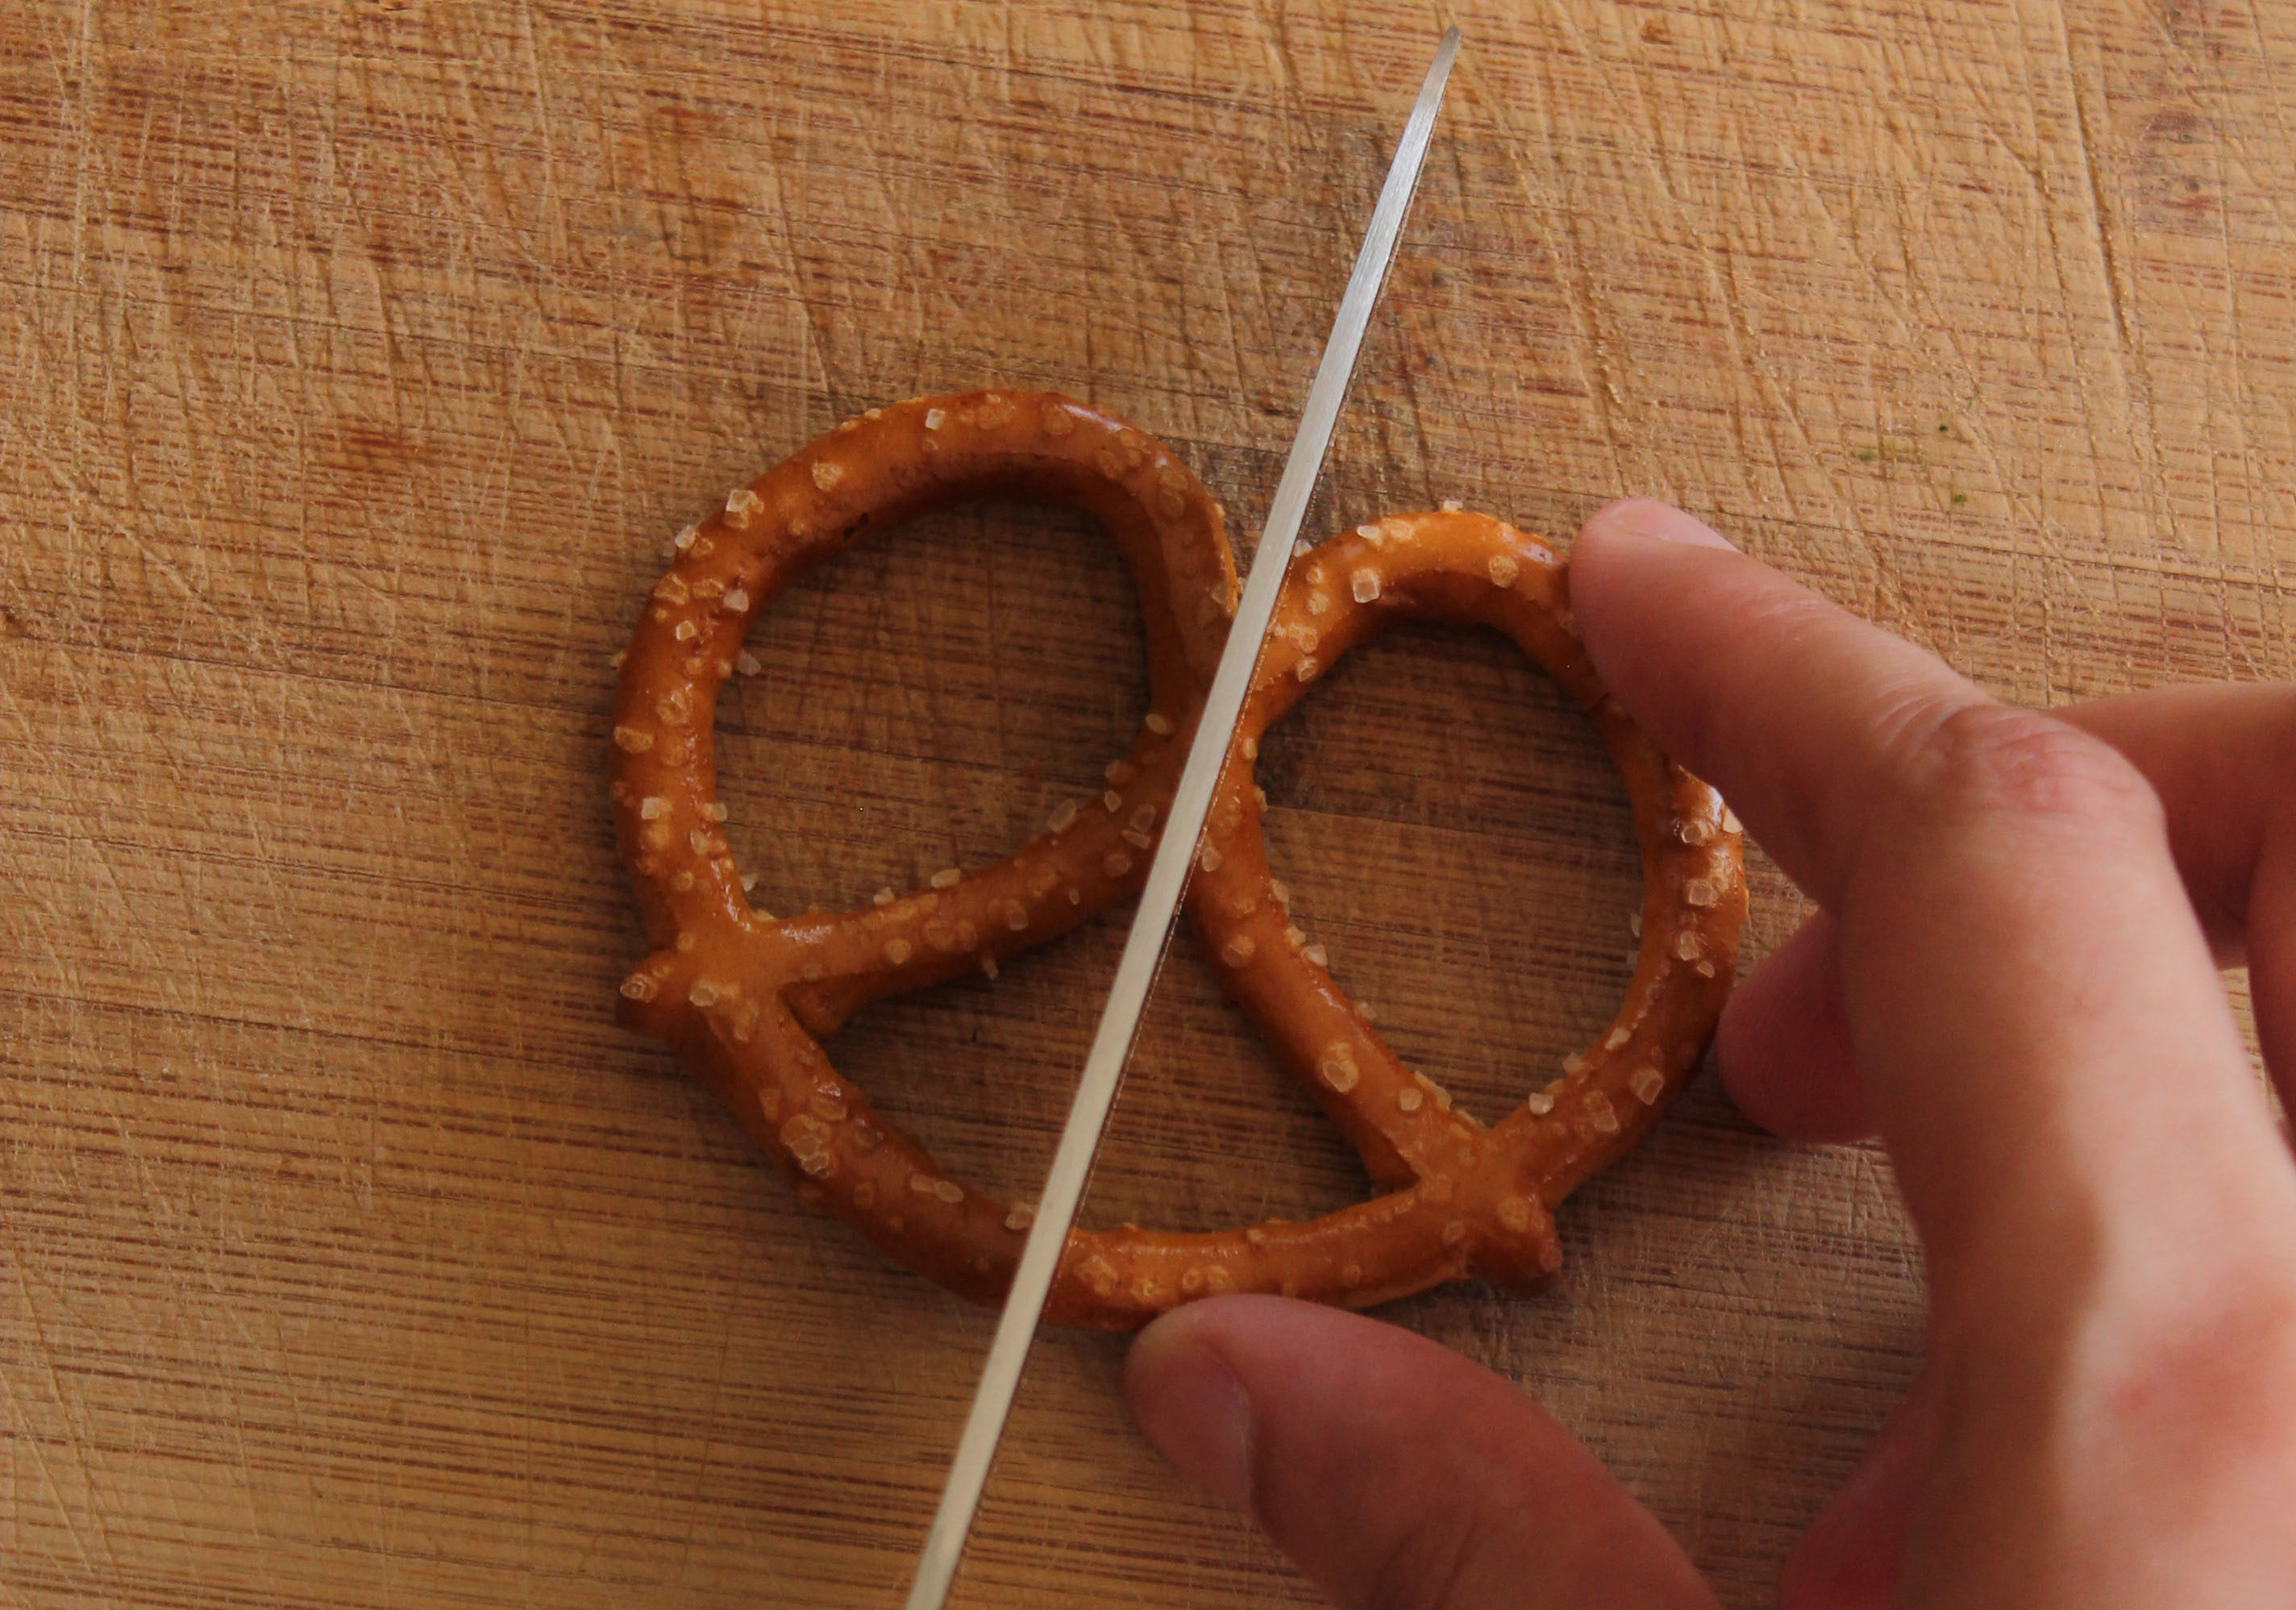
4. To make the ram’s horns, you’ll need to cut a pretzel into two, directly in the middle. This is harder than it looks! One way to go about doing this is to put the pretzel on a chopping block and use a serrated knife like a saw. Saw away at the pretzel, applying extremely little pressure with your hands till you get two clean halves. (If you’d like to save time, just use double the amount of pretzels needed, and chop the pretzels regularly. You’ll notice one side will likely crumble and the other side will remain intact. Use the intact side and eat the crumbles.)

Now you’re ready to assemble the cupcakes!

5. Stick the nose you made with Airheads onto the mini ginger snap cookie and use the black decorator’s icing (here I’ve attached a #3 tip onto the tube) to draw the mouth.6. Next add the ram’s horns by gently inserting the end of the pretzel into the cupcake.

6. Next add the ram’s horns by gently inserting the end of the pretzel into the cupcake.

7. Finally, add the ears near the horns and finish by adding the candy eyes.

Voila – your ram cupcakes are ready to eat!

Have a wonderful holiday! Eid Mubarak!

POST BY MANAL AMAN

Manal is the founder of Hello Holy Days! where she shares DIY ideas for Ramadan, Eid, and Hajj. She loves to entertain and you can bet you’ll always have a great time at her parties with fun games and over-the-top details. She lives in Toronto, Canada where she enjoys nature walks and French crepes.


Vegan Taco Pinwheel Recipe

August 29, 2017

I love lunch options that are easy and can be prepared the night before. So, once school starts for us, this Vegan Taco Pinwheel recipe is going to be a welcomed addition to the lunchbox rotation! They’re healthy, easy to modify, and are the perfect combination of flavor and F-U-N! If you are looking for a quick, vegan lunch option, this recipe is for you! Easy to make, kid-approved and perfect for packing up in lunchboxes or serving up for a quick, weeknight dinner!

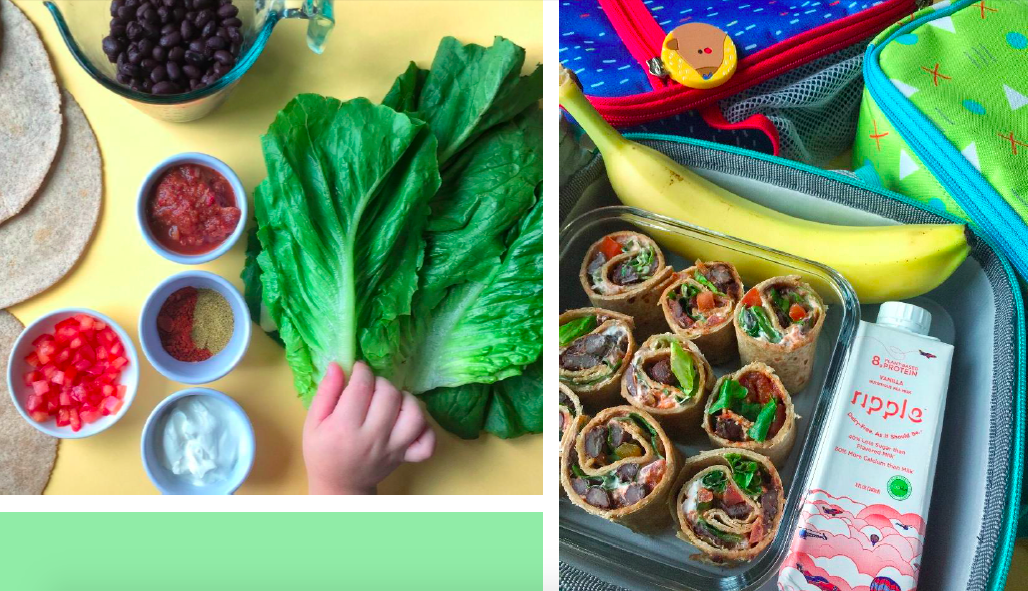
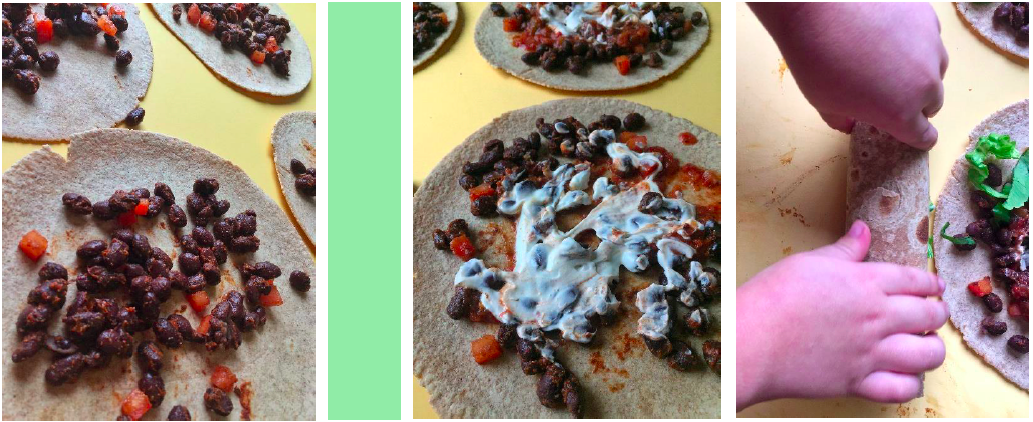
Another great thing about these pinwheels: they are a great meal to let your little one(s) get hands on with. Mixing, pouring, and wrapping – They are the perfect get-your-kids-in-the-kitchen dish. They’ll love being hands on, and you’ll love getting them more excited about healthy eating! See below for complete directions, including a recipe for a delicious sour cream alternative! In minutes, you can go from this (left) to that (right)!

Vegan Taco Pinwheel Recipe

INGREDIENTS: (for 3 full-size wraps, or appox. 12 pinwheels)

  • 3-4 wheat tortillas (depending on size)
  • 1 cup black beans, rinsed and drained
  • 1 tsp chili powder
  • 1/2 tsp cumin
  • 1/3 cup mild salsa
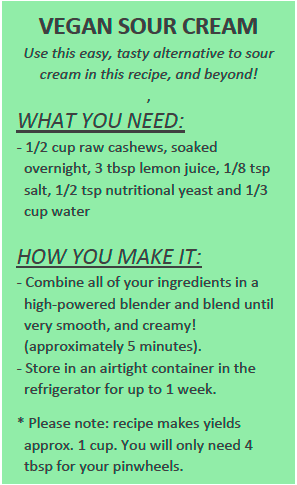
  • 4 tbsp sour cream alternative (recipe to the right)
  • 5 romaine leaves, sliced
  • 1/2 a small tomato, diced a small amount of cilantro, if desired (optional)

DIRECTIONS:

  1. Mix black beans and spices together in a small mixing bowl. Then add in your diced tomatoes and mix again to combine.
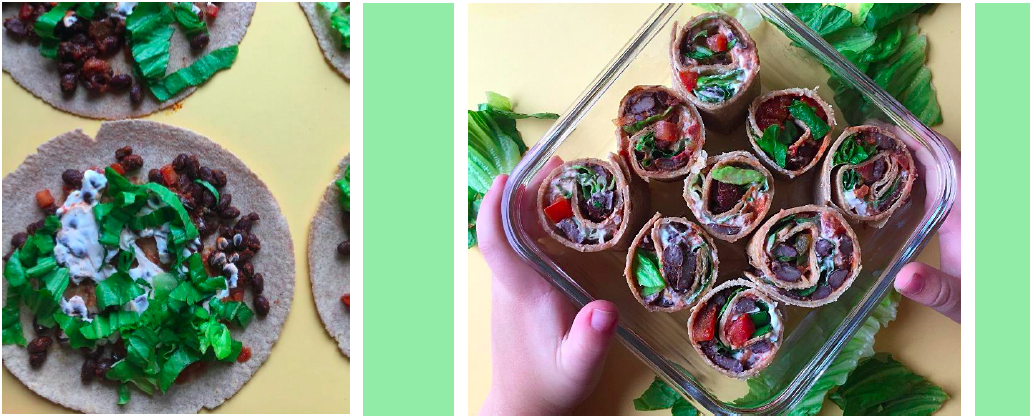
  2. Then, layer each wrap with black beans, then salsa, and then your sour cream alternative. Sprinkle with your romaine.
  3. Wrap tightly and then seal each with a little more sour cream alternative.
  4. Slice each wrap into 3-4 pinwheels and enjoy!

My oldest son (4 years old) was very hands on making these with me. He usually doesn’t like black beans, but he loved these pinwheels. He was just about as excited to eat them as he was to make them with me. Give your little ones the chance to help in the kitchen, and I bet you’ll be amazed at how much they are able to do!

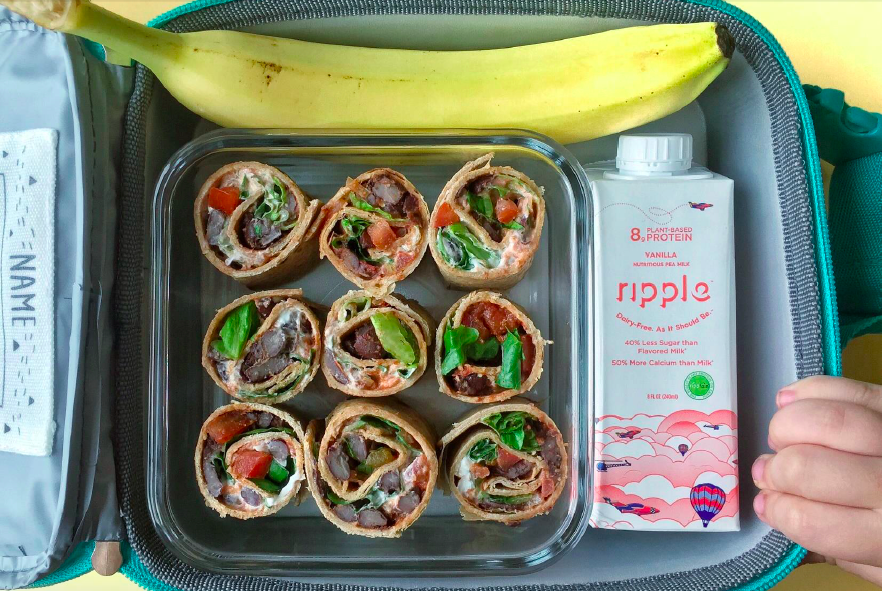
Pair these Vegan Taco Pinwheels with some fresh fruit, veggies and a vegan drink box, like Ripple Vanilla Milk. Flavorful, fun and easy! Whether you are vegan or not, or just want to start doing meatless Mondays, etc. add these pinwheels to your dinner meal plan or lunchbox rotation and you won’t be disappointed!


POST BY LUNCHES + LITTLES

Lunches + Littles focuses on quick, healthy and fun meal options for little ones while sharing practical tips & tricks on how to make meals enjoyable, all the while keeping things simple. A lover of colorful plates, and an advocate for getting kids in the kitchen, Lunches + Littles is also a great resource for parents of picky eaters, parents looking for healthy family and toddler recipes and those mamas (dads too!) who are short on time. A mantra of sorts: Making meals fun doesn’t have to be hard! With 3 little ones (3 and under) it can’t be! Follow @lunchesandlittles for all of the above… And more!

Search backpacks and lunch bags from the Land of Nod here:
https://landofnod.com/kids-backpacks-and-lunch-boxes/toys-and-gifts/1

Product Spotlight: Panda Bedding

August 25, 2017

If you’re looking for something sweet and just a little bit funky for your little one’s nursery, the Panda bedding may be your answer. The black and white print is a nice neutral option that can be paired with just about anything.

For the room below, the World Banner compliments the black and white tones and introduces shades of green, red and yellow. To complete the look, use pieces with a modern, eclectic feel like the Fringe rug and Danish Modern tall bookcase.

Post by Danielle, Home Stylist from The Land of Nod’s Design Services Team. Our Design Services team offers free one-on-one design advice, mood boards and space planning. You have a room to decorate? They’d love to hear from you.

VISIT THE LAND OF NOD’S DESIGN SERVICES PAGE
TO GET STARTED TODAY ON YOUR FREE DESIGN.

Cloudy Day French Toast Recipe

August 23, 2017

Nothing brightens up a cloudy day quite like challah french toast! We’re adding this to our breakfast options as we kick off the school year. What are you planning to make for your kiddos?

Cloudy Day French Toast Recipe

Cloudy Day French Toast & Blueberry Sauce Recipe

Yield: 4 servings

Ingredients:

French Toast:

  • 3 large eggs
  • 1 cup milk
  • A pinch of kosher salt
  • 1 loaf challah bread, cut crosswise into 1/2-inch-thick slices
  • 4 tablespoons butter, divided

Blueberry Sauce:

  • 1 cup blueberries
  • 1 cup water
  • 1/2 cup granulated sugar
  • 1 tablespoon lemon juice

Directions:

French Toast:

  1. Whisk together eggs, milk, and salt until blended.
  2. Pour into a large baking dish and soak bread slices for 2-3 minutes on each side.
  3. Heat 2 tablespoons butter in a heavy skillet or griddle over medium-high heat until bubbly.
  4. Transfer 2 slices to skillet and cook until golden brown on each side.
  5. Cook remaining bread in batches, adding more butter as needed.

Sauce:

  1. Whisk together blueberries, water, and sugar in a small saucepan over low heat until sugar is dissolved.
  2. Increase heat slightly until it simmers and cook until thickened, about ten minutes.
  3. Remove from heat and add lemon juice; serve immediately.

Enjoy!

Post by Kelsey Nixon

Kelsey is an Emmy-nominated TV personality, author, wife, mom, and cooking show host. Her show, Kelsey’s Essentials on Cooking Channel, centers around a tip, technique or tool that shows the home cook how to navigate the kitchen. You can also catch Kelsey dishing about her experiences as a new mom on Family Food and First Time Mom. Follow her on FacebookTwitterPinterest and Instagram.

Train Bedroom Inspiration

August 22, 2017

One of the questions we always ask a customer before starting their room design is if their child has any interests that they’d like incorporated into the space. And for little boys’ rooms, 99.9% of the time, “trains” is listed.

My goal is always to highlight the child’s interests without making it a themed room. After all, most children have a variety of interests and hobbies that will change over time and from a practicality standpoint, it’ll make things easier on you to swap out a few décor pieces here and there versus re-doing an entire room when they’re no longer into trains.

For this train bedroom inspiration, trains are the focal point with the All Aboard Train Bedding. I could’ve easily added a train rug but instead, I opted for more neutral pieces then added décor using colors from the bedding to showcase other interests.


Post by Danielle, Home Stylist from The Land of Nod’s Design Services Team. Our Design Services team offers free one-on-one design advice, mood boards and space planning. You have a room to decorate? They’d love to hear from you.

VISIT THE LAND OF NOD’S DESIGN SERVICES PAGE
TO GET STARTED TODAY ON YOUR FREE DESIGN.

Urban Prep Boys Bedroom

August 18, 2017

In an urban prep boys bedroom, the trend should explore the balance between sophisticated design styles and boyish curiosity. Here you’ll find Americana buffalo check and Boy Scout bravery paired with iconic arrows, bumblebees, and proudly antlered deer.

Urban Prep Boys Bedroom

Post by Stephanie, Home Stylist & Events Designer from The Land of Nod’s Design Services Team. Our Design Services team offers free one-on-one design advice, mood boards and space planning. You have a room to decorate? They’d love to hear from you.

VISIT THE LAND OF NOD’S DESIGN SERVICES PAGE
TO GET STARTED TODAY ON YOUR FREE DESIGN.

5 Tips for Getting Back into the Swing of School

August 17, 2017
5 Tips for Getting Back into the Swing of School

It’s those dreaded three words: Back to School. Where has summer gone?

My little ones are so excited for a new year, new class, new adventures, and learnings. As a child, don’t you remember the thrill of back to school shopping? Getting all new supplies – including the coveted fresh box of Crayola crayons!

New backpacks and lunch boxes were a must on our list this year. My children, Reese and Finn, chose to reflect their own individual styles so I let them pick out their new gear. Since getting them, they’ve had so much fun playing school in anticipation, including packing their own pretend lunches.

5 Tips for Getting Back into the Swing of School


Here are 5 few tips for helping your little ones get back into the swing of school.

1) Bedtime Routine

Slowly start putting your kids to bed on time. During the summer months, bedtime seems to go out the window. Now that it gets dark out earlier it’s a little easier to get back into your set bedtime routine.

2) Get Acquainted

If possible, prior to the first day of school, schedule a meet and great with their teachers, take them by their school or plan a play date with new classmates. It will help ease their first day of school.

3) Involve Them

Let them pick out their school supplies, a new back to school outfit and gear, (don’t forget haircuts & doctor appts) involving them will get them even more excited to start a new year.

4) Be Patient

Getting back into a routine and starting a new year is an adjustment for the whole family. Be cognizant that the first week or two will be an adjustment for everyone. There might be a few tears, but this too shall pass.

5) The Fun is Not Done

Even though school is in session the fun doesn’t have to end. Take advantage of the warm weather as long as you can by still getting outside after school and on weekends. Also, remind your kids the lifelong joys of learning.

5 Tips for Getting Back into the Swing of School

xo,
Doreen

Doreen Corrigan is the voice behind her lifestyle blog devoted to celebrating the “Art of Living.” Doreen believes even the ordinary can be made extraordinary and is passionate about Entertaining, Home Decor, and Fashion. Doreen and her husband Jim, are the proud parents of 4 year old twins. Follow her on FacebookTwitter and Instagram.

Fun & Healthy School Lunches

August 11, 2017

Whether you have a few more weeks of camp lunches left to pack, or are already getting back in the groove of packing lunches for a new school year, I have 3 practical tips for packing healthy lunches that I want to share with you. And, to go along with the tips, I have a super easy, colorful and fun lunch option that has won over both of my toddlers, one of which has been very picky as of late. So, read on for my tips and let’s make packed lunches fun and healthy… Easy too!


1. Make Fruits & Vegetables The Star

You, me, young and old – We all eat with our eyes. And, our little ones are not just included in that list, they are at the very top of it!

When packing up camp or school lunches, I try to incorporate as many different colors as I can. I know that if what I pack is going up against some of those pre-packaged options that fill up a lot of kid’s lunch bags, my babes are going to be disappointed every time if their lunch doesn’t look fun too. But the fun doesn’t have to be sugary fruit snacks or cookies. It can be veggie sticks, a mixed fruit bowl, homemade fruit leather, or other produce cut out into different shapes, flowers, etc. Sometimes it just all comes down to the presentation. (Of course, a treat here and there is perfectly fine too! It is all about finding a healthy balance!)

However you choose to do it, try and make the healthy, good stuff the star of the meal! Pack a couple different options, varying colors, textures, etc. Kids love color and fruits and veggies are naturally full of them!

2. Keep It Simple

If you follow me over on my IG feed, @lunchesandlittles you know that I can, at times, get complicated and over the top with meals and desserts, BUT when it comes to packing lunches, keeping things simple is key! The last thing you want to do is pack something brand new or overly complicated in a lunchbox for your little one. You don’t want them away from home, questioning what something is, or how to eat it, instead of eating it up. So simplify it!

When packing lunches for my babes, I keep it simple by incorporating foods they already know, while still offering a variety. And, I make sure that the various things I pack are easy enough for them to eat in the allotted amount of time. And when it comes to adding shapes, etc. I use cookie cutters, or wave shaped cutters, to add fun without spending too much time on the packing process myself and/or getting things too overly involved for the littles.

3. Think Outside The Box

When someone says lunch, especially school lunch, what do you think of? For most, it’s hard to imagine a packed lunch without two pieces of bread making up some kind of a sandwich. Right?

While it isn’t really intentional, I almost never pack (or serve up at home for that matter) sandwiches. I’m not saying that there is anything wrong with traditional sandwiches, but I do like to pack and offer different things. So, for my last tip, I am suggesting that you think outside of the box a bit. Packed lunches don’t have to include sandwiches and other traditional lunch options.

Below I am going to walk you through an easy, fun & healthy school lunch that includes fresh fruit and veggies, mini breadless “sandwiches” and an unconventional treat!

Cucumber “Sandwiches” Recipe

Ingredients & Utensils:

  • 1 Large Cucumber
  • Sliced Meat (Turkey, Chicken, Ham, etc)
  • Cheese Slices
  • Vegetable Peeler
  • Mini Cookie Cutters

Directions:

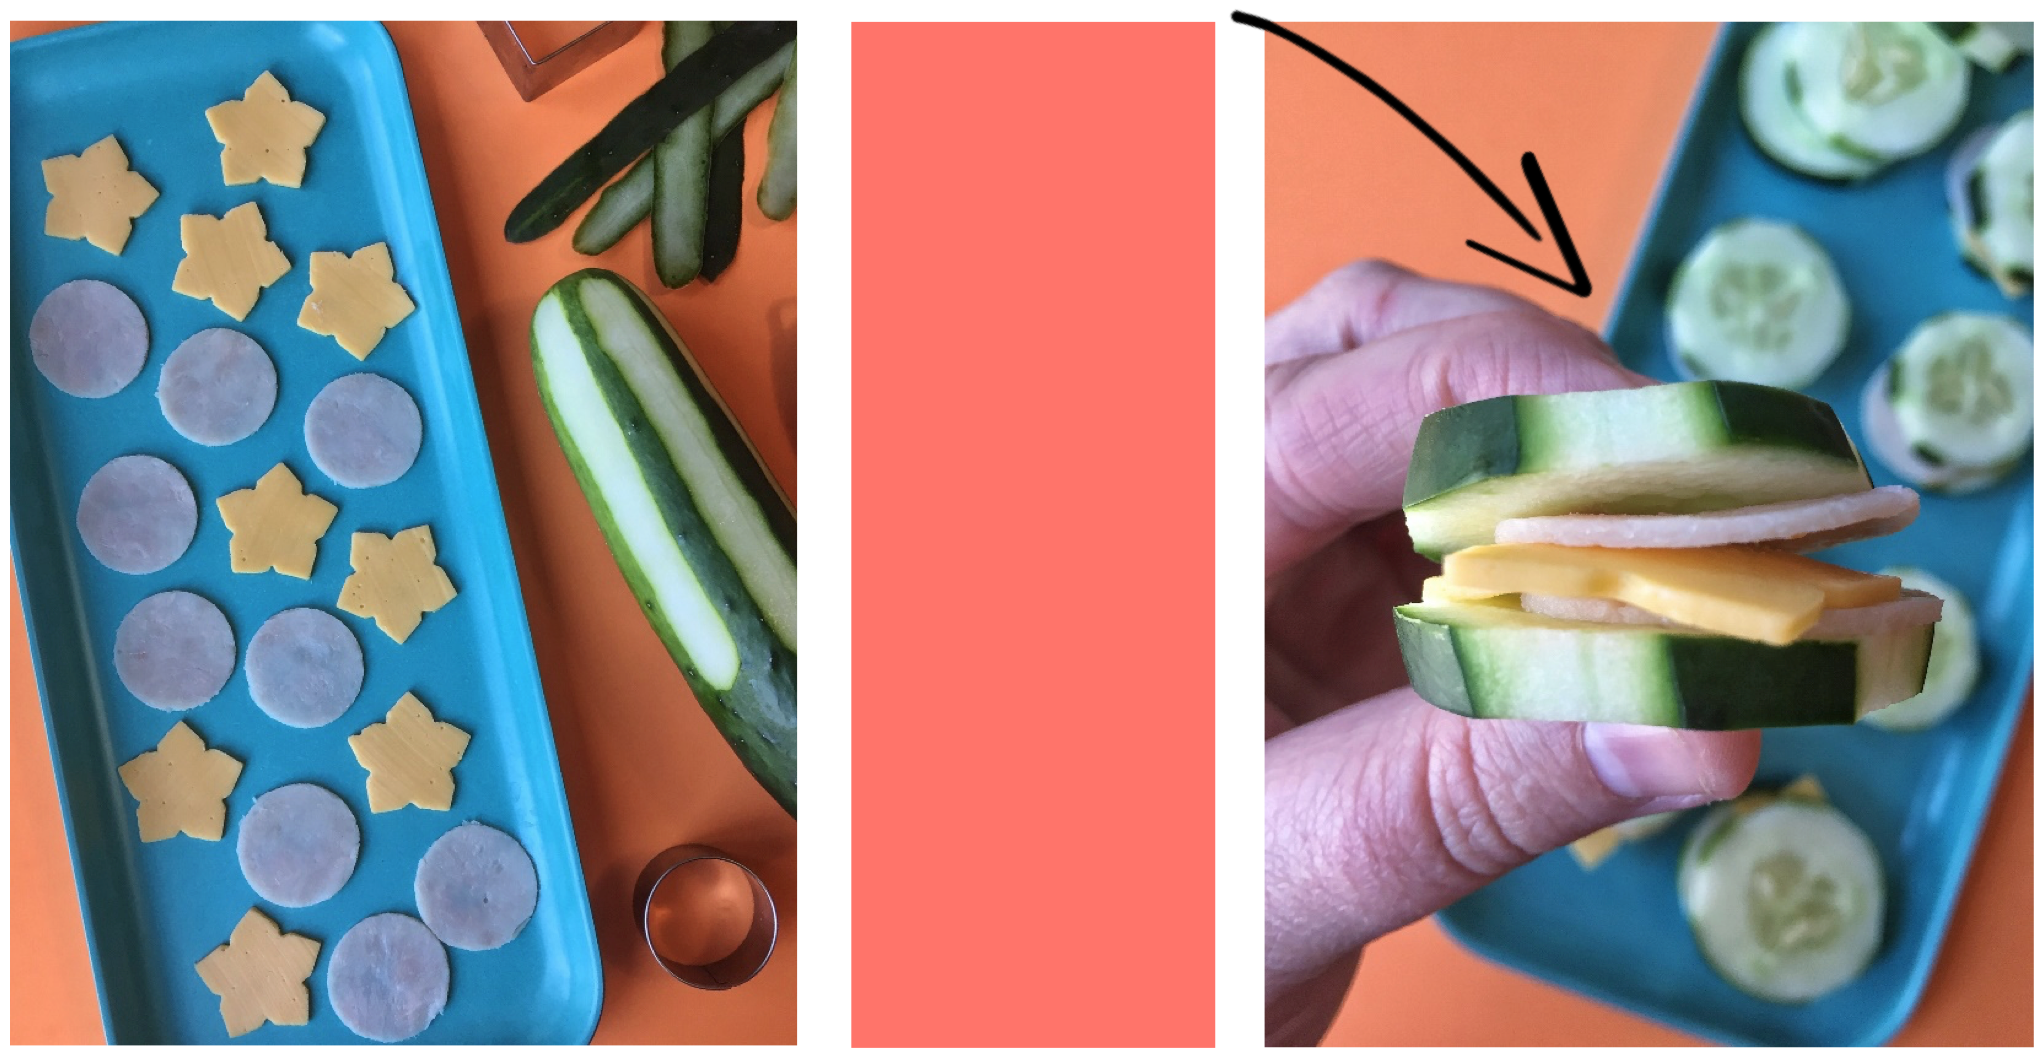
  1. First, find out if your little one(s) will eat the skin of a cucumber. If not, peel it! I peel “stripes” into my cucumbers as shown below. It’s so easy, but adds such a fun little touch!
  2. Then, using your cookie cutters, cut out your meat and cheese shapes. I used a mini circle cutter for my turkey slices and a little star flower for the cheese.
  3. Return to the cucumber and cut into small slices to use as your bread alternative.
  4. Stack/assemble sandwiches by putting 1-2 pieces of your cut out meat and cheese in between two cucumber slices and viola! A breadless finger food lunch option!

Just look at how fun these little “sandwiches” look!

Fun & Healthy School Lunches

To finish off your child’s lunch, add in some fresh produce of choice (remember, color!) and try an unconventional treat like a cereal; yeah, cereal! In a lunchbox, a small handful is a well-loved snack. One of our favorites is Annie’s Cocoa Bunnies. This oat, corn and rice cereal has real cocoa goodness packed into every piece and is completely free of artificial flavors, synthetic colors, preservatives, and high-fructose corn syrup. So much better than some of the other pre-packaged options out there and the little ones love it!


Remember, make fruits and veggies the star, keep it simple and try thinking outside the box! Spend less time stressing over lunches and more time having fun with your little ones. And, if you are looking for a good lunch bag, check out The Land of Nod for some wonderful choices, like the ones shown above!


POST BY LUNCHES + LITTLES

Lunches + Littles focuses on quick, healthy and fun meal options for little ones while sharing practical tips & tricks on how to make meals enjoyable, all the while keeping things simple. A lover of colorful plates, and an advocate for getting kids in the kitchen, Lunches + Littles is also a great resource for parents of picky eaters, parents looking for healthy family and toddler recipes and those mamas (dads too!) who are short on time. A mantra of sorts: Making meals fun doesn’t have to be hard! With 3 little ones (3 and under) it can’t be! Follow @lunchesandlittles for all of the above… And more!


Urban Prep Girls Bedroom

August 10, 2017

The look of the Urban Prep design trend juxtaposes high-end finishes and preppy design motifs with the irreverent grittiness of the city. Throughout the collection of bedding and décor, there’s a mix of nostalgic Americana, Old New York glam, and vintage botanicals.

The bold, yet delicately appliqued detailing in the Cherry Blossom bedding sets the tone for this Urban Prep girls bedroom. Supporting elements in this design include hints of vintage conservatory motifs and metallic finishes with a touch of cheetah print sass.

Happy Styling!

Post by Stephanie, Home Stylist & Events Designer from The Land of Nod’s Design Services Team. Our Design Services team offers free one-on-one design advice, mood boards and space planning. You have a room to decorate? They’d love to hear from you.

VISIT THE LAND OF NOD’S DESIGN SERVICES PAGE
TO GET STARTED TODAY ON YOUR FREE DESIGN.

Ready, Set, Wash: Bathroom Organization Ideas

August 9, 2017

As organizers, we love to help growing families (including our own!) get more organized. Part of that process is helping to create and streamline routines to make everyday tasks a little easier.

The daily routine in our house, and in many of our clients, almost always gets jammed up in the bathroom. Whether it’s getting the kids ready in the morning for school or at night time for bed, there’s a lot to get done (washing hands, brushing teeth, styling hair, oh my!) in an often cramped space.

The solution to the bathroom struggle?

Organization of course! Spending just a little time getting your bathroom organization into tip-top shape can make a world of difference to how your family operates. Check out our bathroom organization ideas and tricks so you can implement the same changes in your own home.

Happy Organizing!

Make it Neat

  • The first step to getting a handle on the bathroom is to clear out the cabinets. Pull everything out and start to categorize it by usage – for instance, first aid supplies in one spot, medicines in another and outdoor items like sunscreen and bug spray in a third. Then, find containers that fit in your space and can hold all of the items comfortably with a little room to grow. Here we used two Blue Small Top boxes to container our items under the sink.
  • Keeping extra supplies within arm’s reach is a life saver, particularly in your kids’ bathroom. If you don’t have a linen closet, consider using a small basket like the Pinstripe Shallow Floor Bin for face cloths, extra towels, etc.
  • If space allows, put a hamper in the bathroom so that there are no excuses when it comes to putting away dirty clothes and towels at the end of the day. We love the Merchant Dark Blue Hamper because it’s not only functional but is a great pop of color to brighten up your room.
  • Toys make bath time a lot more fun, but what’s not so fun is trying to keep them clean and dry (and mold free!). To make cleaning up simple, we like using a milk crate that easily drains water while still keeping the toys tidy.


Make a Station

  • Make your morning and evening easier by creating stations for each step of the regular routine. Gather supplies for brushing teeth, styling hair and first aid emergencies together in holders like the On Display Double Cup, the I Could’ve Bin bin or the Strapping Art Caddy. This will make accomplishing these tasks much easier as everything that is needed is right at your fingertips. We also like using the Strapping Art Caddy to house cleaning products – making wiping up any stray toothpaste a relative breeze.


Make it Theirs

  • Get your children involved in the organizing process so that they take some ownership of the space and help keep it tidy in the future. Include them when choosing the color of smaller items like bins, hooks and toys and then use them throughout the space so that they have visual cues on where to put things. This will help teach them responsibility and hopefully cause less confusion when you have ten minutes to get them in and out of the house in the morning.
  • Access is important in a bathroom so get an On the Double step stool that looks great and gets them a little closer to the sink.
  • Similar to the step stool, installing fun or decorative wall hooks at their level can help keep a small space tidy. If they can reach the hook, they will be more likely to put their towels and bathrobes away.


Make it Fun

  • Brighten up your bathroom to make the space and your routines a bit more cheerful. Try a pop of your child’s favorite color with a Fresh Start bath mat or coordinating towels. Our little ones love orange so these are a favorite in our house.
  • Dress up the room with a new shower curtain like this one that has so many fun colors in it.
  • Mix up bath time with a fun new toy that may help make the routine a bit more lively and encourage your child to have fun with it.
  • Make getting out of the bath fun too with a personalized bathrobe to run around in after the deed is done. With a child who loves water – whether in the bath or on the beach – we have found that having a few tricks up our sleeve to get them out is always helpful.

Michelle & Annie are co-founders of Henry & Higby, a professional organizing company in New York City, and contributors to WhatMomsLove.com, a website that provides moms with ideas and solutions to make their journey through modern day motherhood easier. They believe that life should be as simple as possible and that the process of getting organized can help.  

If you need help organizing your life and home, contact them at hello@henryandhigby.com

Electric Pop Boys Bedroom

August 8, 2017

Boldly go where no kid has gone before! This Electric Pop boy’s bedroom design comes fully charged in bold neon and retro graphics. It’s a high art meets school science fair sort of vibe. Boldly layering a “Kandinsky-esque” rug with super scholastic bedding is a step in the right trek for styling a bedroom that’s totally out of this world!

Post by Shawna, Home Stylist from The Land of Nod’s Design Services Team. Our Design Services team offers free one-on-one design advice, mood boards and space planning. You have a room to decorate? They’d love to hear from you.

VISIT THE LAND OF NOD’S DESIGN SERVICES PAGE
TO GET STARTED TODAY ON YOUR FREE DESIGN.


Urban Prep Nursery Inspiration

August 4, 2017

The look of the Urban Prep design trend juxtaposes high-end finishes and preppy design motifs with the irreverent grittiness of the city. Throughout the collection of bedding and décor, there’s a mix of nostalgic Americana, Old New York glam, and vintage botanicals.

This urban prep nursery inspiration takes the form of an All-American picnic with a rebellious edge. A modern twist on the classic cuckoo clock balances the unexpected cheekiness of the “Ragamuffin” pennant, while the denim rag rug and apple print crib bedding fit the sweet home vibe of a summer afternoon.

Urban Prep Nursery Inspiration


Post by Stephanie, Home Stylist & Events Designer from The Land of Nod’s Design Services Team. Our Design Services team offers free one-on-one design advice, mood boards and space planning. You have a room to decorate? They’d love to hear from you.

VISIT THE LAND OF NOD’S DESIGN SERVICES PAGE
TO GET STARTED TODAY ON YOUR FREE DESIGN.

Veggie and Egg Skillet Recipe

August 3, 2017

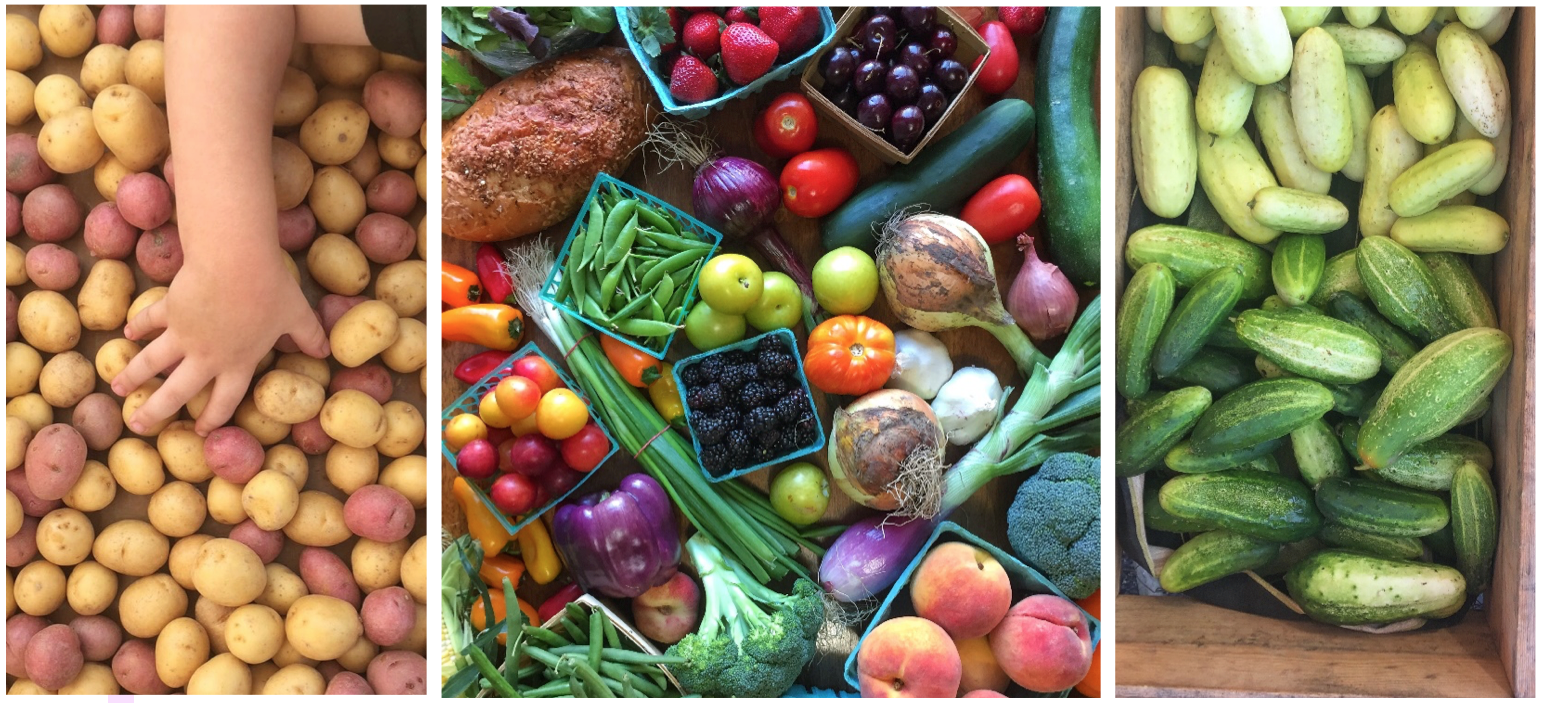
Farmer’s markets are back up and open where we live, and mostly everywhere right now. And we just love the market season for so many reasons! If you are a parent of a little one (especially a picky eater) getting out to a farmer’s market with your little(s) could be a big help in introducing them to new foods, teaching them about where foods come from and once you are back home, getting them to try out some of the new finds you picked up!

Veggie and Egg Skillet Recipe

We make it a habit each weekend to visit at least one farmer’s market, though lately, we have been going to two or three. Our entire family loves the experience, and we love that our kids get to be exposed to so many fresh foods up close. I have found that when little ones get to touch and choose different foods and be such an integral part of the selection process, it really helps with mealtime success later on at home.

Each weekend we let our oldest two kids (ages 3 and 4 years) choose at least one new-to-them food from the market, with the understanding that they will be trying it at some point throughout the weekend in a meal or for a snack. Last weekend, between the two of them, they chose green plums, duck eggs and a salt and pepper cucumber. Week to week, these new-to-them foods may not always result in a new love for the foods chosen, but exposure is key! And with continued exposure to new foods, you are not only broadening your little one’s palate, you are also making them a little more adventurous around food overall, and that is something that may very well stick with them for a lifetime!

Here’s a challenge for you: If you do not regularly visit farmer’s markets, try and get to one this week. And while you are there, let your little one(s) choose some new-to-them foods, and take the opportunity to talk with them while at the market about farming and where food comes from, etc. If you are able, even stop and shake hands with a farmer, and let your kids meet first hand, someone who is helping bring food to others. These little moments can be huge when it comes to trying and accepting new foods and getting excited about meal times. Our kids love farmer’s markets and have come to get so excited over finding (and trying!) something new each week. So grab a bag and some comfortable shoes, and head on over to a market nearby. You may be surprised at how much a different shopping experience will excite your littles; I know it sure does mine!

And if you are interested in a great, farmer’s market friendly recipe, see our breakfast skillet recipe below! You should be able to find everything you need locally and this skillet is perfect for the weekend!

Veggie and Egg Skillet Recipe


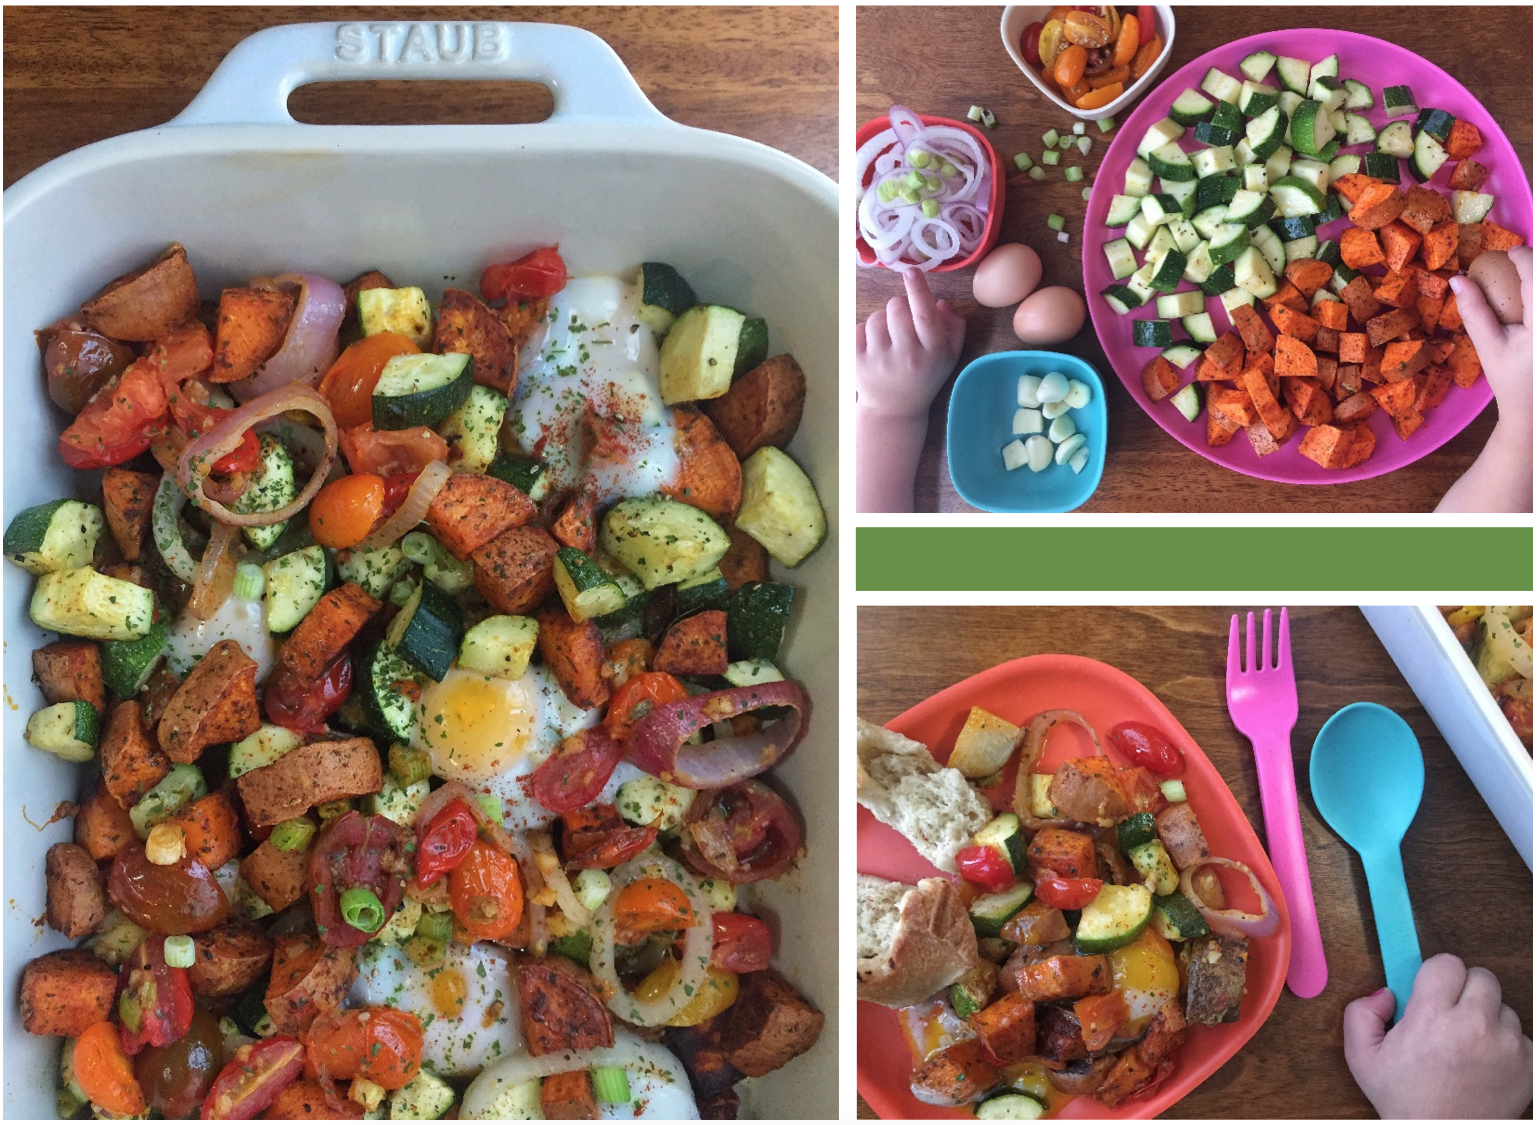
Farmer’s Market Veggie and Egg Breakfast Skillet Recipe

Ingredients:

  • Sweet Potatoes, 3
  • Candy Onion
  • Shallot
  • Garlic
  • Green Onions
  • Grape Tomatoes
  • Chicken Eggs
  • Zucchini, 3
  • Olive Oil
  • Parsley (optional)
  • Salt & Pepper

Directions:

  1. Preheat oven broiler on high.
  2. Cut your sweet potatoes and zucchini into bite-sized pieces and season them as desired. I drizzled them with olive oil, salt and pepper, and, on the sweet potatoes, I added a little bit of smoked paprika. Set them aside.
  3. Slice up a candy onion, the small shallot, some green onion, and mince a few cloves of garlic. Set aside.
  4. Cut a handful of grape tomatoes in half and drizzle with just a small amount of olive oil and then season with a little salt and pepper. Set aside.
  5. Saute the sweet potatoes and zucchini in a large skillet pan for 6-8 minutes until slightly fork tender, then add onion, shallot, and garlic.
  6. Continue to cook in skillet until the onions soften and garlic is fragrant, then add in tomatoes and cook until they too are softened – then remove from pan.
  7. Transfer your skillet contents to an oven-safe dish, spreading evenly, and sprinkle with parsley, if desired.
  8. Crack as many eggs as you wish over the top and place the dish in the oven, under the broiler, and cook until desired. We cooked 6 small eggs, and to get them over easy it took 3 minutes in the broiler – they cook fast, so watch them closely!
  9. Serve & Enjoy!

Veggie and Egg Skillet Recipe

POST BY LUNCHES + LITTLES

Lunches + Littles focuses on quick, healthy and fun meal options for little ones while sharing practical tips & tricks on how to make meals enjoyable, all the while keeping things simple. A lover of colorful plates, and an advocate for getting kids in the kitchen, Lunches + Littles is also a great resource for parents of picky eaters, parents looking for healthy family and toddler recipes and those mamas (dads too!) who are short on time. A mantra of sorts: Making meals fun doesn’t have to be hard! With 3 little ones (3 and under) it can’t be! Follow @lunchesandlittles for all of the above… And more!

Electric Pop Girls Bedroom

August 1, 2017

Ziggy Stardust and Girl Power high five in this Electric Pop girls bedroom design! It’s the pastel pink of strawberry ice cream and the electric energy of shooting stars. Mythical unicorns encounter intergalactic patterns in playful pastels for this classic-pop styled room for girls.

Post by Shawna, Home Stylist from The Land of Nod’s Design Services Team. Our Design Services team offers free one-on-one design advice, mood boards and space planning. You have a room to decorate? They’d love to hear from you.

VISIT THE LAND OF NOD’S DESIGN SERVICES PAGE
TO GET STARTED TODAY ON YOUR FREE DESIGN.


DIY Pretend Vacuum

July 27, 2017

While your kiddo might not be ready to run the household vacuum, they certainly can practice cleanliness with this DIY pretend vacuum. Using materials you have around the house, this crafty-number will take only a couple of minutes to whip-up and will (hopefully) keep your little one entertained and tidy.

DIY Pretend Vacuum

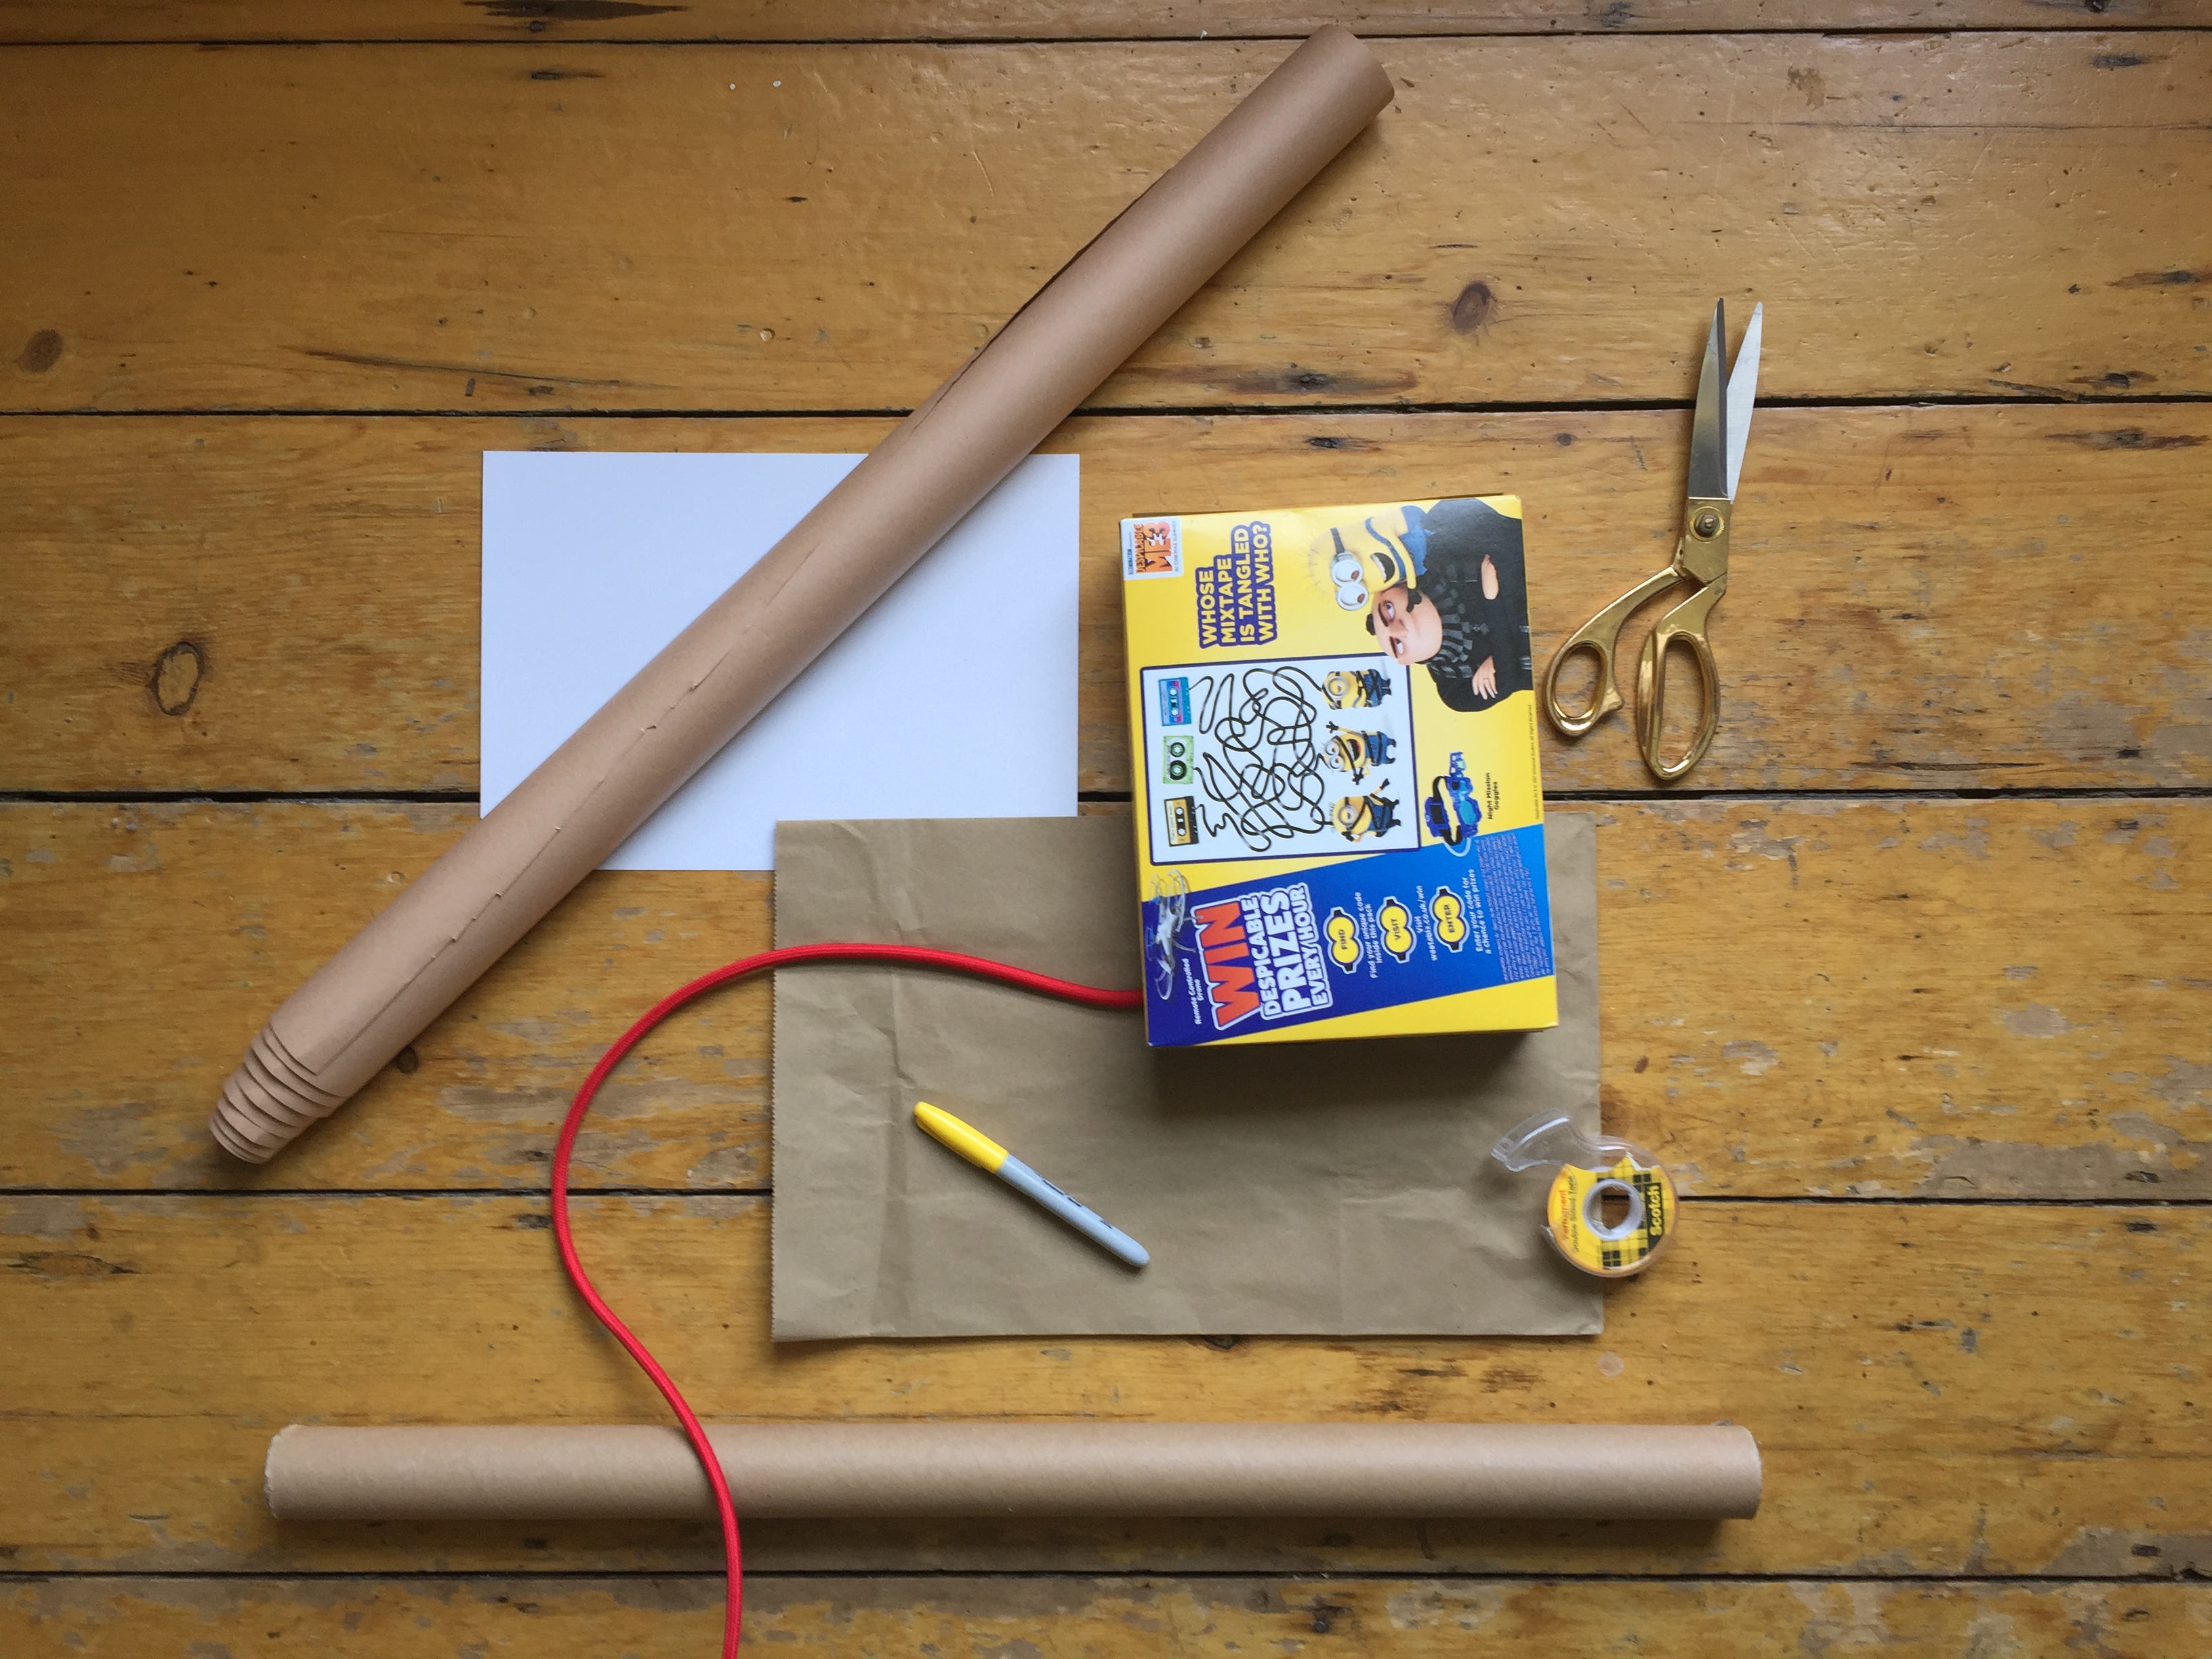
Supplies:

  • 1 cardboard tube (gift wrap tube or a fabric roll is perfect!)
  • 1 small box (we used a cereal box)
  • Craft paper
  • Paper bag
  • Fabric wrapped cord, thick twine or yarn (optional for the “power cord”)
  • 1 sheet of paper
  • Marker
  • Scissors
  • Double sided tape

Directions:

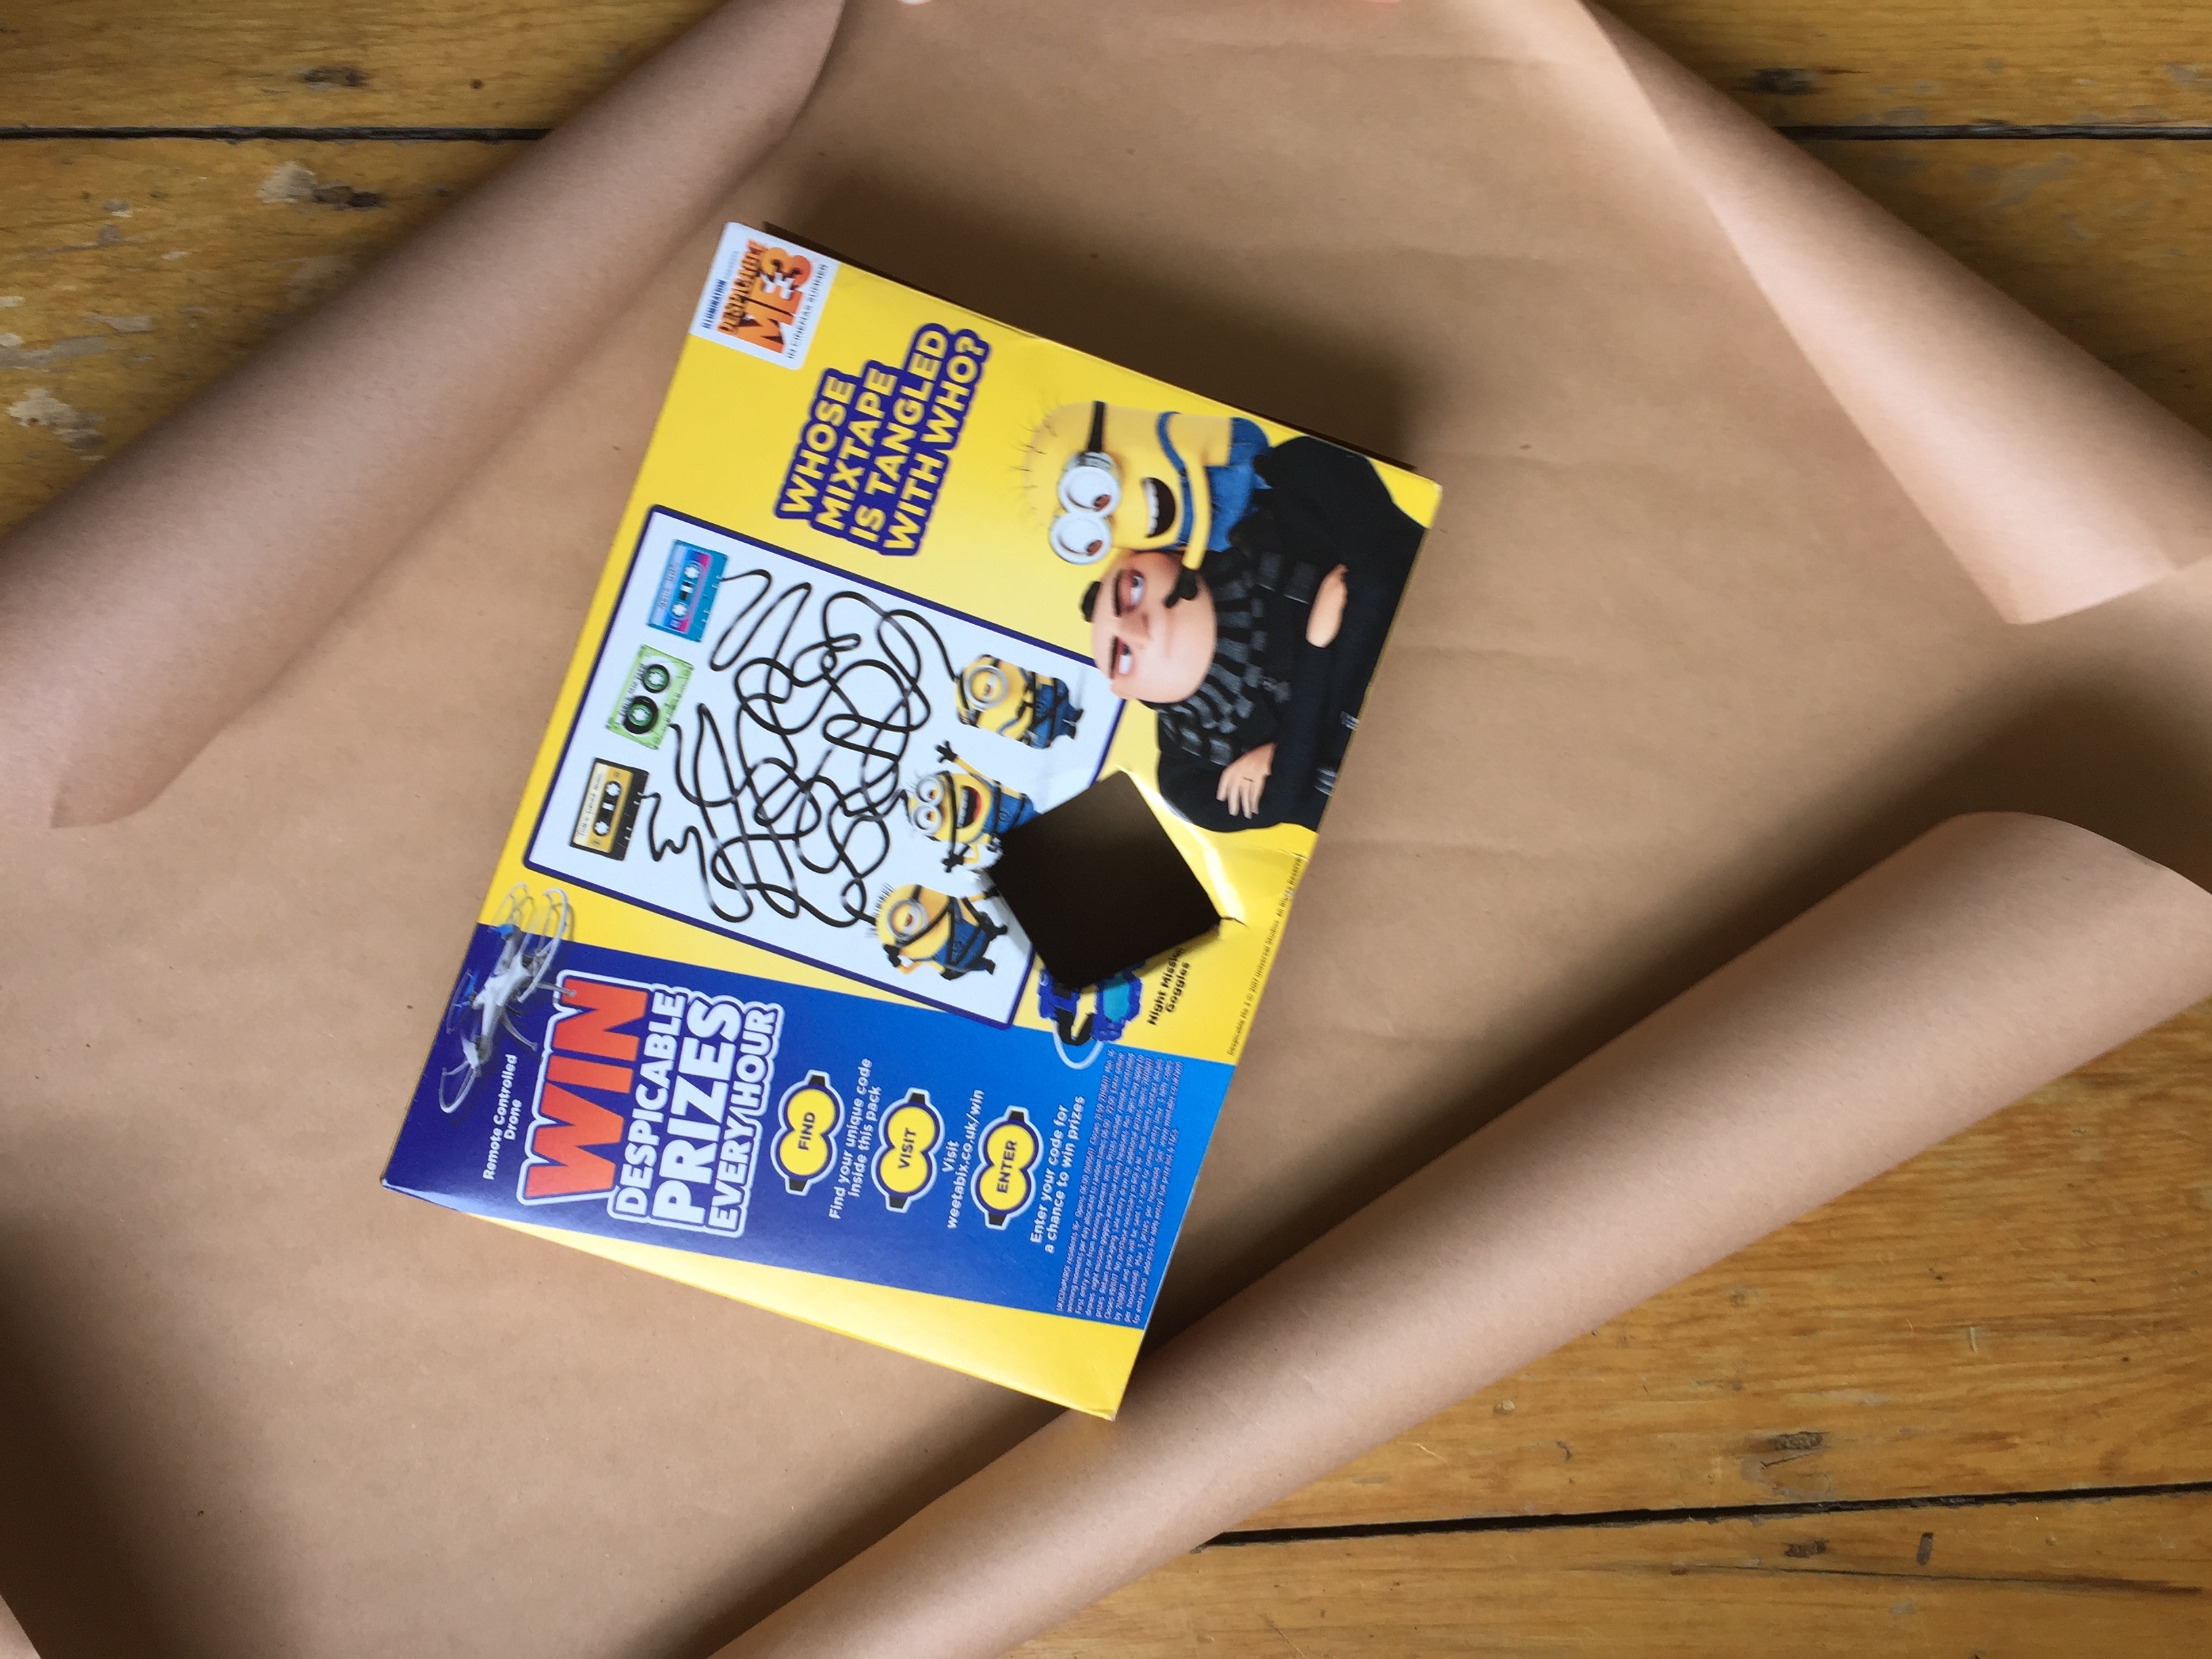
1. Cut a small cross into the top of the cereal box, making sure it is wide enough to securely fit the cardboard tube.

2. Once the hole is cut, wrap the box like a present using the craft paper then cut the paper over top the existing hole in the cereal box. Fold the excess craft paper under and tape.

3. Now make a small hole at the back of the vacuum and thread through the cord/twine to create a make believe power cord. Using the large opening in the top, pull the string through and tie a knot at the end so it can’t fall out. The cord can just trail onto the ground for authenticity!

DIY Pretend Vacuum

5. Once the cord is in – you can pop your tube in the hole on the top and use a little double sided tape to hold it in place.

6. Next, run one length of double sided tape down the center back of the tube and attach your paper bag.

7. Final touch… add your “vroom” label in any color, style you wish!

DIY Pretend Vacuum

Now get vacuuming!

Post by Emily Rickard

Emily is a New York interior and prop stylist for The Land of Nod and more! Follow @emilyrickardstylist for inspirational ideas on decor, design and life’s little moments.


Ladybug Game & Crafts for Kids

July 26, 2017

Ladybug games and crafts for kids

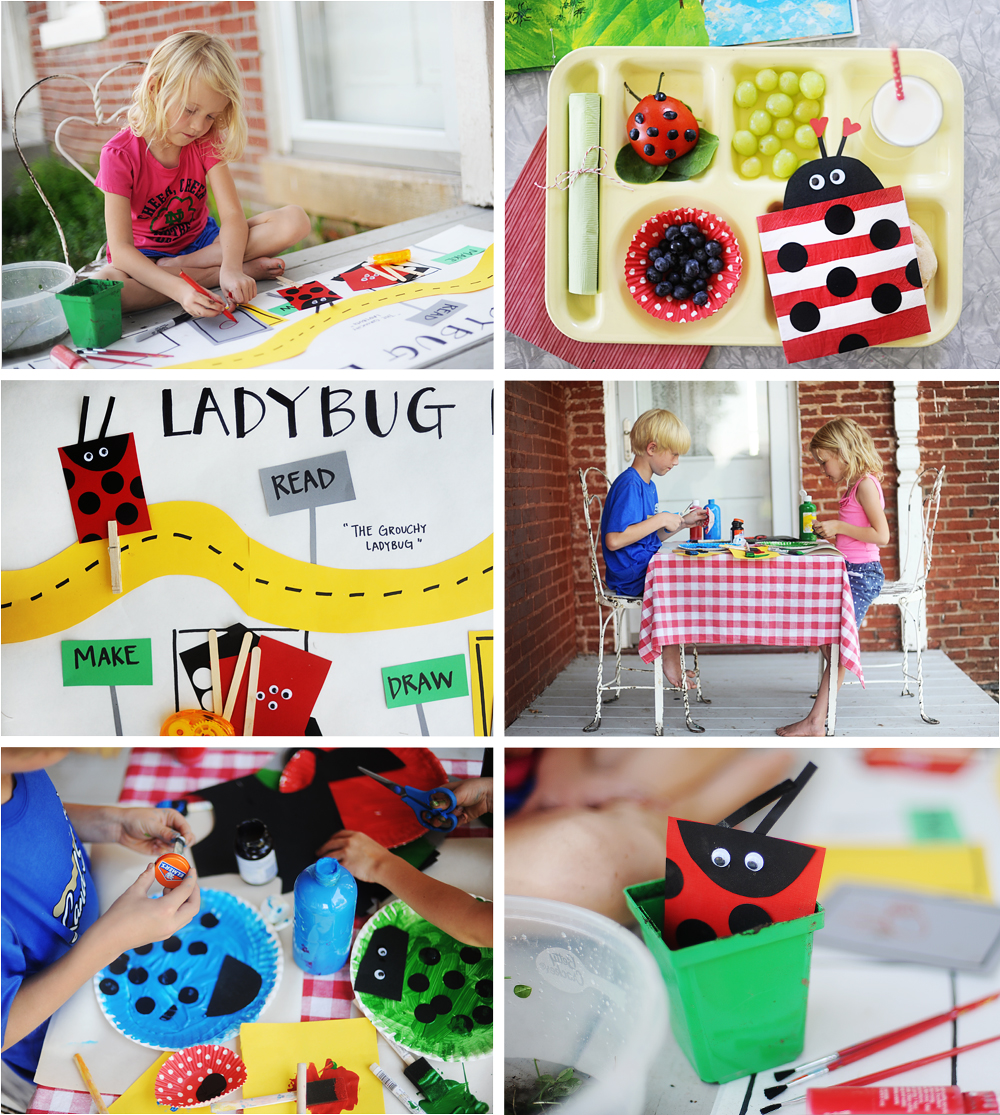
Did you know that there are approximately 5,000 species of ladybugs in the world?  All the more reason to love these magical little critters!  Here is a fun ladybug game and craft for kids to investigate and celebrate our favorite spotted friends—

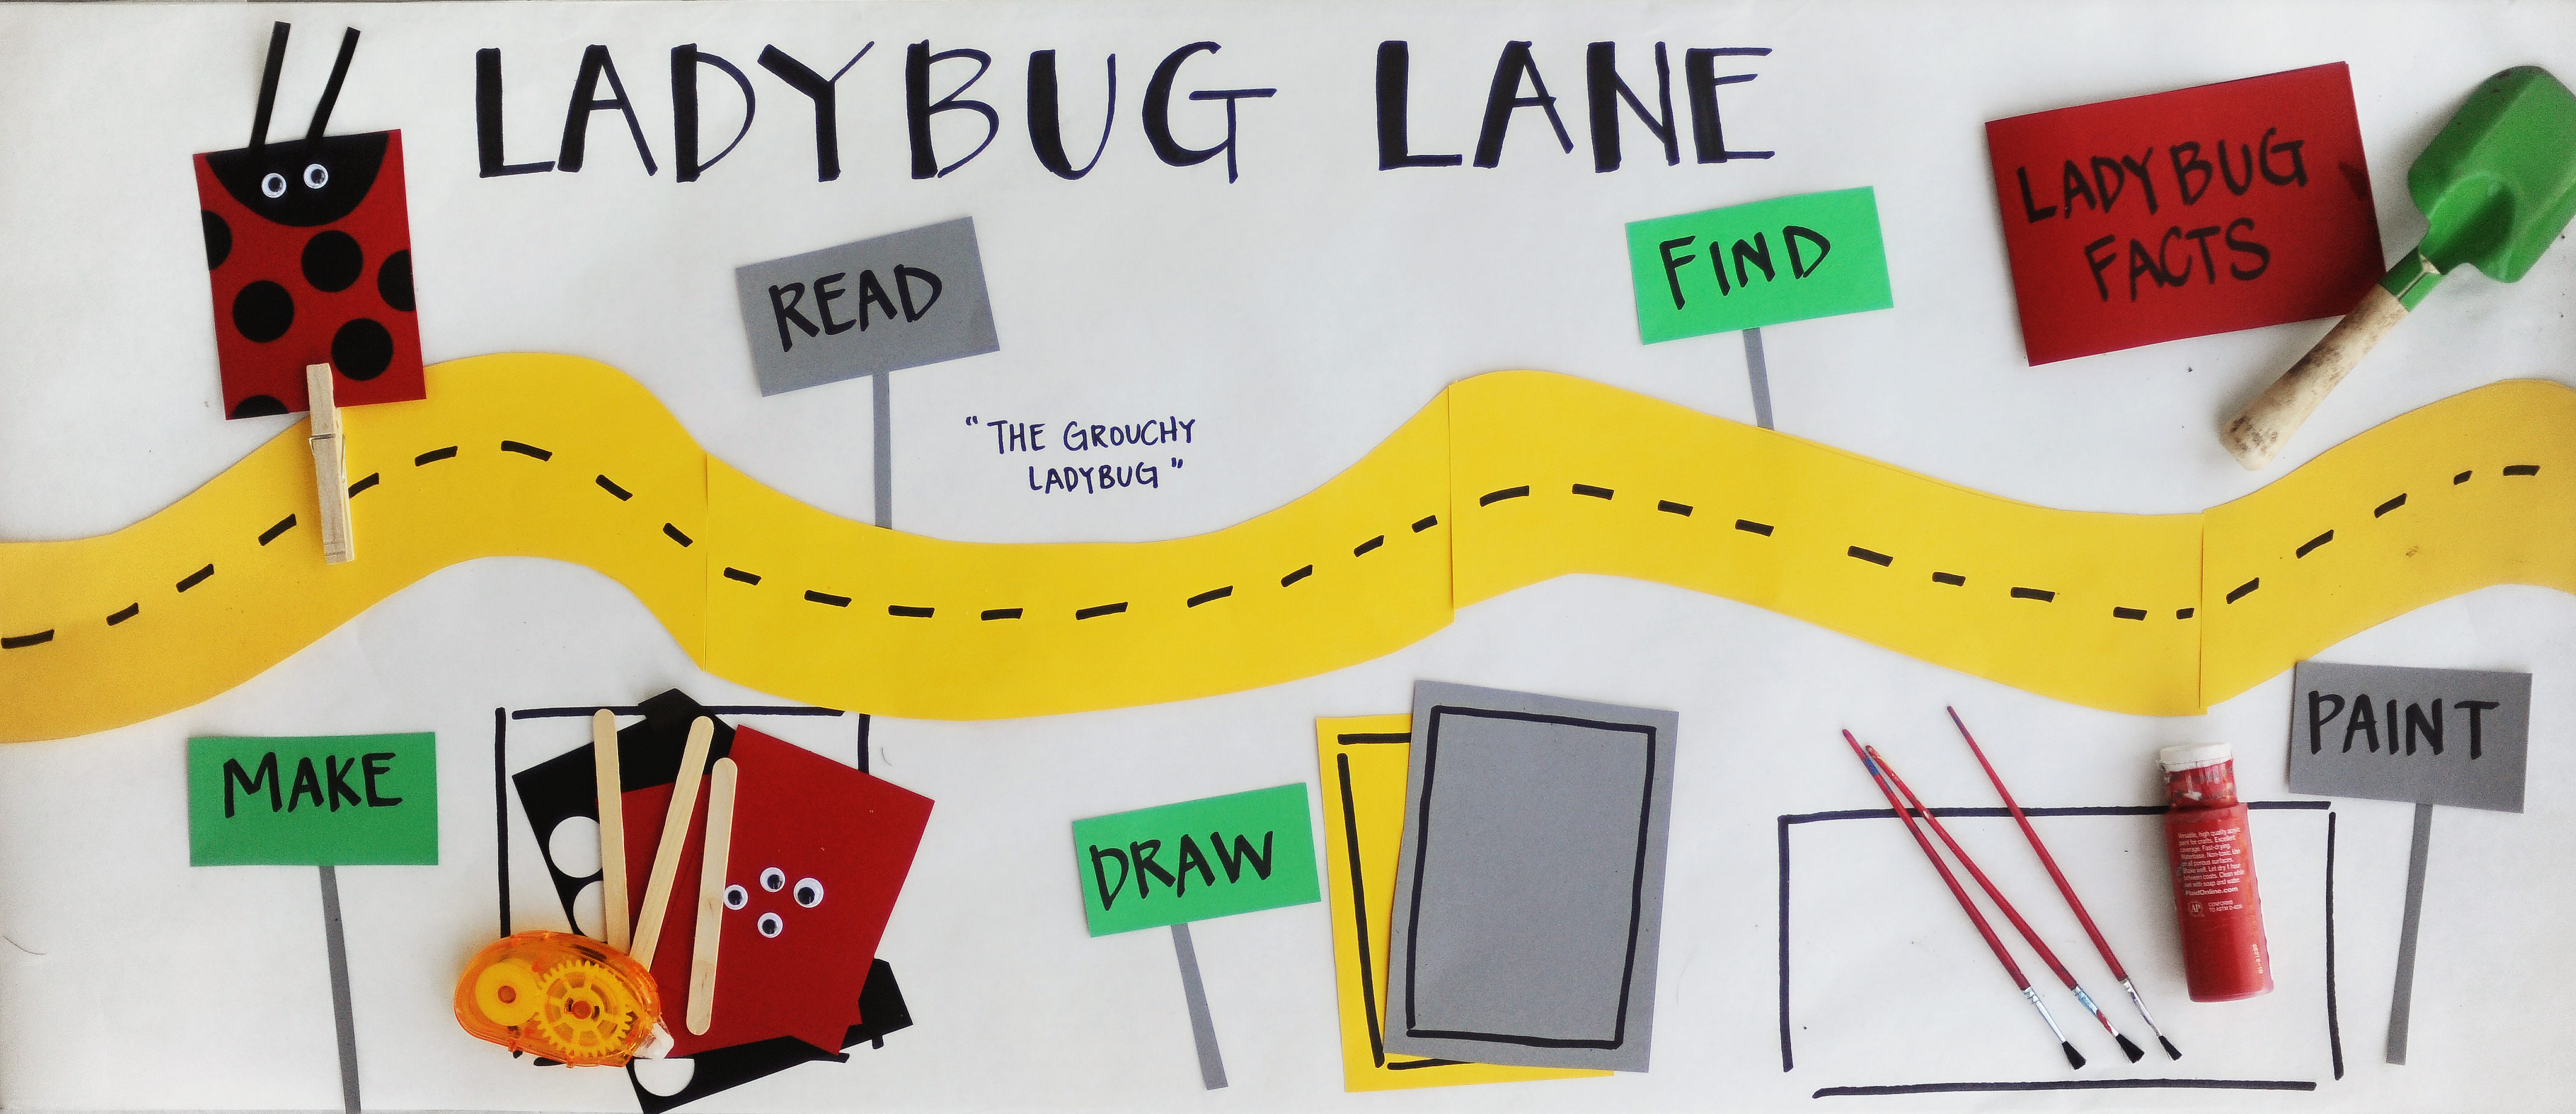
Ladybug activity called Ladybug Lane

1.  LADYBUG LANE GAME!

Use a long roll of butcher paper to create an interactive “walk” down Ladybug Lane.  Hand sketch or use colorful construction paper to map out several stops for your little one to enjoy.  I started this activity by inviting my daughter to make a ladybug puppet that she could take along the lane (the MAKE station).  Other stops included READ (“The Grouchy Ladybug” by Eric Carlisle is our favorite!), DRAW, FIND (I had a flower pot off to the side with mini ladybug erasers hidden in the dirt), FACTS and PAINT!

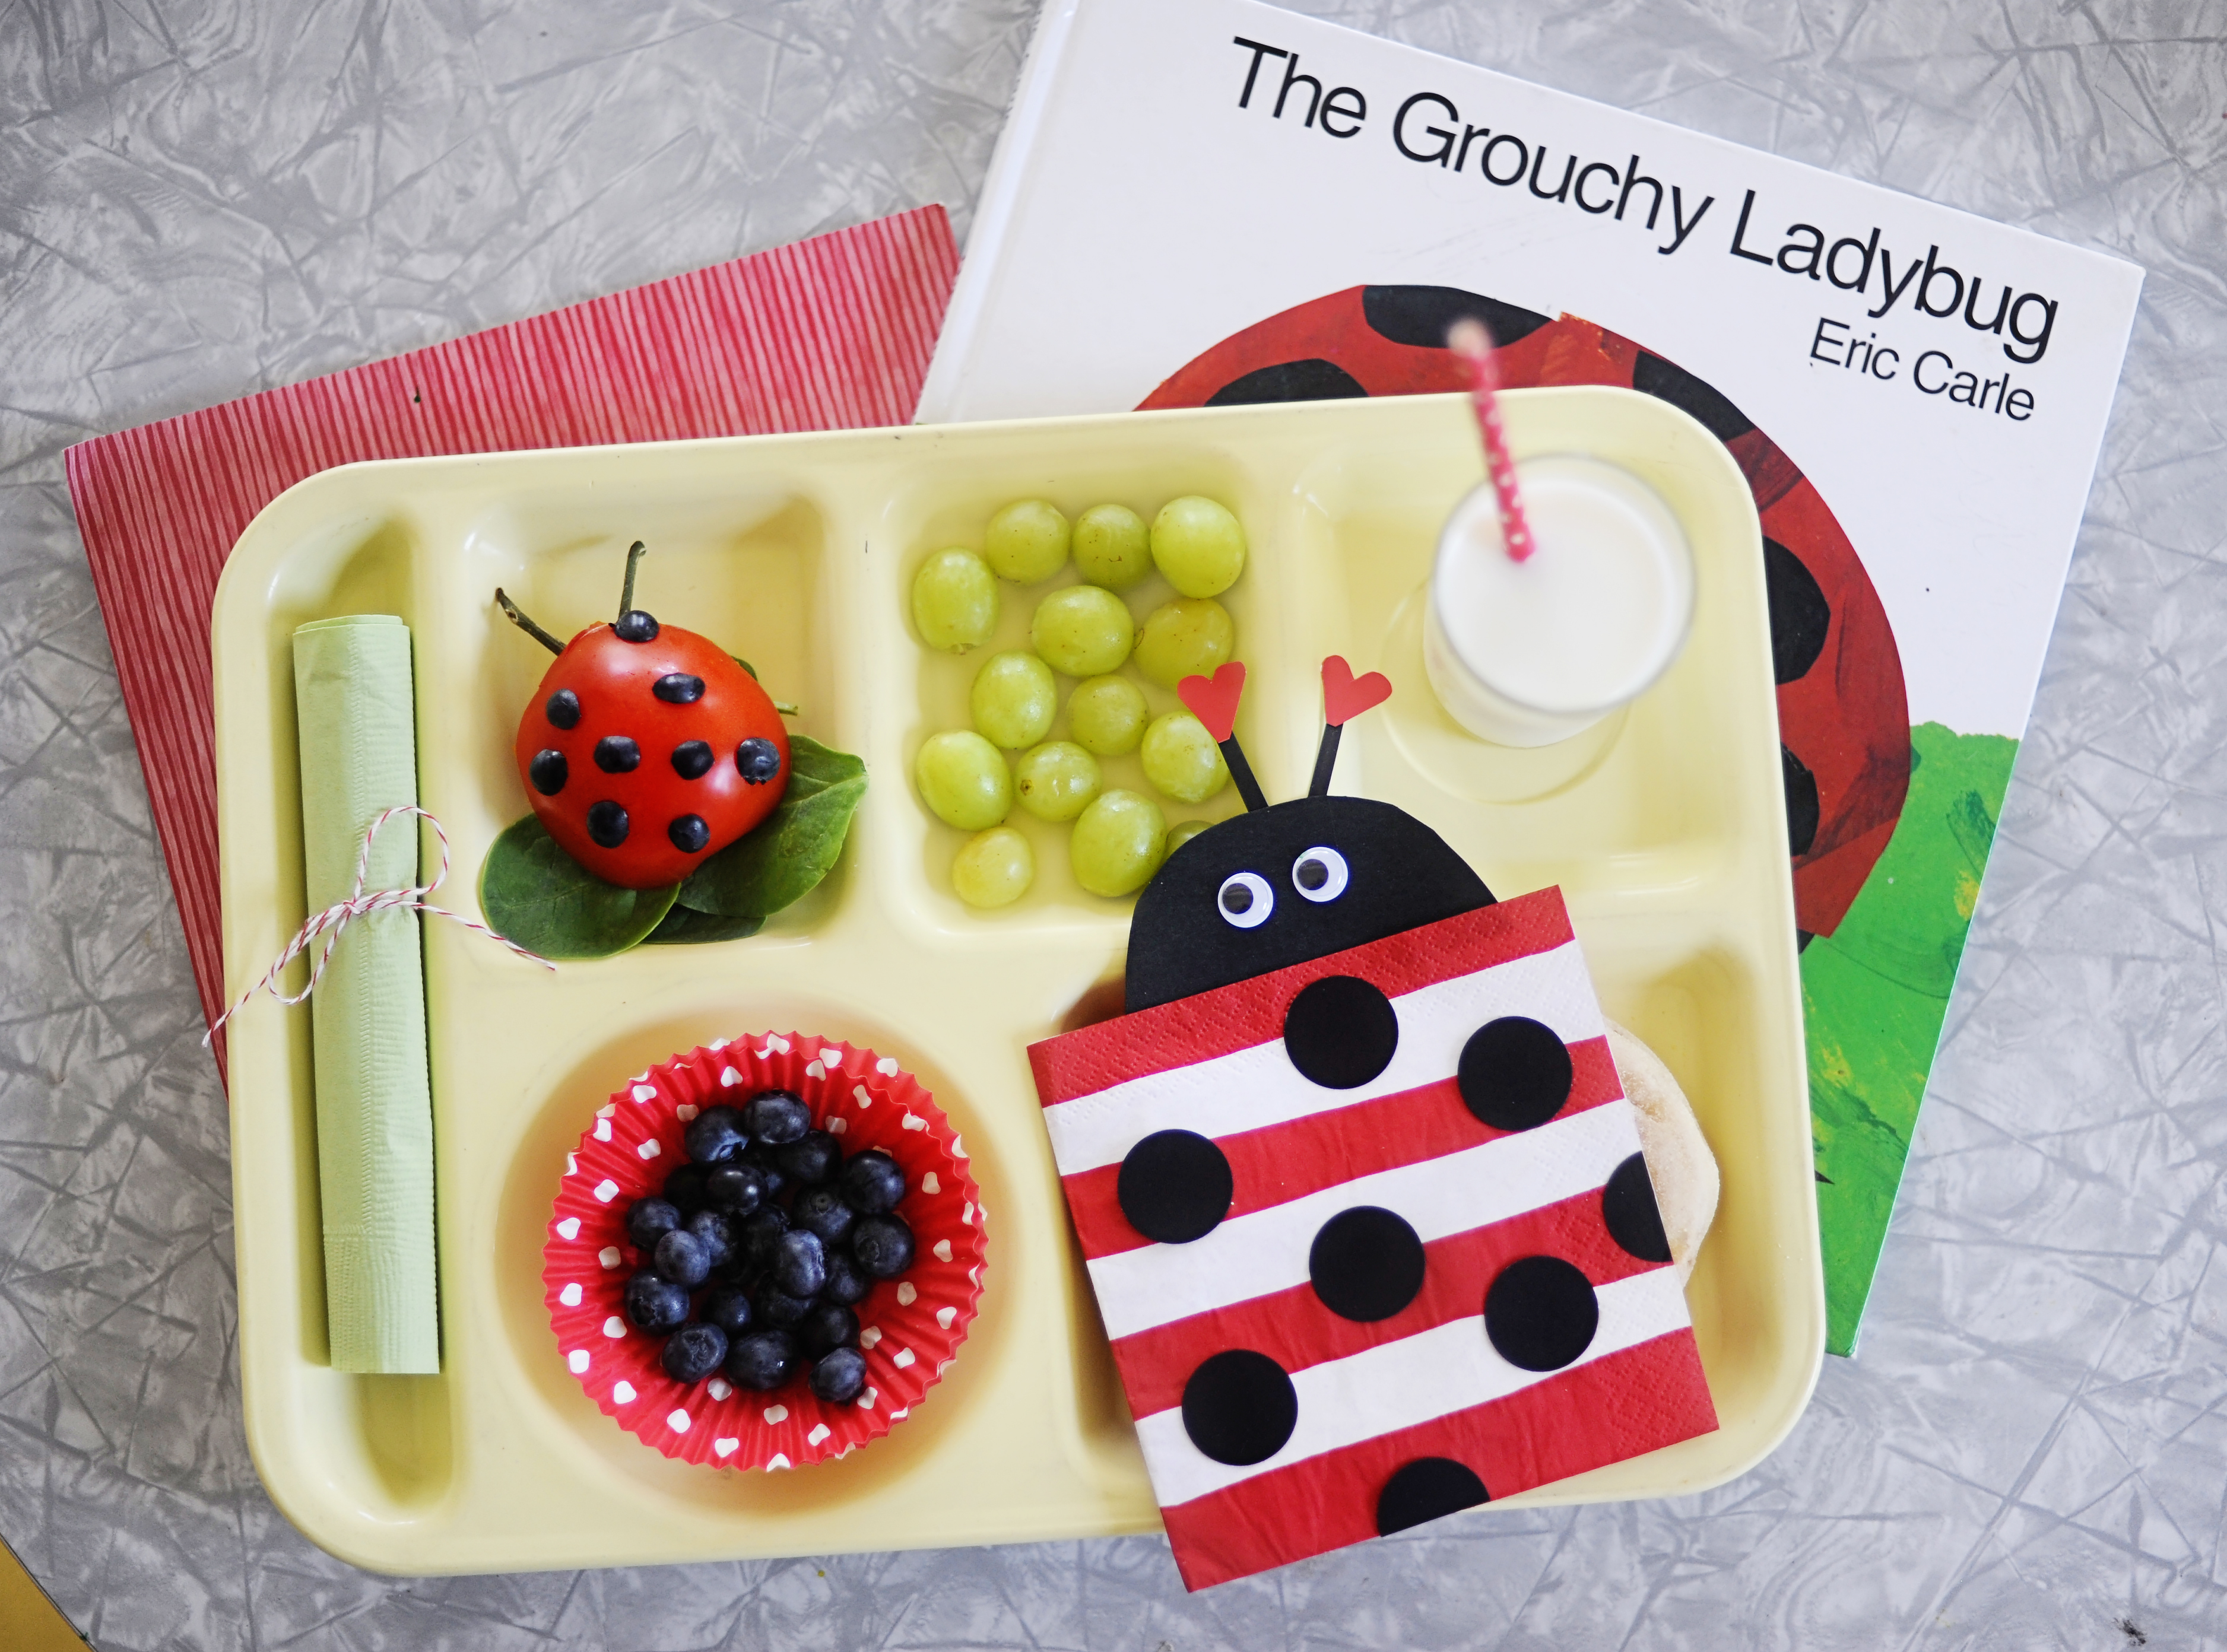
A ladybug themed lunch with a sandwich

2.  LADYBUG LUNCH!

With a little creativity, you can turn a peanut butter and jelly sandwich into a ladybug!  You might even pretend that grapes or blueberries are aphids!!  For this meal, I used a striped napkin with black punch out circles for the main bug and small pieces of blueberries on a juicy tomato for the smaller bug.

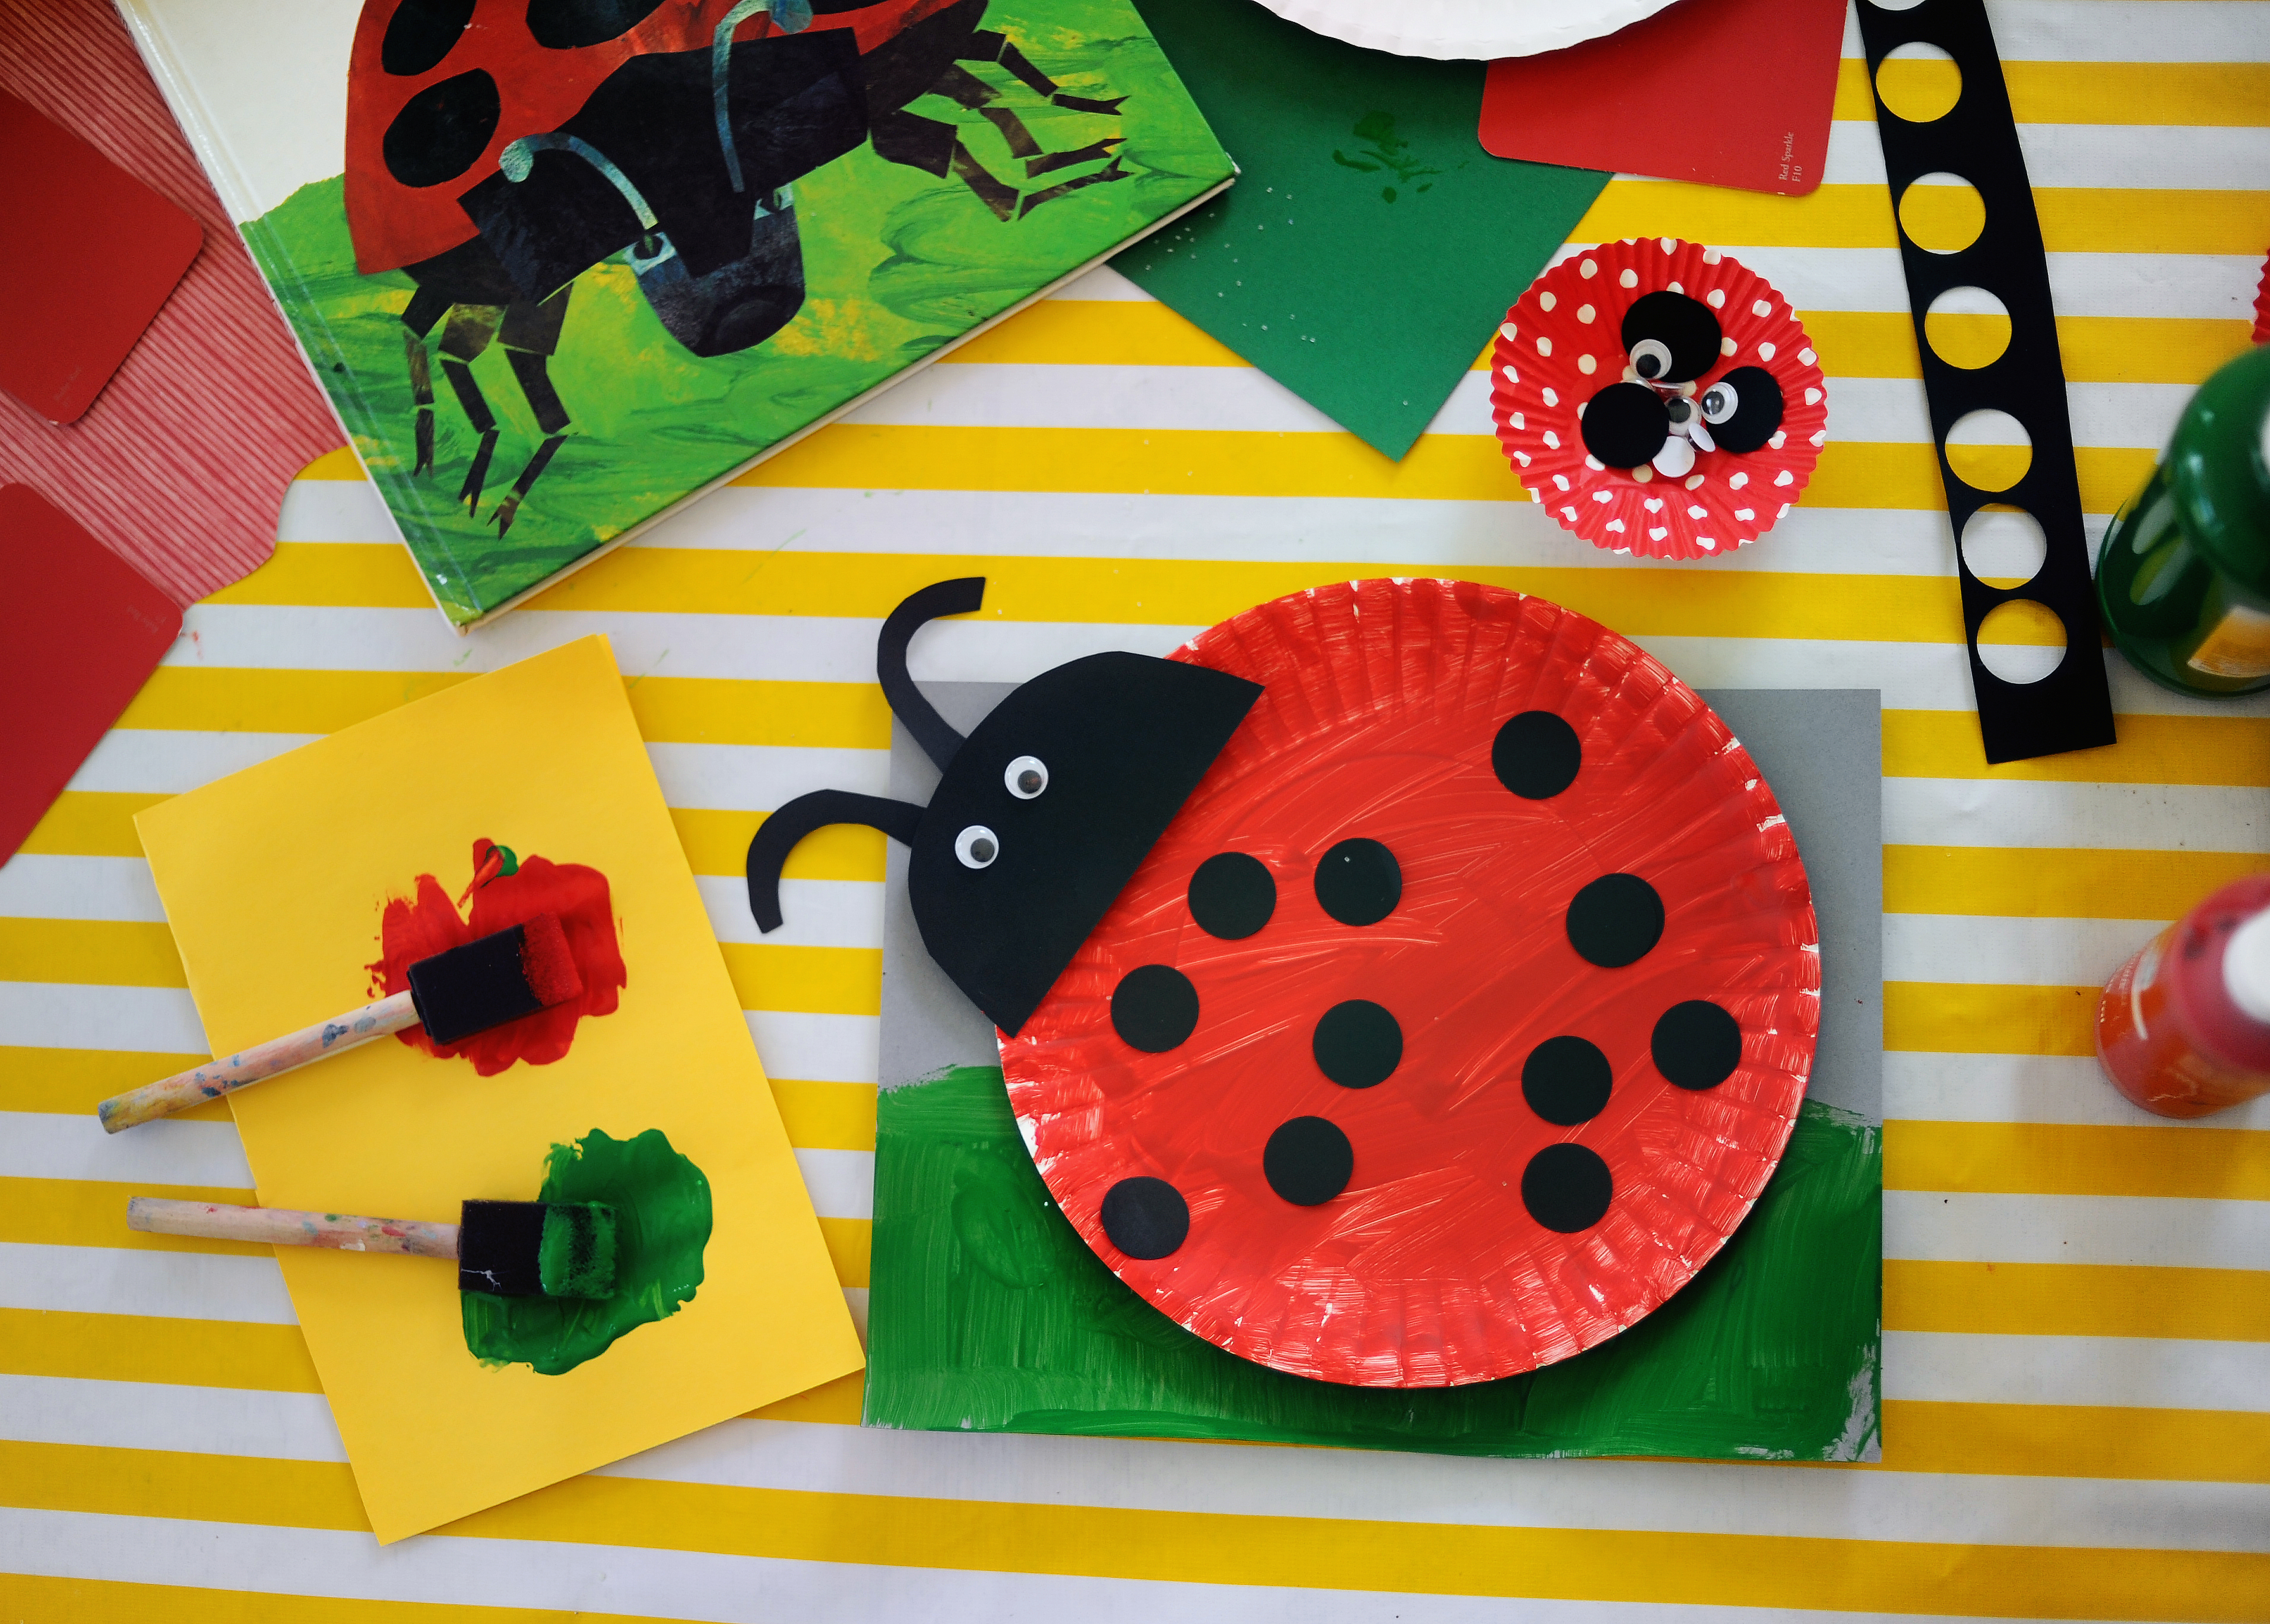
A classic ladybug craft made from a paper plate

3.  LADYBUG CRAFT TIME!

Preschool and art teachers know that paper plate crafts never go out of style!  All you need for this classic craft is a paper plate, paint, construction paper, glue and a paper punch.  Create traditional red and black critters or go wild with colors and patterns like you might find somewhere in the world!

POST BY KATHERINE MARIE.
YOU CAN FIND MORE OF HER MESSY, CREATIVE AND FUN PROJECTS ON INSTAGRAM AT KATHERINEMARIES 

DON’T MISS OUR COLLECTION OF LADYBUG TOYS & DECOR