Close

Blog

DIY Magazine Bead Necklaces

May 14, 2012

neck This project is from Mary Ann Kohl's book, Good Earth Art: Environmental Art for Kids .           I loved it because it was so so easy and the girls got really into it, spending almost an hour rolling beads.

Here's the scoop:

1. On a magazine page or newspaper, at the top of the page, mark off 1 inch intervals with a ruler.

2. On the other side of the page, mark off 1 inch intervals beginning at 1/2 inch.

3. Connect the lines to make long skinny triangles (see my picture above for illustration).

4. Cut out the triangles.

5. Wind the wide end of the triangle around something skinny – we used kabob skewers but you could also use toothpicks or maybe even a twig.

6. Place glue on the rest of the triangle and roll tightly.

7. Let dry then lace on cord or string.

8. Wear as a beautiful necklace or bracelet. Easy peasy. roll kids 
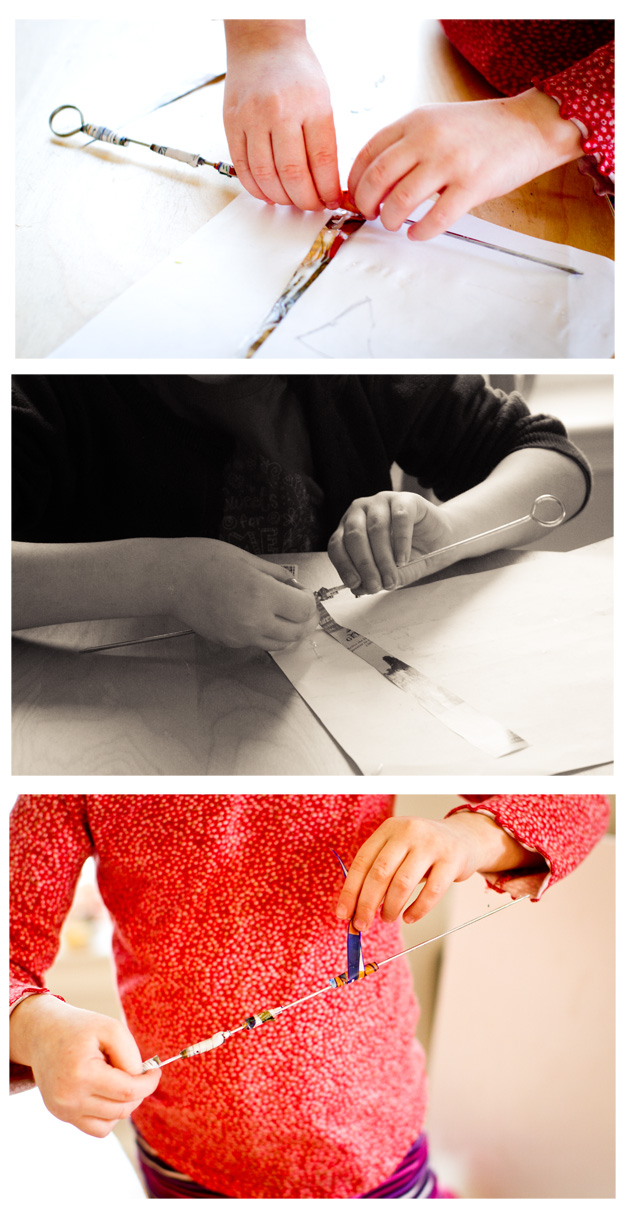
The kids actually wear these. Even 6.5 year old F, who scorns most of my ideas regarding fashion. cut     
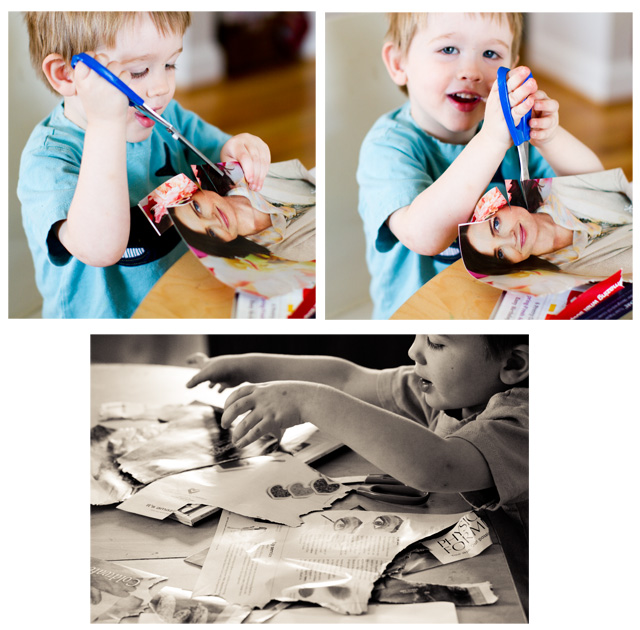
At 2 years old, T couldn't master the rolling of the paper, so I let him use scissors (his favorite new "toy") to cut up the rest of the magazine.


Post by Darcy : bedtimemonsters.blogspot.com

All Dressed Up With Nowhere to Playroom

May 11, 2012

Post by Danielle Kurtz, Land of Nod Creative Director

When Emily T. contacted us via honesttonod.com about her troubles putting together a playroom for her two daughters, we were more than happy to oblige. According to Emily, her daughters, Gracen (age 4) and Hadley (age 2 ½) are total girly-girls, and having a girly-girl of my own (she’s not even two and already has an opinion about her shoes!), I was eager to help.

Emily told me that the girls share one bedroom, so they can dedicate the other bedroom as a playroom solely for play. A wise idea, since it allowed her to create a serene and peaceful place for sleep, and a joyful, inspiring room for play. So, here’s what I came up with.

All Dressed Up With Nowhere to Playroom | Honest to Nod

For this room, I actually started with the rug. It doesn’t get much happier than our Candy Dot Rug. The grey’s a great neutral, but the pops of saturated colors will allow the room to be girly, but not just pink. It’s also a great choice for a playroom because it’s made from thick, 100% New Zealand wool. This makes it comfy to get down on the floor and play, and it’ll wear very well.

Next, I moved onto the furniture. Emily said her aesthetic is modern cottage. So, I chose our Elementary Play Table. This will provide plenty of room for the girls to play, and has a lot of great storage space beneath it, which is important since the room is on the small side. Also, its traditional lines will fit in with the cottage look in the rest of the home. I paired it with the more modern Mojo Stools. I chose this for two reasons. First, the modern look will balance out the vintage table. Second, they’re absolutely perfect for kids this age. Because of their splayed-leg design, they’re nearly impossible to tip over. I know this because I have 4 of them in my kids’ playroom!

Then I moved onto storage. Every playroom, actually every room, needs lots of storage. And, nothing beats our Storagepalooza. They come in a few configurations and are perfect for plush toys, dress up clothes, games, books. You name it, and you’d be shocked at just how much they can hold. Paired with our Gingham Strapping Basket, the white Paloozas are crisp and won’t overpower the small space.

And what’s a girl’s room without accessories? A cluster of our Lighten Up Pendant Lamps add some of that hot pink the girls love. Then I opted for the Besties Wall Banner to pay homage to the built-in-best-friend you get having a sister. Emily mentioned there’s a large window in the space, so I chose our Multi Ruffle Panels in a blush pink color. They’ll add some softness to all the white furniture and just a dash of that girly-girl fussiness.

Finally, I know these girls love to dress up, so I put in a grey metal coat tree for their boas, hats, capes and costumes. And, a couple Lucky Four-Leaf Mirrors, so they can see just how divine they look in all that get-up.

The final look is a bit cottage, a bit modern and oh so feminine. Also, it’s a look that can grow with the girls. In fact, I think I’d like to hang out there! Hope Emily, Gracen and Hadley like what I’ve put together, and if you have any decorating dilemmas you’d like us to tackle, feel free to comment below or get in touch with us via Twitter or Facebook.

Post by Danielle Kurtz. Danielle is the Creative Director at Nod and an over-protective mother of two. She’s also completely obsessed with Pinterest, Twitter and her Kindle, but not necessarily in that order. Danielle loves to craft, sew and crochet, but all her supplies have a layer of dust on them about 5-years-thick, wonder if it’s just a coincidence that her oldest kiddo is 5 years old?

Looking for even more playroom inspiration? Check out our Playroom Board on Pinterest.

Boy-Or-Girl? Reveal Party

May 10, 2012

1

With Bettijo’s due date just weeks away it seems like a fun time to share this party. Bettijo and I threw a big Boy-or-Girl? Reveal Bash back in November when Bettijo had her ultrasound to find out what her baby was going to be. We’ve been keeping things under wraps for a while because the amazing Amy Atlas featured our party on her blog yesterday! (You can see her write up here). We are so excited about the feature and wanted to share a few more of the party details with you all.

These “gender reveal” parties are starting to become popular, but no one in our neck of the woods has really heard of them. Of course we love any excuse for a party, but also since early on in Bettijo’s pregnancy, her husband was badly injured (don’t worry — he’s all better now), his accident made it necessary for Bettijo to tell her family and friends that she was pregnant without any big, fun surprise. Since Bettijo felt a bit cheated having to reveal her pregnancy early, she decided we simply must throw a party to reveal the baby’s sex.

2

We went with a gender-neutral color scheme of yellow and gray. Bettijo designed the invitations to be simple and modern and used only gray and white. I love the circle punch in the upper-right corner — such a clean way to dress up the card and all you need is a corner rounder and 1-inch circle punch. Bettijo says the circle cutout was inspired by a growing mama’s baby belly.

If you want to make this invitation, we do offer printable templates customized with your party details in our Supermom Co-op.

3

We used pregnancy cravings as the theme for our dessert table featuring something sweet, sour, salty, crunchy and chewy. (If I’m being completely honest here, this pregnancy has definitely altered Bettijo’s taste buds! I think she’s been through each one of these cravings — and sometimes on the same day! What a trooper she is!)

4

We served all her favorite cravings: crunchy tortilla chips with her favorite ranch dip; chewy chocolate-dipped marshmallows; salty freshly-popped popcorn; sour pickle chunks; and sweet chocolate-dipped oreos.

5

These marshmallow pops on a stick not only add color, they also were a favorite treat among the kids at the party. (After all, doesn’t everything taste better on a stick?) I used fabric tape, a new favorite discovery of mine, to embellish the stick top.

6

My favorite detail of the whole party was the fabric scrap popcorn box embellishment. It is so simple and unexpected, yet it was the perfect touch to coordinate with the draped fabric scrap swag on the table.

7

To make the popcorn box fabric detail, we punched a hole in one of the scallops then looped a short piece of fabric through the hole. We also printed extra salty signs on adhesive paper to affix to the front of each box.

8

Pickles for dessert? Absolutely! Bettijo requested whole Claussen pickles, as this baby has distinctive tastes! It took me a few days to come up with a buffet solution that would accommodate such a … different?… dessert. (Thankfully, I didn’t have to worry about serving ice cream with it!) In the end, along with the popcorn boxes, the pickles are also my favorite detail. The tiny silver appetizer forks are just adorable and nearly steal the show!

9

Chocolate-covered Oreos are beautiful, and with a little yellow chocolate drizzle, they were the perfect sweet to round out the dessert table.

10

To create the Ultrasound Garland that dressed up the fireplace, Bettijo used her beloved large circle cutter to make a couple sizes of yellow circles out of construction paper. She then sewed them all together with a long, straight stitch on the sewing machine. She layered over a piece of cotton rope and used mini wooden clothespins to clip up various ultrasound photos.

11

No one at the party actually knew the gender, Bettijo and her husband found out with everyone else when they opened the box and saw the colored balloons. We accomplished this by giving Bettijo’s ultrasound tech a note card and envelope. Bettijo asked the technician not to tell her the gender of the baby, but instead to wait until she left the room and to write the gender on paper and to seal it in an envelope.

I took the envelope to the party store along with a big white box and explained to the sales clerk that we wanted her to look inside the envelope and if the card said, “Boy” to fill the box with blue helium-filled balloons, and pink for “Girl.” Bettijo wanted me to get the balloons just in case there was any kind of slip-up, then I would be the only one that knew the secret, and it wouldn’t spoil Bettijo’s “surprise” moment at the party.

We had guests suggest possible boy and girl names, and Bettijo and her husband took turns reading them out loud to the group just before the big balloon reveal. Some of the suggestions were pretty humorous and this game actually ended up being a highlight for the party.

12

Each guest was asked to cast a vote on whether they thought it would be a boy or girl, and then they put on a mini flair button that showed their vote. Bettijo designed the buttons, and I love the simple gender-specific person! You can purchase buttons for your own party in our Supermom Co-op.

13

We took photos of “Team Boy” and “Team Girl” before the balloon reveal. Since Bettijo already has two daughters, nearly everyone was with Bettijo in rooting for a boy. Only a handful of people, Bettijo’s husband included, were wearing “girl” buttons, but in the end, they were right.

14

Here is printable template of the labels we used at the party.

Post by Aimee and Bettijo : www.supermommoments.com


DIY Tape Luggage

May 9, 2012

Tape_suitcase_21
Whattya need?

  • X-Acto knife or sharp utility knife
  • Drill
  • Colored tape (we used duct tape)
  • Any hard luggage piece (resale or vintage stores are great places to find these)

TapeSuitcase_blog

How do I make the tape luggage?

Step 1:  Cut tape into strips.

Tape_suitcase_05

Step 2:  Apply pieces of tape to luggage, overlapping and alternating colors.

Tape_suitcase_09

Step 3:  Trim tape around handles, opening and any other details on the luggage, such as locks or name plates.

Tape_suitcase_17

Tape_suitcase_15


Created by Dane Holweger

Neutral Nursery

May 8, 2012

I’ve never been a fan of khaki, (you will never catch me in a pair of khaki pants), yet I’m totally loving the look of these neutral nurseries. The soothing color palette creates a calm, nurturing environment and has a really sophisticated, modern feel.

Design sponge

From here

Great mix of patterns, textures and styles:

Sea grass

From here and here

Remember, storage bins aren’t just for holding things, they are part of the décor. Use them to add a pop of color or enhance your theme:

With storage

From here and here

A pop of pink adds a feminine touch:

Pink

From here and here

Woodland animals fit in perfectly to a neutral theme:

From here

Here’s some ideas to try it on your own:

Neutral Nursery

Classic Elephant Bookend, $50
Rattan I Am Storage Collection, $21.95-$79
Low-Rise Crib, $900
Khaki In the Mix Crib Bedding, $24-$138
My Bucket My Buddy, $12.95
It’s a Jungle Up There Mobile, $56
Oh Goody Footies, $36
Rifle Paper Co. Framed Animal Poster, $89
Luca Glider, $995
Elephant Wild Nightlight, $48
White Floor Base and Khaki Shade, $88


By Anna Passadori

Anna develops and designs exclusive product for The Land of Nod. She hails from the west coast and has traveled the world to source product. She loves anything Marc Jacobs, Sofia Coppola or stripes! (So, if anyone can get a photo of Sofia Coppola wearing a striped outfit by Marc Jacobs, please send it along.)

Cereal Bars

May 7, 2012

1

This cereal bars recipe is a great healthy snack for kids—including kids with certain food allergies and special dietary needs. This grab-and-go snack is easily made with both gluten-free and casein-free ingredients. In the ingredients list I provide the reader with recommended ingredients that are free of certain allergens. My son, a little boy on the autism spectrum that loves to eat, and is also on a vegan, egg-free, gluten-free, and casein-free diet, approves of these tasty treats. Of course, for those that don’t have special dietary needs, this recipe can be made with ingredients that aren’t necessarily allergen-free.

2

Combine the cereal, dried apples, cinnamon, and flaxseed.

3

Heat and combine the natural buttery spread and almond butter.

4

5

Add the heated mixture to the cereal mixture, press into a pan, refrigerate, and serve.

6

7

8

9

Recipe:

Ingredients List—

Chocolate rice cereal puffs, 3 cups (Recommendation: Nature’s Path EnviroKidz Organic Koala Crisp Chocolate Cereal, GFCF)

Dried apples, 1 ½ cups, chopped

Cinnamon, ½ tablespoon

Flaxseed, 1 tablespoon, ground

Natural buttery spread, 1/3 cup (Recommendation: Earth Balance Soy Free Natural Buttery Spread , GFCFSF)

Almond butter, 1 cup (Recommendation: Earth Balance Natural Almond Butter, GFCFSF) (For a homemade almond butter recipe, check out Jen’s Maple Cinnamon Almond Butter , this recipe can also be made using GF ingredients)

Instructions—

1. In a large bowl, combine the cereal, dried apples, cinnamon, and flaxseed.

2. In a small pot, heat the natural buttery spread over low heat for 30 seconds, or until melted.

3. Add the almond butter to the melted buttery spread, continue to cook over low heat for another 30 seconds, stirring to achieve a creamy consistency.

4. Add the natural buttery spread and almond butter mixture to the bowl of cereal, dried apples, cinnamon, and flaxseed; and stir until completely coated.

5. Press everything in the bowl into an 8×11.5 pan, refrigerate for 1 hour, and slice into cereal bars for an easy and healthy snack that kids love.

Post by Kristina Michel : Mom Colored Glasses

For more ideas from Kristina check out her blog Live, Love, Laugh, and Autism.


In My Own Home…

May 4, 2012

Being a product developer,  I am surrounded by beautiful products, creative ideas and mountains of color around every turn. Eventhough I don’t have any little ones running around the house I can’t help but bring some of my favorite Land of Nod products into my own home.

These are our grey breezy striped sheets- they are yarn dyed in Portugal and are amazingly soft! Paired with a white duvet and a few pops of red ( I can never go totally neutral!) they are the perfect thing to jump into after a long day!

MyHome_1

I so enjoy working with Blanca Gomez, she is quite talented and a lovely person too! The below Monsieur III print has always been one of my favorite pieces from her. I was so excited to see it get added to our Nod Insitute of Art Shop. On top of my dresser I get to see it every morning as I pick the chosen baubles of the day.

MyHome_2

This is a wall in my dining room- the print to the left is Everything is Ok by Lisa Congdon. I love collecting small pieces of art from some of my favorite artists and sprinkling them around the house.

MyHome_3

Living in a small space means I am forever changing up the décor and accessories as new pieces get purchased. These handsome men are currently holding court in my window seal- not everything has to be framed! The Giraffe and Squirrel are by Berkley Illustrations. I love their work, plus they are from Portland, Oregon, my hometown! The Giraffe is also part of this season’s Nod Institute of Art, but get him soon- they are limited edition!

MyHome_4

This little corner is filled with vintage finds, a few new modern pops and some items I’ve crafted myself- the mix is eclectic, but very me. The newest addition is the Moroccan inspired Leather Seats Come Standard Pouf. I love the bright pop of red and extra seating it brings into the space.

MyHome_5

This is Milly my pup, she is partial to the pouf too! Luckily it is made of PVC so I can wipe down any dirty paws she decided to add.

MyHome_6

I hope this little trip into my space has inspired you to look at products in a new way. One of the reasons I love working here is because our products are fun, quirky and kid friendly.          But they can also be sophisticated, stylish and used in a wide variety of spaces and places!

By Sarah Culbertson  

Once upon a time a fashion plate from Seattle met a childrens retailer from Chicago, and it was love at first sight.  After spending a lot of time together at the mall, they both knew it was a perfect match. So Sarah packed up her fabulous Kate Spade suitcase and headed for the Windy City. Where they lived happily ever after, designing and developing textiles for little kiddos everywhere.


Geeky Graduation Party

May 3, 2012

Post by Aimee and Bettijo of  pagingsupermom.com

My youngest brother graduated from ASU this month. My mom hosted his graduation party and asked me to help out by providing a few decorations. She wasn’t sure what theme to do, particularly since my brother wasn’t a big school fan, so the typical gold and burgundy didn’t seem to fit. I was racking my brain for graduation-themed ideas, but then I remembered how much Aaron adored these computer circuit board cufflinks I’d given him for Christmas a couple years back. Since his degree is in Computer Science I decided a geeky theme was a must!

1

Once I got started with the computer theme, I had lots of party decor ideas come to mind. First up, was to make a Binary Code Banner spelling out “Class of 2011.” I knew my brother would think it was cool since he and his wife had binary code ones and zeros as the frosting pattern on their wedding cake (super geeky, right?). Then I realized that in binary code each letter is spelled out using an 8-digit, one and zero combination. Which would have made my “Class of 2011″ banner 88 characters long. I quickly decided to go with the shorter 32-character banner you see in the photo that spelled out just “2011″ in binary code.

2

I created a stencil of the computer power button symbol — using a spare piece of chipboard and craft knife — to help frost the top of these Power Button Cupcakes.

3

Who hasn’t admired the pretty rainbow shine on the back of a CD? They’re practically begging to be made into party decorations, and nothing could be more fitting for this party. I ordered a big pack of CDs then tied them together with fishing line and a square knot. I varied the lengths of the CD garlands — some were three disks and others were six long — then I tied them in groupings onto the light fixtures in the room. The effect was mesmerizing!

4

Using a thick permanent marker, I wrote some fun code onto the helium-filled balloons. In HTML the code is marked with tags set off by carrot symbols. The opening tag is enclosed with “< >” and the closing tag is the same but with a backslash symbol added. So essentially this balloon is heralding the end of homework or more directly translated: “close homework.”

5

6

I also used the code markups to create fun labels to help guests keep track of their cups.

7

For my brother’s graduation gift, I made him a set of Geek Poetry Magnets for the side of his file cabinet at his new, geeky job.

8

Not going for geeky? Here are some more fun graduation party theme ideas.

Post by Aimee and Bettijo of  www.supermommoments.com

Backyard Birdwatching

May 2, 2012

IMG_3344

Birdwatching is a fun, inexpensive outdoor activity to do with your kids. Not to mention it's perfect for this time of year. Whether you spend a little time each day observing birds; or you make a full day trip out of it, it's something every member of the family can enjoy. We like to photograph the birds, then use the photos and whatbird to help us identify them.

Here are a few things we've learned along the way:

  • If you install a bird feeder, give the birds about a week to find it. (we picked up an inexpensive one with a huge bag of birdseed at Target…all for under twenty bucks).
  • Toddlers tend to scare away the birds. They get so excited and chase after them shrieking, "BIRD!" or at least this is true in my case. And when the bird gets scared and flies away, the older sibling gets annoyed.
  • Take plenty of snacks (this will help the aforementioned bird-scaring problem by providing a distraction to the younger one). Plus, who doesn't like snacks? 
  • Take an extra camera, if you have one. My six-year-old wanted ultimate control, which resulted in a lot of blurry photos of leaves and dirt. 

This is one of those activities that you can tailor to fit your family's interest level and attention span. And you may just learn something along the way! I created a little field journal to help you keep track of your findings. Download it for free here.

Field Journal-02

Helpful hint: I printed off pages 3-4 front and back, so it would open up like a book, and all the information on one bird would be in the same place: 

Field journal-01

If you have any questions or want to read more about our birdwatching adventures, pop on over to my blog. Happy Birdwatching!


Signature

Post by Christina Williams : justcallmechris.blogspot.com

Hand Painted Geo Blocks

May 1, 2012

IMG_2465

During my nesting phase while pregnant with my little girl, I embarked on a number of creative projects. This easy, hand painted set of geo blocks is one of my favorites. While the process is simple, it takes a good amount of time to paint 16 blocks so be sure to have an audio book, podcast, or television show to help pass the time! I find the end-result to be worth it, and even though my baby girl isn't yet old enough to appreciate this toy, it has kept even my older children busy.

You will need:

16 1 1/2" blank blocks
Non-toxic paint (such as Apple Barrel brand) in five colors, including white
Non-toxic sealer
Five sponge brushes
Masking Tape

Step 1: Prime blocks with white paint. Let dry.  

Process

Step 2: With masking tape, mask half of the block face at a diagonal. Do this with all blocks, and paint with color of your choice. Let dry and apply another coat.

IMG_2476

Step 3: Remove the tape and mask another side of the block, then paint. Some sides can be a solid color. Three of my six sides are solid and three are triangles. 

Step 3

IMG_2484

Step 4: Finally, apply two coats of sealer, allowing it to dry between coats.

IMG_2468

IMG_2480

IMG_2467


Post by Jenn : Ambrosia Creative

Room Decor Math

April 30, 2012

This plus this equals that! Too bad I can’t remember much real math from school, so I’ve invented my own!  Just follow these simple steps and you’re on your way to a super cute room!

RoomMath_1

Cat and Candy Print + Candy Dot Rug + Gummy Bear Nightlight = Candy Couture


RoomMath_2

Partly Cloudy Shelf + Head in the Clouds Pillow + Pop Up Lamp with Cloud Shade = Rainy Day Room


RoomMath_3

Circus Nod Chair + Ferris Wheel Nightlight + Balloon Animal Bookend = Circus Chic


By Anna Passadori

Anna develops and designs exclusive product for The Land of Nod. She hails from the west coast and has traveled the world to source product. She loves anything Marc Jacobs, Sofia Coppola or stripes! (So, if anyone can get a photo of Sofia Coppola wearing a striped outfit by Marc Jacobs, please send it along.)

DIY Elbow Patches

April 27, 2012

One of my daughter’s new favorite sayings is, “Easy Peasy Lemon Squeezy.”  Lola, of Charlie and Lola fame says it and she loves Lola so she’s adopted this little tag line……and I adore it!  And this little DIY is just that; Easy Peasy Lemon Squeezy.

If you’re looking for a way to add some flair to a worn out shirt or you have a shirt that is newer, but a bit boring this is the DIY for you.  I used a long-sleeved shirt of Georgia’s that shockingly still fits her after having had it almost a year.  I wanted to spice it up a bit–here’s what I did:

1

I gathered my supplies; the shirt, some felt, some sewing floss, scissors, and a needle.

  • Yes, those scissors say “crafts only.” I learned that from my mom…..otherwise I’d find myself cutting my bangs, flower stems, food, sticks, and paper with them and they’d never be sharp for actual projects.
  • Pick bright contrasting colors for all of your supplies.

Put the shirt on yourself or your child–whoever it’s for…

2

Have them bend their elbows and put a dot right where their elbow pokes out.  You’ll want to position the patches dead center on these dots.

Then cut out a paper shape for whatever your patches will look like (a heart, circles, triangle, oval, whatever).  Lay the paper shapes on the shirt sleeves where you think you’ll sew them just to eye the positioning.

3

Then…thread your needle with the sewing floss (you’ll want a pretty big needle) and start sewing.

4

That’s it!  And this will work for any gender, any age, any shirt, anywhere! You could also use material other than felt.  I just like the look and saturated color of felt.  You can also put some fray protector on the edge of the felt if you’re worried about it fraying in the wash.  I don’t think it’s really necessary, but if it’d make you feel better–go for it!

5


Post by Maggie Terryn : Mom Colored Glasses

Year Boxes

April 26, 2012

1

In keeping with my "documenting life" theme, I found this little craft over a year ago and I knew I had to recreate it. I found it HERE… the blog needs no introduction because all know and love Design Sponge.

2

The Year Box

The premise of the year box is that you have a card for every day of the year and they are divided by month. On every card, each line is a different year, I just started mine so my first year is 2012. Kind of boring this year but each card holds 12+ years depending on your index cards. So it is going to be so fun to look back and see what I was doing one year ago and then five and so on. I am just jotting down a few words to sum up the day. Some days are boring and say something like "ran errands at target and the grocery store" then others are more important like "first steps".

3

I have to admit that some days I have been bad and didn't write anything… but for the most part I'm keeping up with it. I can't wait to look back on it when the boys are older. I also made my mom and sister one for Christmas. They were a hit and easy to make in "bulk".

4
What you need:
These cute berry boxes, I found mine online at an etsy shop.
5
Date stamp and index cards (cut in half). I got my date stamp online at amazon.com but I have also seen them at Office Max or Staples. I love mine and use it for my Project Life stuff.
6
Postcards (also cut in half) of course Design Sponge had real vintage postcards, I had to cheat and found this cute pack with a "vintage look" but were actually new.
7
The longest part was the date stamping, I turned on a movie one night and stamped away, but because I was making 3 boxes it took what felt like all night. It was worth it because I love the outcome!
They are really a cute and simple (and inexpensive) gift. Do you have a way to jot down what you do daily to look back on it… do share!
8
Taylor sign
Post by Taylor Urban : www.itstaylormade.com


Come Sail Away

April 25, 2012

Latley I have been dreaming of a boat trip away- to see the sun, feel the sand and wear some sailor stripes.

SailAway_1

                        1                                                              2                                                     3


BON VOYAGE


SailAway_2

                             4                                               5                                            6


TO PACK

*How can you forget a fake anchor tattoo?

SailAway_3

                                7                                                        8                                                9


BEACH TIME

SailAway_4

                       10                                                   11                                                    12

SailAway_5

                            13                                                                                14


SIGHTSEEING READY

SailAway_6

                    15                                                    16                                                        17

SailAway_7

                            18                                                        19                                            20


HOMEWARD BOUND

SailAway_8

                            21                                                            22                                           23

SailAway_9

24


By Sarah Culbertson  

Once upon a time a fashion plate from Seattle met a childrens retailer from Chicago, and it was love at first sight.  After spending a lot of time together at the mall, they both knew it was a perfect match. So Sarah packed up her fabulous Kate Spade suitcase and headed for the Windy City. Where they lived happily ever after, designing and developing textiles for little kiddos everywhere.

DIY Yarn wall

April 24, 2012

D6839_GabrielleRoom_016

Whattya need?

  • Two different color yarns
  • Scissors
  • Push pins
  • A wall 

Blog_YarnWall_01

How do I make a yarn wall?

Step 1: Set push pins in a horizontal line on wall (let spacing between be random).

Blog_YarnWall_03

Step 2: Cut lengths of yarn appropriate for your room. Make them longer than you need; you will cut off excess soon.

Blog_YarnWall_02

Step 3: Tie one end of yarn around each push pin. Cut excess.

Blog_YarnWall_04

Blog_YarnWall_06

Step 4: Sit and stare at wall.

Blog_YarnWall_08

Created by Dane Holweger

FREE Furniture Delivery

April 23, 2012

Supercat_freefurndel_042012

To celebrate the launch of our exclusive new Monarch Collection, we're offering FREE DELIVERY on all furniture. Just stop by a store, call an associate or enter promo code INBLOOM during checkout at landofnod.com.

Shop Furniture

But hurry, because this special delivery ends April 29th 11:59 p.m. CST.

Chocolate Ganache Tart w/ Shortbread Crust

Hello again from Becca of CAKE.

I made this tart for a dinner party last weekend and it went over like gangbusters.  The crust has a hint of almond and a buttery shortbread flavor that compliments the dark chocolate ganache so wonderfully.  I added the raspberries to lighten and brighten it up a bit, but I might also recommend garnishing with a little sea salt, caramel drizzle, or if you’re feeling extra indulgent… perhaps even a bit of crumbled bacon?

1

2

photos + styling © cake. 2012

Chocolate Ganache Tart w/ Shortbread Crust
adapted from Martha Stewart

Ingredients 
3 tablespoons slivered blanched almonds
6 tablespoons sugar
1 1/4 cups (spooned and leveled) all-purpose flour
2 teaspoons grated orange or lemon zest, (optional)
1/4 teaspoon salt
6 tablespoons unsalted butter, cold and cut into pieces
12 ounces bittersweet chocolate, coarsely chopped
1 1/4 cups heavy cream
1 teaspoon vanilla extract

Directions 
1. Preheat oven to 350 degrees. Make dough: In a food processor, pulse almonds until finely ground. Add sugar, flour, zest (if desired), and salt; pulse until combined. Add butter, pulsing until coarse crumbs form with no large butter lumps (dough should clump together when squeezed with fingers).
2. Immediately transfer dough to a 9-inch tart pan with a removable bottom. Using a measuring cup, evenly press dough in bottom and up sides of pan.
3. Bake in center of oven until golden brown and firm to the touch, about 20 minutes.      Transfer to a wire rack to cool completely, about 1 hour.
4. Make ganache: Place chocolate in a large mixing bowl. In a small saucepan, bring cream to a boil. Pour hot cream, through a sieve, over chocolate. Stir until smooth and creamy in texture. Mix in vanilla.
5. Pour chocolate mixture into center of cooled tart shell (if chocolate is lumpy, pass through a sieve). Let stand until set, about 2 hours, or chill for 1 hour.

Need more tasty recipes and delicious bites? Check out our Let’s Eat Pinterest Board.

Post by Becca : www.cakeeventsblog.com

Pin a Playroom Contest Winners

April 20, 2012

We had so much fun looking through all of the entries for our Pin a Playroom Contest on Pinterest. Honestly, we were blown away by the creativity, playfullness that went into the boards. While it was no easy feat, we narrowed down the 327 entrants to one grand prize winner and five runner ups.

Drum roll please….

Heather Good stole the show with her future attic playroom & library. Heather's ingenuity shines through in her drawing of what she hopes the current empty attic space will be. She pulled inspiration from storage, movies & the overall coziness of libraries. There is no doubt her three young children will enjoy learning and playing in this incredible space.

Playroom winner

Runner-up winners ($100 gift card):

Andrea Grabowski's playroom highlights a sweet woodland theme. We acutally saw quite of bit of this genre, however we loved Andrea's modern look & feel of this charming trend.

Martha Louise Shamp's playroom is very feminine, soft and homey. It brought us back to the innocence & discovery of childhood.

Rachel Wagner put together a color scheme we absolutely love – red & teal. The inspiration items are vibrant and bold- perfect for a modern playroom.

Michelle DuPuis's board is very eclectic yet soothing. She pulled a lot of greys and yellows (one of our fav color palletes right now) to keep this shared adult/kid room functional and cozy.

Caitlin J created a library inspired playroom. Sure not to miss details like a story time rug & comfy seating, what kid wouldn't like kicking back with their favorite read?!


Thank you again for all the hard work & imagniation in these boards. We will reach out to the winners. Stay tuned for more fun contests!

By Katie Harrington

In addition to being the mom to heart-throb toddler, Gavin, Katie’s in charge of all things social media and PR at Nod. She’s exceedingly energetic, which is good since, like the rest of us, she’s just trying to figure out how to be an incredible mom, while working and still having a blast being young herself! (BTW, we think she’s nailing it, but she’d probably disagree…darn mommy guilt.)


I ♥ HEARTS

Hearts_1

Clockwise from top left: Marc by Marc Jacobs iPhone Case, ban.do Heart Shoe Clips, Madewell heart tote, ASOS big heart sheer tights, Nan Lawson City of Heart, Kate Spade heart studs, Summerland Classic Bow Tie, ASOS Magpie Flat Shoes.


By Anna Passadori

Anna develops and designs exclusive product for The Land of Nod. She hails from the west coast and has traveled the world to source product. She loves anything Marc Jacobs, Sofia Coppola or stripes! (So, if anyone can get a photo of Sofia Coppola wearing a striped outfit by Marc Jacobs, please send it along.)

Boy, oh boy, oh boy.

April 18, 2012

When we asked our twitter followers if they had any decorating dilemmas they could use some help with, Shannon R. (@SAHMconsulting) responded pretty quickly. You see, Shannon has three sons and a daughter. And, next year, when the youngest turns 2, she’s hoping to move all 3 boys into one bedroom.  Brave woman, huh? The problem is that like most families, they need the room to serve a lot of purposes. They need beds for all the boys, of course. Plus, clothes storage, and the closet just won’t cut it. And a place for cuddling and reading. Oh, and somewhere to put all those toys.

It’s a tall order, but I think I have some suggestions that might get Shannon going in the right direction. Here’s what I put together.

Boyohboy

1 2 3 4 5 6 7 8 9 10

First, the furniture. I suggest going with painted white furniture. While it’s not the traditional choice for boys, I think it’ll not only look great, it also won’t overwhelm the room. With a bunk and a twin bed in the room, a lighter color is definitely the way to go. And speaking of light colors, I’d definitely suggest opting for one for the walls.

Next, the bedding. Shannon mentioned the boys are fond of our Robots Bedding. And, it’s actually the perfect fit. It pairs nicely with our Moving Blankets which comes in several colors, so each boy can customize his bed to his tastes. Also, there are some fun throw pillows to mix in to give each bed its own personality. I also like this set because it’s a clever take on a boy’s theme that can easily grow with the children. So, it’ll work for all three of them for some time.

Storage is definitely an issue. And by suggesting a bunk and twin bed, I’ve negated the ability for Shannon to add a dresser. Instead, I’d suggest opting for underbed storage. Our I Think I Canvas Collection comes in tons of sizes and shapes. And the underbed group is perfect for clothes storage. Also, the closet system will allow her to optimize the space in the existing closet. In a variety of colors, it can be customized to each of the boys. And there are several coordinating options for toy storage

 Next, a reading area. Our Joya Rocker is a great choice. It’s small frame allows it to fit easily when space is at a premium. Plus, it’s sleek, modern design will transition easily to another room in the house when the boys are older. And, for book storage, I’d suggest our Straight & Narrow Book Ledges. They don’t take up any floor space and allow for storage of plenty of books. They also allow the books to act as wall art for the room. Why not take advantage of all of those gorgeous books!

As for a lighting, our Bright Idea Floor Lamp is perfect for the reading nook. And, for each of the boys, a Gummy Bear Nightlight adds a little fun to the room. Last, but not least, a rug.      I’d choose a cut or loop pile wool rug. It’ll provide a soft, cushy surface for the little ones to play. Our Blue Broad Stripe Rug gives a nod to the ombre trend and adds some great saturated hues to the space.

With 4 kiddos, I’m sure Shannon’s got her hands full. So, I hope this at least gave her a few tips to get started. I love the idea of the 3 boys together in one room, like a constant sleepover with your life-long pals. Hmmm, maybe I should do some re-arranging at my place this weekend?     A 5 year old boy and an almost 2 year old girl in one room, and mommy gets a craft room out of the deal…tempting.

By Danielle Kurtz

Danielle is the Creative Director at Nod and an over-protective mother of two. She’s also completely obsessed with Pinterest, Twitter and her Kindle, but not necessarily in that order. Danielle loves to craft, sew and crochet, but all her supplies have a layer of dust on them about 5-years-thick, wonder if it's just a coincidence that her oldest kiddo is 5 years old?