Houndstooth to Chevron in 15 Minutes Flat
Alternately titled: the biggest change you can make in the smallest amount of time!
Ladies and gentleman (I always wonder… any guy readers out there?), I give you a 15-minute project that will cost you less than $10 and make your DIY heart happy:

We have a bench at our dining room table. Partly because, when we bought our table four years ago as a floor sample at Pottery Barn, we needed seating and couldn’t afford six new dining chairs to go with it. I found four Windsor-style chairs at a yard sale for $10 and Ryan painstakingly painted them black with an oil-based satin paint (and that’s a story for another day), but we still needed two more seats.
We found this bench in the scratch-and-dent section (without a scratch on it!) at American Signature Furniture for $60. The structure has been sturdy as can be with my monkeys-for-children torquing all around on if for three meals a day the past four years. However, the original upholstery wasn’t pretty. Just plain beige – begging to be soiled.
Between then and now, I’ve recovered the bench about four times (once a year, usually). It only takes half a yard of fabric and a few staples to make it feel brand new all over again. (OR, if you have seats and not a bench to recover, this fabric will go even further!)
So, this is what the poor thing looked like yesterday morning. It’s a houndstooth material that my sister had leftover from reupholstering a sofa for a salon downtown Franklin.

But, do you see what has happened? Pudding, yogurt, and Heaven knows what else has made it a pretty ragged seat which my Mama opted out of sitting on in her clean fancy pants last time she came over. Can you blame her?
(Isn’t it funny how we just live with things and they get yucky over time and you don’t notice until you finally just look at it in a horrified moment of objectivity and realize what you are subjecting all of your sweet guests to?)

Yeah, something had to give. Time to turn that bench upside down and release the seat from it’s screws.

See the holes in the wood part of the frame? There’s a screw in each one – unscrew them to begin the transformation!

Once you’ve dismantled your bench in a moment of both rage and inspiration, go ahead and assemble some tools. You should be able to accomplish this project with half a yard of upholstery fabric (I was still undecided when I took this photo – both of the fabrics you see here can be found here and here), a pair of scissors, a screwdriver and a heavy-duty stapler.
(Can we talk about the fact that a yard of this pretty upholstery fabric is $9.75 and I only need to use half of it!!)
You may also want to grab a roll of batting if you want to add a bit of extra fluff to the seat.

A note on staples: I used to use long staples and it was so frustrating when they wouldn’t go all the way in on the first shot. I was in a constant pattern of staple-hammer it in the rest of the way – staple. Not pleasant. Silly me for not realizing that I need them to be just a bit shorter. All my dreams have now been realized. Amen, little 3/8″ staples. Amen.

Okay, so back to the project. Take out all the screws and release the seat. Set the frame aside.

You can see on the underside of my seat (I beg your pardon!) a few of my previous design choices. That red fabric is from back in the days when I worked at Ethan Allen. I’m showing you this so you can see that sometimes I take off a layer before putting a new one on, and sometimes I just add fabric right on top.
In this case, I’m using a light-colored fabric, so the houndstooth had to go. I took that off (just tugged at the staples until it all came loose) and beneath that was a layer of batting. (Thank you, last year Raechel, for taking the time to add fresh cushion so I don’t have to do it this year. Check.)

Okay, houndstooth is gone. This is where we stand. Now lay your pretty, clean, new fabric right-side-down on the floor and lay your seat on top of it, seat-side-down.

Pattern note: If you’re using a graphic pattern or a fabric with any kind of noticeable repeat, make sure you are lining things up really well. Nobody wants a wonky reupholstery job. Nobody.
So, start with the front of your seat and (with your pattern lined up carefully), start stapling from the center and working your way out – keeping things pulled tight and straight. (Hint: it helps to put your staples in about 2″ from the edge – any closer and you could risk a weird, visible puckering on the edge where each staple is.)

Now onto the backside. Give the whole piece of fabric a good tug and make sure the top looks just right. Then staple the backside.
I had a full yard of fabric here, so after I did the back row of staples I trimmed the remaining half yard off and set it aside.

Now do the two remaining sides the same way. Keep things pulled nice and tight as you staple.
Corners: the key on these – as you may have guessed – is keeping things tight. Pull the fabric from the front and staple it close to the side edge in one direction. Then pull the fabric from the side and staple it close to the front edge in the other direction. Then pull the triangle of fabric you’ve made super-duper tight and staple it in place well. Cut away excess fabric.


The back of my seat has notches for the frame, so I just behaved as though there were two corners on each side, making a slit with my scissors down the center, not too close to the edge.

And just like that, we’re almost there! The pattern lined up nicely!

Set the seat back in place and drive your screws back in the holes – they should be sharp enough to go right through your new fabric without too much trouble.

The fabric I used is pretty light – especially since I’m raising two blonde chickens in my house. So, a couple of coats of Scotch Gard is a good investment. Don’t we all feel better!?

Post by Raechel : www.raechelmyers.com


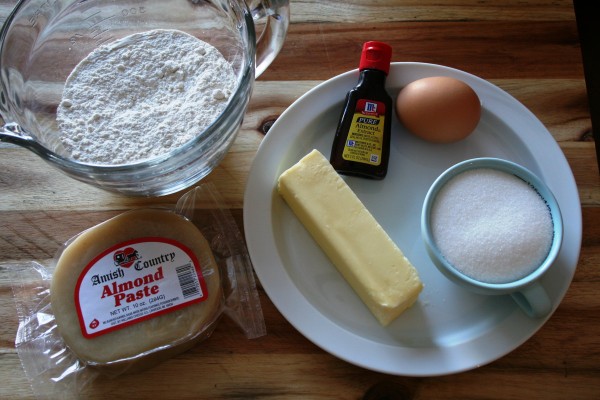 What you need:
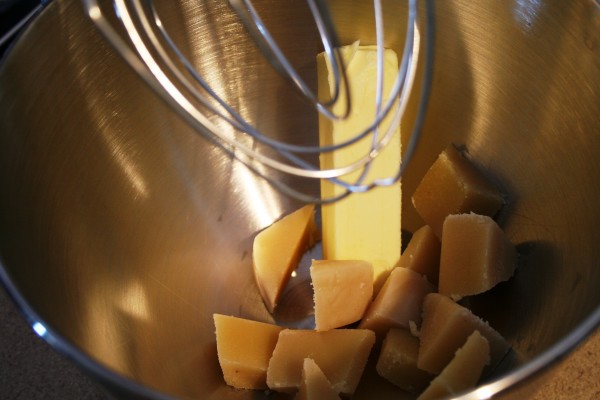 Cream together butter & almond paste. Cut up the almond paste into big chunks, because even if you leave it out on the counter over night it never really gets that soft.
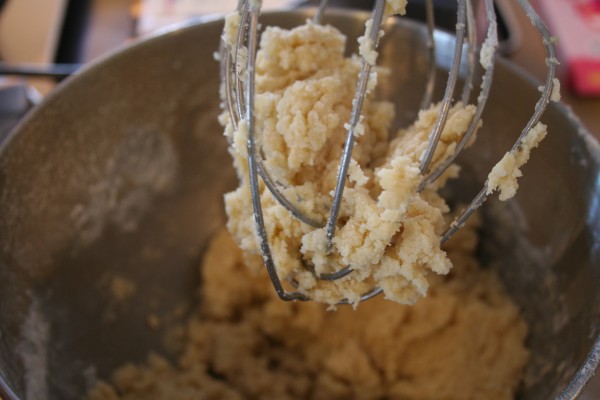 Do not chill this dough…you have to finish it right away.
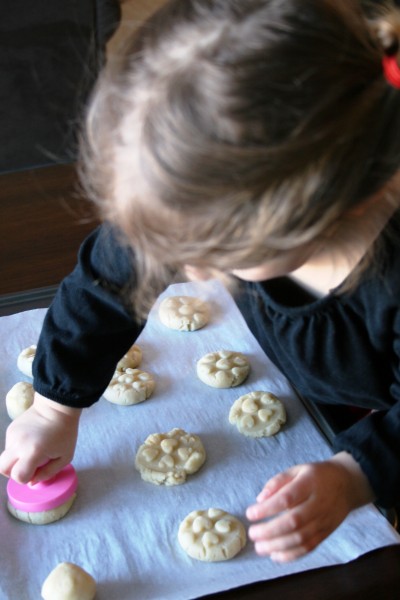
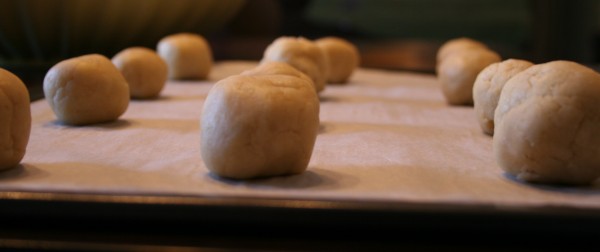 Next, you’ll need a cookie stamp….mine has little hearts on it. It doesn’t really matter what the stamp is…..you could probably even flatten them with the bottom of a glass. Press the stamp into each cookie so they end up being about 1/2″ thick. Georgia did some of mine for me and I promise that I threw the ones away that she bit while stamping and I washed her hands…..I promise!
 Bake at 350 degrees for about 10-12 minutes…11 minutes seems to be perfect in my oven. Let them cool on a rack before icing them.
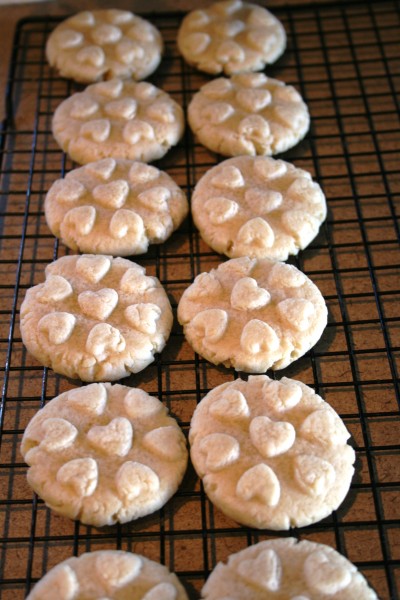 For the icing…..