Close

Blog

Best Shows To Binge Watch on Maternity Leave

March 17, 2017

Post by Rachel, Nod’s Brand Marketing Manager

When you have a baby, you have no time on your hands but more than enough time to binge watch a few shows while your newborn cycles through eating and sleeping. Goodbye free time, hello Netflix. Personally, I spent my days watching Real Housewives (reality TV junkie right here!) and Friends.

I asked a number of new parents around the office what they binge watched, and everyone had their 2-3 shows that kept them entertained while caring for baby. So we asked our Instagram followers for their favorites and came up with the list below.

Tell us – did we miss anything? We’d love to hear what kept you going while home with baby.

Ever wonder who’s behind The Land of Nod social media accounts? That’s Rachel! When she’s not telling anyone who will listen that she’s not meant to live in cold, snowy Chicago, you will find Rachel hanging out with her husband and new baby and binge-watching Netflix after baby’s bedtime. Or starting crafting projects that never get finished

Kindah Khalidy – Artist Interview

March 16, 2017

Interview with Artist Kindah Khalidy

Kindah Khalid - Artist Interview

Photo by Alex Nicholson

Tell us a bit about yourself….

  • Hometown: Monterey, CA
  • Current Town: San Francisco, CA
  • Fave Ice Cream Flavor: Cheesecake
  • Fave Breakfast Food: potatoes!
  • Fave Holiday: Do birthdays count?
  • Fave Color: Right now, light pink
  • Fave Movie: Purple Rain
  • Fave Decade: 80’s

Kindah Khalid - Artist Interview

Tell you how you got your start: I started designing textiles when I couldn’t find the fabrics I wanted in stores. It went hand in hand with my love for painting.

What are the most rewarding and the most difficult parts of running your own business? Most of the time is spent on business logistics, a very small percentage can be left for art.

Kindah Khalid - Artist Interview

How would you describe your style? A love for quality pieces, and overall comfortable.

If you could travel anywhere, where would it be? Ideally a place with warm ocean water.

If you could possess a superpower, what would it be? Flying would be fun, I’d save a lot of gas.

Kindah Khalid - Artist Interview

Tell us about the rugs, clothing and artwork you’ve designed for The Land of Nod. How did the partnership and products come about? What was the inspiration? Working on these products has been a lot of fun – they started from drawings, paintings, and a mood board of inspiration. I really enjoyed being able to focus on my strengths, painting and textiles, and Land of Nod has the most amazing artisans and makers creating their products. I strive to create products that make people happy, and design little bits of beauty that you can engage with throughout the day.

SHOP KINDAH KHALIDY FOR THE LAND OF NOD

DIY 3D Shamrock Craft

March 15, 2017

Post by MJ of Pars Caeli

DIY 3D Shamrock Craft

St. Patrick’s Day is just around the corner even if the view out your window is snowy white, it’s a great time to turn everything green! You don’t have to go big like the city of Chicago and turn your river green; you can add little bits here and there, like convincing your kids a leprechaun has pranked the house, to bring the holiday to life.

The celebration of St. Patrick’s Day at our house brings green food, leprechaun traps, silly pranks, golden chocolate coins, and these fun three-dimensional shamrocks. They’re made from heart shapes with a little extra cut so even small hands can get into the crafting.

DIY 3D Shamrock Craft

Supplies

  • Green copy paper or construction paper
  • Heart Template
  • Scissors
  • Tape or glue (hot glue works well)
  • String
  • Rainbow-colored crepe paper or other papers

Directions

  1. First, decide if you want to create a three- or four-leaf shamrock. If you’d like a three-leaf, you’ll cut out six hearts, and for four-leaf, you’ll cut eight hearts.
  2. Next, print out the heart template. If possible, print the template right onto your green paper. This will save you a step! If not, print out the template, cut the heart shapes, and trace them onto your green paper. Make sure to cut all the way into the middle of the heart as shown.
    We used a few shades of green to bring in some variation.

    DIY 3D Shamrock Craft

  3. Once you have the hearts cut, using the slit in the middle, overlap the humps of the heart (like we did here). Use glue to hold in place. A hot glue or strong craft glue will works well. Glue all of your hearts into leaf shapes.

    DIY 3D Shamrock CraftDIY 3D Shamrock Craft

  4. Cut a 1” square out of the green paper. Glue the tips of the leaves onto the square. You’ll have extra you can trim off if you’re creating a three-leaf clover.

    DIY 3D Shamrock Craft

  5. Repeat with another square and four more leaves for the back side of the shamrock.
  6. If you’d like to add a rainbow end, trim long strips of paper or use an already rainbow stream of crepe paper. Sandwich the streamers of paper between the two full clovers with glue.
  7. Add string and hang some good luck in your home!

DIY 3D Shamrock Craft

How do you add a touch of green to your home for St. Patty’s?

Xoxo, MJ

MJ is a graphic and product designer, wife, and proud momma to three. She founded Pars Caeli (meaning a piece of heaven), a delightful blog and shop, to add more creative to the everyday. MJ worked with our team to bring her lunchbox jokes to life in our product Lunchtime LOL Notes, now available at The Land of Nod to bring on a case of the giggles! 

Puff Pastry Palmiers Recipe

March 14, 2017

Post by Giulia, photographer and blogger at Giulia Doyle

I love the versatility and ease of use of store bought puff pastry. Having a couple of rolls in your freezer allows for all kinds of last minute creations and I thought I’d share these easy sweet and savory palmiers with you today. The sweet palmiers I created remind me of morning buns and the savory pesto ones are a perfect afternoon snack or quick cocktail appetizer. The kids had a lot of fun folding these and then enjoying their spoils.

Puff Pastry Palmiers Recipe

Cinnamon Sugar Lemon Palmier (1 dozen)

  • 1 sheet of puff pastry thawed
  • ½ cup of sugar
  • 1-2 teaspoons of cinnamon
  • Zest of one lemon

Directions

  1. Combine sugar with cinnamon and zest
  2. Lightly sprinkle a piece of parchment with sugar mixture. Place the puff pastry on top and roll to a rectangle 8 by 26 inches and approximately 1/8 inch thick if it does not already come rolled out. Sprinkle generously with the rest of the sugar mixture.
  3. Fold rectangle in half on long end and unfold again. Working quickly but gently, fold each long end to the center line of the pastry and then fold again. The fold will look like an open book. Freeze folded log for 20 minutes, until very firm but not frozen.
  4. Slice crosswise into 3/8-inch slices. Place palmiers 2 inches apart on a parchment lined cookie sheet and press down on each one with the palm of your hand until they are about ¼ inch thick. Sprinkle the center of each with sugar that fell off during folding.
  5. Preheat oven to 425 degrees. Bake palmiers 10 minutes, until golden on the underside.
  6. Carefully flip with a spatula, pressing down to flatten if palmiers seem to be unrolling. Bake 8 minutes more, watching carefully, until golden and crisp.
  7. Transfer to a cooling rack and cool completely.

Puff Pastry Palmiers Recipe

Pesto Palmiers (1 dozen)

  • 1 sheet of puff pastry thawed
  • 2-4 tablespoons of store-bought pesto

Directions

  1. Place the puff pastry on top of a sheet of parchment and roll to a rectangle 8 by 26 inches and approximately 1/8 inch thick if it does not already come rolled out.
  2. Fold rectangle in half on long end and unfold again. Spread with pesto from edge to edge.
  3. Working quickly but gently, fold each long end to the center line of the pastry and then fold again. The fold will look like an open book. Freeze folded log for 20 minutes, until very firm but not frozen. Slice crosswise into 3/8-inch slices. Place palmiers 2 inches apart on a parchment lined cookie sheet and press down on each one with the palm of your hand until they are about ¼ inch thick.
  4. Preheat oven to 425 degrees. Bake palmiers 10 minutes, until golden on the underside.
  5. Carefully flip with a spatula, pressing down to flatten if palmiers seem to be unrolling. Bake 8 minutes more, watching carefully, until golden and crisp.
  6. Transfer to a cooling rack and cool completely.

Giulia Doyle concentrates on food photography and travel photography – using the full color spectrum. She tries to live life to its fullest and will take every opportunity to travel or entertain. With her lovely family, she has big dreams of cottages by the ocean, boutique bed and breakfasts, brick and mortar stores or possibly moving back to Europe – if only she could make up her mind!


Healthy Unicorn Yogurt Bark Recipe

March 13, 2017

Post by Lunches + Littles

A Healthy Spin on Unicorn Food

Have you noticed all the pastel rainbows, glitter and sparkles that are making up this new, unicorn food craze? These foods are pretty and fun, but often loaded with sugar and candies, and as a mama of three little ones that just isn’t something I can get behind. But, I have found a compromise!

I love making meals (and snacks!) fun and love sharing with other parents how fun food doesn’t have to be unhealthy. So, here is a unicorn snack, that is colorful, easy to make, and yes, totally mom-approved! Your little one(s) will love the bright colors, and you will love that it’s an easy and healthy snack option! – Read on for a healthy spin on a new food trend. This Unicorn Yogurt Bark is simply magical!

New! Bambino Pink Bowl and Bambino Pink Cup

INGREDIENTS:

  • 6 cups plain Greek Yogurt (you can use regular yogurt here too)
  • 2 Tbsp Honey
  • 1 banana, sliced
  • 3-4 strawberries, sliced
  • Various Food Coloring (we used 6 different gel food colors)
  • Sprinkles (we used several different kinds and colors)

* For this recipe I used an 11 x 17 baking tray, and this yielded approximately 20 pieces of bark.

DIRECTIONS:

  1. Mix yogurt and honey together until well combined.
  2. Divide yogurt into various bowls, depending on how many different colors you would like to make. We made 6 different colors, so divided our yogurt into 6 bowls.
  3. Add food coloring, until you reach desired colors. We made a range of pastels: pink, orange, yellow, green, blue and purple.
  4. Next, line a baking tray with parchment paper and spoon various colors into pan, being sure to space colors out, so that you will get a nice rainbow effect in the end.
  5. Once you have all your yogurt in your pan, spread/blend with the back of a spoon just slightly. Be careful not to blend your yogurt too much!
  6. Top with sliced bananas and strawberries, and finally sprinkle with your assorted sprinkles!
  7. Freeze for 3-6 hours, or until yogurt is completely frozen.
  8. Then, remove from freezer and separate from parchment paper. Using either a knife or just your hands, break bark into various pieces and serve immediately! (Leftover yogurt bark can be stored in the freezer in food bags for easy snacks later!)

Unicorn Yogurt Bark Recipe

Lunches + Littles focuses on quick, healthy and fun meal options for little ones. One of the goals of Lunches + Littles is to share practical tips and tricks on how to make meals fun, all the while keeping things simple. A lover of colorful plates, and an advocate for getting kids in the kitchen, Lunches + Littles is also a great resource for parents of picky eaters, parents looking for healthy family and toddler recipes and those mamas (dads too!) who are short on time. A mantra of sorts: Making meals fun doesn’t have to be hard! With 3 little ones (3 and under) it can’t be! Follow @lunchesandlittles for all of the above… And more!

Irish Potato Bites Recipe

March 10, 2017

Post by Corri of Glitter and Bubbles

Irish Potato Bites Recipe

St. Patrick’s Day is right around the corner and this year we’re serving up something savory. Potato, butter and cheese are staples in Ireland, so we combined them all to make the perfect little appetizer. These bite sized potatoes take less than 30 minutes to make and will put your family in the St. Patrick’s Day spirit! What does your family do to celebrate?

Irish Potato Bites Recipe

INGREDIENTS

  • Kerrygold Irish Butter
  • Kerrygold Irish Cheddar
  • 10-12 Red Potatoes
  • 1 Green Pepper
  • 3-4 Pieces of Bacon
  • 1/4 Cup Sour Cream
  • 2 Tablespoons Green Onion, Chopped
  • Salt & Pepper

Irish Potato Bites Recipe

DIRECTIONS

  1. Preheat the oven to 400 degrees.
  2. Cut the potatoes crosswise 3/4 of the way.
  3. Using a mandoline, slice thin pieces of green pepper and place into every other cut of the potato.
  4. Next, slice the cheddar into small pieces and place in the remaining openings.
  5. Spread butter over the top of each potato and bake for 7-10 minutes.
  6. Slice the green onions and cook the bacon and then crumble.
  7. Once out of the oven, top the potatoes with a small dollop of sour cream, bacon and green onions.

Corri McFadden is the Owner/Founder of eDrop-Off luxury consignment and creator of Glitter and Bubbles, a modern-day moms guide for those looking for inspiration through fashion, décor and food.  The site was launched in honor of her daughter and muse, Zelda and gives daily doses of stylish “must haves”, easy recipes and unique décor that are suited to inspire even the busiest of Moms!

Molly Hatch – Artist Interview

March 9, 2017

Interview with Artist Molly Hatch

Molly Hatch - Artist Interview

TELL US A BIT ABOUT YOURSELF…

  • Hometown: Woodstock, Vermont
  • Current Town: Florence, Massachusetts
  • Fave Ice Cream Flavor: Coconut
  • Fave Breakfast Food: Waffles with REAL maple syrup
  • Fave Holiday: Christmas
  • Fave Color: Cobalt Blue
  • Fave Movie: Sophia Coppola’s Marie Antoinette
  • Fave Decade: 1770s

Tell you how you began your business: I started out as a studio potter. When I finished graduate school in 2008, I started my own pottery and sold my pottery through galleries and Etsy as well. About a two years after I started my pottery, in 2010 I was approached by Anthropologie to design a line of tableware. This opportunity led to many more product collaborations as well as opportunities to grow my brand beyond tableware with other companies, leading to lots of fun collaborations like this one, with Land of Nod!

Molly Hatch - Artist Interview


What are the most rewarding and the most difficult parts of running your own business? I find that balancing my work and personal life one of the most challenging aspects of being a self employed artist. My work hours are long—and often its hard to explain to friends that what I want to do in the evening with a glass of wine is the same work I was did all day! Travel is probably the most taxing on my family, but its also one of the more rewarding aspects of my work—it is amazing having a supportive husband and daughter and I get really excited when they get to come along for travel too. I find that it is incredibly rewarding when I hear back from people using the products I design—that my work fulfills a need and make people happy. I am so grateful that my days are filled with beautiful things and positive, inspiring messages. I feel truly lucky to get to make the work I do for a living.

How would you describe your style? Modern yet traditional. Instant heirloom.

If you could travel anywhere, where would it be? Hmmm, Paris is ALWAYS a good idea. Always.

If you could possess a superpower, what would it be? To spread magic—and peace….

Molly Hatch - Artist Interview


Tell us about the products you created for The Land of Nod. How did the partnership come about? What was the process like? My collection for Land of Nod was the perfect opportunity for me to envision a makeover for my daughter’s bedroom! I love when my work allows me to re-design my home in the process. I particularly love that I got to include lots of ceramics in this collection given my start as a potter. So, I am particularly excited about the piggy banks and lamps in the collection. I sketched the whole collection in pencil first, then went to work making the ceramic prototypes which were 1:1 scale. The flat art for the bedding and pillows was all done with watercolor—creating a softer look. Watercolor is typically how I create surface patterns and designs.

Molly Hatch - Artist Interview


Which of your products you created for The Land of Nod is your favorite so far? I LOVE the deer lamp, the little bluebird pull is adorable and the gold detail is fabulous! My daughter LOVES the snail pillow!

Molly Hatch - Artist Interview

SHOP MOLLY HATCH FOR THE LAND OF NOD

Wall Mounted Art Station for Kids

March 8, 2017

Post by Colleen of Lemon Thistle

Wall Mounted Art Station for Kids


Do your kids love to create? Mine, especially my daughter wants to do art ALL the time. She was constantly asking me to pull her art supplies out of the closet and every meal we were cleaning them up off the table to eat. When I spotted this Beaumont Wall Mounted System from The Land of Nod I knew it was the perfect solution for us.

Wall Mounted Art Station for Kids

We have a small play room in our basement and we chose to use one of the walls to mount this system and create an ultimate art station for them. I love that it keeps everything off the floor, it’s really easy for them to clean up, and it’s always available for them to use without any adult assistance to set up. It’s kind of the perfect storm.

Since our kids are young (three year old twins and a 1 year old), I mounted everything pretty low for them. I also was working with a half wall so that worked out well! If I had older kids, I’d probably try do two rails height wise (one for them to sit, one for them to stand) to maximize space.

Wall Mounted Art Station for Kids

We used three different peg rails– one for the main paper roll, one for a chalkboard, and one for a bin. We used the book ledge to hold notebooks and paints and the additional hooks to hang bags and pouches for chalk, paints, and I plan to get the kids smocks for painting and those will hang there as well. We used the white space around the station to add clothespins for them to display art work they like- I love this so much more than them taping art on the wall everywhere (do your kids do this too?).

One tip on laying out a wall mount system like this is to use painters tape to mark it out and to mark the holes. It’s so nice to be able to see how it will look visually (space wise) without holding anything in place.

Wall Mounted Art Station for Kids

Wall Mounted Art Station for Kids

All in all, I’m SO happy with this solution, I only wish we’d had it sooner! It’s been such a hit- it gets used every single day. Tell me, how do you display all your kids’ art supplies?

Wall Mounted Art Station for Kids

Colleen is a wife, Mama to twins with one on the way, and the DIY and lifestyle blogger behind Lemon Thistle where she shares printable art and hands on tutorials for DIY home decor, parties and gifts. Colleen believes you can have a beautiful life, home, and party without spending a lot- we’re keeping it real on a budget so everyone can join in on the fun.

Best Parenting and Pregnancy Apps

March 7, 2017

Post by Rachel, Nod’s Brand Marketing Manager

Every morning when I was pregnant, I laid in bed wishing I could go back to sleep (I wish I could blame that on pregnancy but I can’t) and read through all my pregnancy apps. I tracked my son’s growth – from lemon to pineapple – and learned about his development. Personally, it helped me feel more connected and aware of what was going on in my belly. It also introduced me to a community of women who were pregnant at the same time and going through many of the same emotions and feelings. Because being pregnant is all about the feelings!

Now that my son is almost 1 (how is that even possible?!), I look back on those slow mornings with fondness. Which is probably because I can’t keep my son still long enough to lay in bed anymore. But it’s also because those apps helped me learn so much about my little kiddo’s growth while I was pregnant.

We asked our Instagram followers to share their favorite parenting and pregnancy apps and it was very clear the apps were helpful to you all too! Here are the top parenting and pregnancy apps, as told by our Instagram followers. Let us know if there are any we favorites we missed.

Ever wonder who’s behind The Land of Nod social media accounts? That’s Rachel! When she’s not telling anyone who will listen that she’s not meant to live in cold, snowy Chicago, you will find Rachel hanging out with her husband and new baby and binge-watching Netflix after baby’s bedtime. Or starting crafting projects that never get finished.

Angular Art Project

March 6, 2017

Post by Rebecca of Not-So-SAHM

Angular Art Project

Do you have a forbidden art supply in your house? Some people have a ban on glitter, others lose their minds at the idea of letting kids loose with paint. I’m pretty laid back about our kids trying out different art materials. But I draw the line at permanent markers. No matter how much they promise to be careful, if our kiddos use permanent markers unsupervised, ink will be all over our kitchen table, their clothes, and generally the kids too. Do you know how much fun it is to scrub permanent black marker out of granite? It’s not.

So of course permanent markers are the most sought after art supply in our home. I think they’d take a sharpie over a sweet. Seriously. To that end, I had a few permanent marker art projects on my mind to appease them when I spotted The Land of Nod’s Angular Quilt. I knew immediately that I wanted to try an angular art project that combined permanent marker and watercolors. I love the contrast between the markers and paint and I knew the kids would love it too.

Angular Art ProjectAngular Art Project

Plus, I love that this project is super simple, but turns out such beautiful and different results. Of course, the fun is in the process. But it’s nice to have a nice looking piece of art at the end too!

To make your own, you’ll need:

    • Sturdy paper (try cardstock or watercolor paper)
    • Black permanent marker
    • Ruler
    •  Watercolors 

Angular Art ProjectAngular Art Project

In addition to showing our kids the quilt, we looked at a few different examples of geometric art for some inspiration. Then I let the kids use a ruler to draw different lines and angles on the paper. When they were happy with the design, they used the watercolors to fill in the spaces with color. It’s such fun to see how different each one turns out!

Angular Art Project

Rebecca is a mom to two young kiddos and, in her spare time (ha!), likes to pretend she’s a back-up dancer, craft cocktails, and run long distances. A relatively recent SAHM, she blogs family-friendly activities, DIYs and celebration fun at Not-So-SAHM.

Hospital Bag Essentials

March 3, 2017

Post by Chandra of Oh Lovely Day

Hospital Bag Essentials

If you’re expecting a baby and are going to give birth in a hospital, you’ll need to pack a hospital bag with essentials for both you and baby. I tried to finish packing mine by 36 weeks (aside from the few things that I couldn’t pack until it is time to go). I remember being overwhelmed packing for my hospital stay when I was having my first baby, but by baby three I felt like I had a good grasp of what we really needed. Here’s what I found to be the most helpful to have when I was in the hospital, after three deliveries and hospital stays that were all very different.

First, I have to share my bag because I love it so much. I used the Weekender from Birdling Bags and it is the perfect size, is compartmentalized into three sections (which is perfect for dividing things up for labor, postpartum for me, and comfort items, snacks, and baby. It’s also great for family travel and is a great carry on when we fly as a family. Now, here’s my packing list and my favorite specific items that went inside my bag. I hope this list can help you pack your own bag and feel a little less overwhelmed as you prepare for your baby’s arrival.

Hospital Bag Essentials

The Essentials:

  • ID AND INSURANCE INFO which you’ll need when checking in.
  • PHONE AND CHARGER (I’d also recommend buying and bringing an extra long cord because sometimes you can’t reach where you need to charge your phone without one, and you don’t want to have to get up to get your dying phone after you have had a baby.)
  • CAMERA (if bringing something other than your smart phone)
  • NURSING PAJAMAS, ROBE, NURSING TANKS: Bringing some soft and comfy nursing pajamas or a nursing gown and a luxurious robe will make you feel human again after you have a baby. I loved my James Fox Co Gown (which would make a great delivery gown or is also perfect for after) it was perfect for doing skin to skin and nursing after delivery when my baby was in the NICU. I also packed Belabumbum nursing pajamas, my Doie Lounge Robe (this robe is so soft and feels so nice you guys!), and some leggings, a nursing tank, and cardigan to wear home (remember, you’ll still likely look and feel at least 5 months pregnant — don’t think you’ll be walking out in pre-pregnancy jeans!)
  • WARM SOCKS OR SLIPPERS: I tend to get hot so I prefer to have slippers I can slip on to walk around the room and slip off when I get back in bed, but others get super cold in the hospital and love to have warm socks. I pack both, just in case.
  • NURSING SUPPLIES: The only thing I’ve ever used or needed in the hospital is a nursing pillow and nipple balm (this is my favorite because it is natural and doesn’t stain clothing with grease spots). I also throw in a couple sets of Bamboobies nursing pads (my favorite ones for their softness and because you can wash and reuse them), and a couple of nursing bras (this one is my personal favorite). Some women bring their own pump as well, but I’ve never used mine at the hospital (most hospitals have pumps available for you to use, but you may want to ask ahead of time and bring yours if they don’t have one available).
  • HOMECOMING OUTFIT FOR BABY, plus any special blanket or hat you want baby to wear at the hospital or on the way home. It is nice to have something special for some photos and to save as baby’s homecoming outfit. A set like this one is really cute. The hospital does provide shirts, blankets, diapers, and even a hat, so you don’t need to pack a ton of baby clothes, just a couple of special pieces.
  • EXTRA (EMPTY) BAGS: You leave the hospital with a lot of stuff. Diapers, thermometers, some side snap shirts, mesh underwear, etc. etc. etc., plus gifts that visitors might have brought you and baby. Extra empty bags come in handy to haul your stuff home.
  • CASH AND CHANGE FOR VENDING MACHINES
  • FLIP FLOPS (for the shower)
  • FACE WIPES: These feel so good to clean up with after labor and to refresh without having to get out of bed, or if you can’t get out of bed.
  • CHAPSTICK OR LIP BALM: A must! Pack your favorite in an easily accessible place. If you don’t have a favorite, I LOVE this one and it lasts forever.
  • SNACKS, CANDY, GUM, SPRITE/7-UP: I pack some special treats for myself, some snacks, some Oat Mama lactation bars (they help with milk production but are also delicious — the chocolate & peanut butter one is my fave!), gum or mints, and anything else you would find helpful during your stay.
  • TOILETRIES: That first shower after you deliver feels like such a treat. Pack travel sizes of your favorite shampoo, conditioner, face wash, etc. Don’t forget a toothbrush and toothpaste, a hair brush, and deodorant. Also, hand lotion, face moisturizer, and lip balm are musts for me because I get so dried out after labor.
  • WHITE NOISE: I would add a white noise app to your phone so you can drown out the hospital noise when you are ready to get some rest. My room was next to the nurses’ station once and it was constant noise and activity 🙁
  • INFANT CAR SEAT: You’ll need one of these properly installed for the hospital to release you (and they do escort you out and check).
Hospital Bag Essentials

The Nice-To-Haves:

  • DELIVERY GOWN: I’ve brought my own delivery gown to the hospital and worn the same one for all of my babies (yes, the exact same gown has survived three births!) While this isn’t essential — the hospital does provide one to you — it does feel nice to have your own that is cute and all yours. And I love that all three of my babies were delivered in the same gown. I plan to have it made into little stuffed animals for them to save forever 🙂
  • COMFORTS OF HOME: These aren’t necessary but might make you feel more comfortable during your stay (I didn’t pack them with my first and did with my second and third and was so glad I did!): Your own throw blanket (this is my favorite), Your own bed pillow (make sure your pillow case is distinctive so they don’t take it if they come in to clean your linens), Bluetooth speakers to play music if you plan to have a birth playlist
  • Essential oils diffuser and oils if that is something you do at home and find relaxing (I packed a Clary Calm roller and Serenity to diffuse. And I like this diffuser.)
  • ZIPPERED POUCH TO HOLD ESSENTIALS: You might be tired, sore, or holding a sleeping newborn — probably all of the above — and unable to get up and search for that chapstick, phone charger, or whatever else you really need to reach. I put all of my essentials in a zippered pouch and kept it on my little hospital tray table to keep everything easily within reach.
  • BABY BOOK OR MEMORY BOOK: Nice to have if your hospital does footprints for you (mine didn’t but many do)
  • ENTERTAINMENT: Having an iPad, Kindle, Laptop, or book is nice in case you have any downtime. These were once on my “don’t bother bringing” list, but after my third delivery I changed my mind. My husband was home with our other two children and I was mostly alone and my baby was in the NICU. I ended up having my husband bring my laptop because I needed a distraction and the Flip or Flop marathon got old after a couple of days.
  • CUTE PHOTO PROPS: Although you definitely don’t need a swaddle blanket or your own hat (the hospital provides these during your stay) I liked having my one or two of my own to use as well, plus for some cute photo taking.
  • GIFT FOR OLDER SIBLINGS FROM THE NEW BABY: If you have other children who will be coming to meet their new sibling, bring a small wrapped gift for each one from the new baby, especially if they are ages 5 and under. They don’t have to be big expensive things. Just a stuffed animal, car, doll, or book that you know your child will love. I let my older children pick out a gift for the baby that they wrap and bring as well (a lovey like this or a soft stuffed animal like this are great ideas but let them choose something themselves if possible).

The Don’t Bothers:

  • Medicine: the hospital will give you whatever you need on a schedule and keep track of any doses
  • diapers or wipes, unless you want to use something specific
  • baby grooming things (the hospital has and provides you with these)
  • underwear or sanitary pads: the hospital gives you mesh underwear (some women don’t like these but I actually love them those first few days, plus you don’t want to ruin your own underwear) and sanitary pads, so save your own for when you’re back home. You might want to pack one pair of your own underwear but I wear the mesh ones for days (they’ll even send you home with some!)
  • you don’t need a ton of clothes for yourself. Your gown, a set of pjs, and something comfy (like a nursing tank, cardigan, and maternity pants or joggers – NOT your pre-pregnancy jeans) to wear home
  • I don’t pack a bag for my husband. He’s on his own to pack for himself, and now that we have kids he is only there for labor/delivery anyways. After that he stays at home with our other children and visits when he can.
  • pain relieving spray or ice packs are also provided by the hospital

I hope some of you find this helpful. Is there anything you pack for the hospital that I left off my list or anything I listed as unnecessary that you’ve found you needed? What is your number one essential for the hospital?

Chandra is the wife to her high school sweetheart and the momma of three boys: Charlie, Calvin & Quincy. She lives in Los Angeles (for now, at least), where she tries to enjoy the sunshine and go on lots of family adventures. Some of her favorite things include: a morning coffee, hiking at Griffith Park, reading a good book in a hot bath, carbs,  binge watching on Netflix, chocolate chip cookies, family dance parties, and cuddles and kisses from all of her boys. Chandra is the creator of Oh Lovely Day, which she started in 2010. She also writes for Momtastic.


Whole Home Nod Decor

March 2, 2017

Post by Stephanie, Home Stylist & Event Designer from the Land of Nod’s Design Services Team

When it comes to putting together a nursery or kids room, the natural impulse is, of course, The Land of Nod. It’s the no-fail, go-to for quirky, stylish youth-focused furniture and décor. However, what about those other rooms — the rooms where the whole family likes to hang out? Living rooms, dining rooms, even kitchens have just as much potential for seeing Nod magic as the traditionally designated “kid zones”, but are often perceived as separate from the Nod product assortment. Not so!

Check out this inspirational living room and see if you can spot the Nod products hiding among the standard furniture and décor.

Whole Home Nod Decor

Happy Styling!

Post by Stephanie Geurkink, Home Stylist & Event Designer  from The Land of Nod’s Design Services Team. Our Design Services team offers free one-on-one design advice, mood boards and space planning. You have a room to decorate? They’d love to hear from you. Visit The Land of Nod’s Design Services page to get started today.

Hygge Inspired Kids Room

March 1, 2017

Post by Stephanie, Home Stylist & Event Designer from the Land of Nod’s Design Services Team

Hygge (pronounced hoo-ga) is an emotion-driven design trend with roots in Danish culture. Hygge is all about a sense of warmth and welcoming. It’s the philosophy of designing your home to be a relaxing retreat, a sanctuary to unwind and regroup. When I think of hygge, I think of a glowing fireplace, warm blankets, and candlelit meals shared around a table filled with family and close friends. So how does this design trend translate into a space for kiddos? I’ve put together two different inspirational room designs for bringing all things hygge into a comforting space for your little one.

Hygge Inspired Kids Room

Opting for neutral colors, soft plush textures, and warm rich wood finishes is a great starting point for bringing hygge design into a kids space. For bedding, aim for building a snuggly nest using a duvet cover paired with throw pillows and a knit blanket. An upholstered glider and wool throw pillow create the perfect cozy reading nook for winding down the day with a bedtime story.

Hygge Inspired Kids Room

Happy Styling!

Post by Stephanie Geurkink, Home Stylist & Event Designer  from The Land of Nod’s Design Services Team. Our Design Services team offers free one-on-one design advice, mood boards and space planning. You have a room to decorate? They’d love to hear from you. Visit The Land of Nod’s Design Services page to get started today.

How to Layer Rugs

February 27, 2017

Post by Stephanie, Home Stylist & Event Designer from the Land of Nod’s Design Services Team

There are a few different reasons why you might want to layer rugs in a space. Maybe you’re looking to cover a large surface area or maybe you need a way to designate different activity zones. In the case of my friend Ashley, the idea for layering rugs came about when she was looking to bring in some added texture to her daughter’s playroom. She already had a large, pink flatweave rug in the room, but she wanted an extra layer to give the space more visual interest. With that in mind, I put together a few new rug recommendations and suggested layouts to help her decide how to proceed.

How to Layer Rugs

How to Layer Rugs

The first option for Ashley’s playroom uses a second flatweave rug layered at an angle over her existing rug. I opted for a rug with a large-scale pattern to compliment the subtle pattern in her existing rug, it’s our Indoor+Outdoor Grey Rug.  To cover the most amount of surface area, I pushed the existing rug to one side of the room and angled the new rug to reach from the play teepee to the accent chair.

How to Layer Rugs

How to Layer Rugs

In the second option, I used a round flokati rug to designate a “reading nook” in the play teepee. Flokati also brings in a nice contrasting texture to the existing flatweave rug. The extra fluff makes the space feel just a little more cozy and inviting. However, to break up the shaggy textures, I included an upholstered ottoman as an alternative to the Shaggy floor pouf presented in the first option.

How to Layer Rugs

How to Layer Rugs

The last layout option uses two rugs of the same size, but with different textures, to completely cover the playroom and also designate different activity zones. The new Tally rug in grey would go under the sofa and the existing rug would fill the corner where the play teepee is. Between the two rugs, the entire room would be unified with complimentary, but contrasting colors and textures.

Happy Styling!

Post by Stephanie Geurkink, Home Stylist & Event Designer  from The Land of Nod’s Design Services Team. Our Design Services team offers free one-on-one design advice, mood boards and space planning. You have a room to decorate? They’d love to hear from you. Visit The Land of Nod’s Design Services page to get started today.

Simple Tortellini Soup Recipe

February 24, 2017

Post by Giulia, photographer and blogger at Giulia Doyle

We still have snow on the ground and I know we aren’t done with winter. However, we are getting glimpses of spring here and there, which is encouraging. That being said, something warm and comforting that can be thrown together easily is very welcome at our house and this tortellini soup fits the bill. It has great flavors and can be served at lunch or dinner and even works for school lunches in a thermos. Picky eater approved once you remove the chard.

Simple Tortellini Soup Recipe

Simple Tortellini Soup (serves 4)

  • 1 cup of sliced salami or cubed pancetta
  • Green onions sliced (about 1 cup)
  • Olive oil
  • About 1 quart (1 liter ) of good quality stock
  • 1 package of frozen cheese tortellini
  • 1 bunch of Swiss Chard washed and torn into large pieces. Remove tough stems.
  • 2-3 tomatoes cut into chunks
  • Salt and pepper
  • Jarred pesto
  • Grated parmesan

*Feel free to add carrots if you like and if you don’t like tomato skins, blanch tomatoes first to remove the skins or use peeled canned tomatoes

Directions:

  1. Heat oil in large pot, add salami and onions and stir until salami slightly crisps and onions turn glossy.
  2. Add broth and bring to a boil.
  3. Add tortellini, chard and tomatoes then cook at medium/high until tortellini are soft but not mushy (about 5 minutes).
  4. Taste and season with salt and pepper to your liking.
  5. Serve with a dollop of pesto, a sprinkling of Parmesan and some crusty bread.

Simple Tortellini Soup Recipe

Giulia Doyle concentrates on food photography and travel photography – using the full color spectrum. She tries to live life to its fullest and will take every opportunity to travel or entertain. With her lovely family, she has big dreams of cottages by the ocean, boutique bed and breakfasts, brick and mortar stores or possibly moving back to Europe – if only she could make up her mind!


How to Mix and Match Patterns for a Woodland Nursery

February 23, 2017

Post by Danielle, Home Stylist on The Land of Nod Design Service’s Team

Maybe you’re a nature lover and looking to bring some of the outdoors into your new baby’s nursery design, or maybe you just can’t get enough of our adorable fox sheets. Whatever your motivation, creating a woodland sanctuary for your little one is all about mixing patterns that feel like they belong in a log cabin with playful animal and tree prints, like the Nature Trail bedding used in this design. To round off your woodland, trying pulling in artwork and accessories that lend themselves to travel, adventure and nature.

Post by Danielle, Home Stylist from The Land of Nod’s Design Services Team. Our Design Services team offers free one-on-one design advice, mood boards and space planning. You have a room to decorate? They’d love to hear from you. Visit The Land of Nod’s Design Services page to get started today.

A Modern Take on a Colorful Playroom

February 22, 2017

Post by Rebecca Propes of Petite Party Studio

A Modern Take on a Colorful Playroom

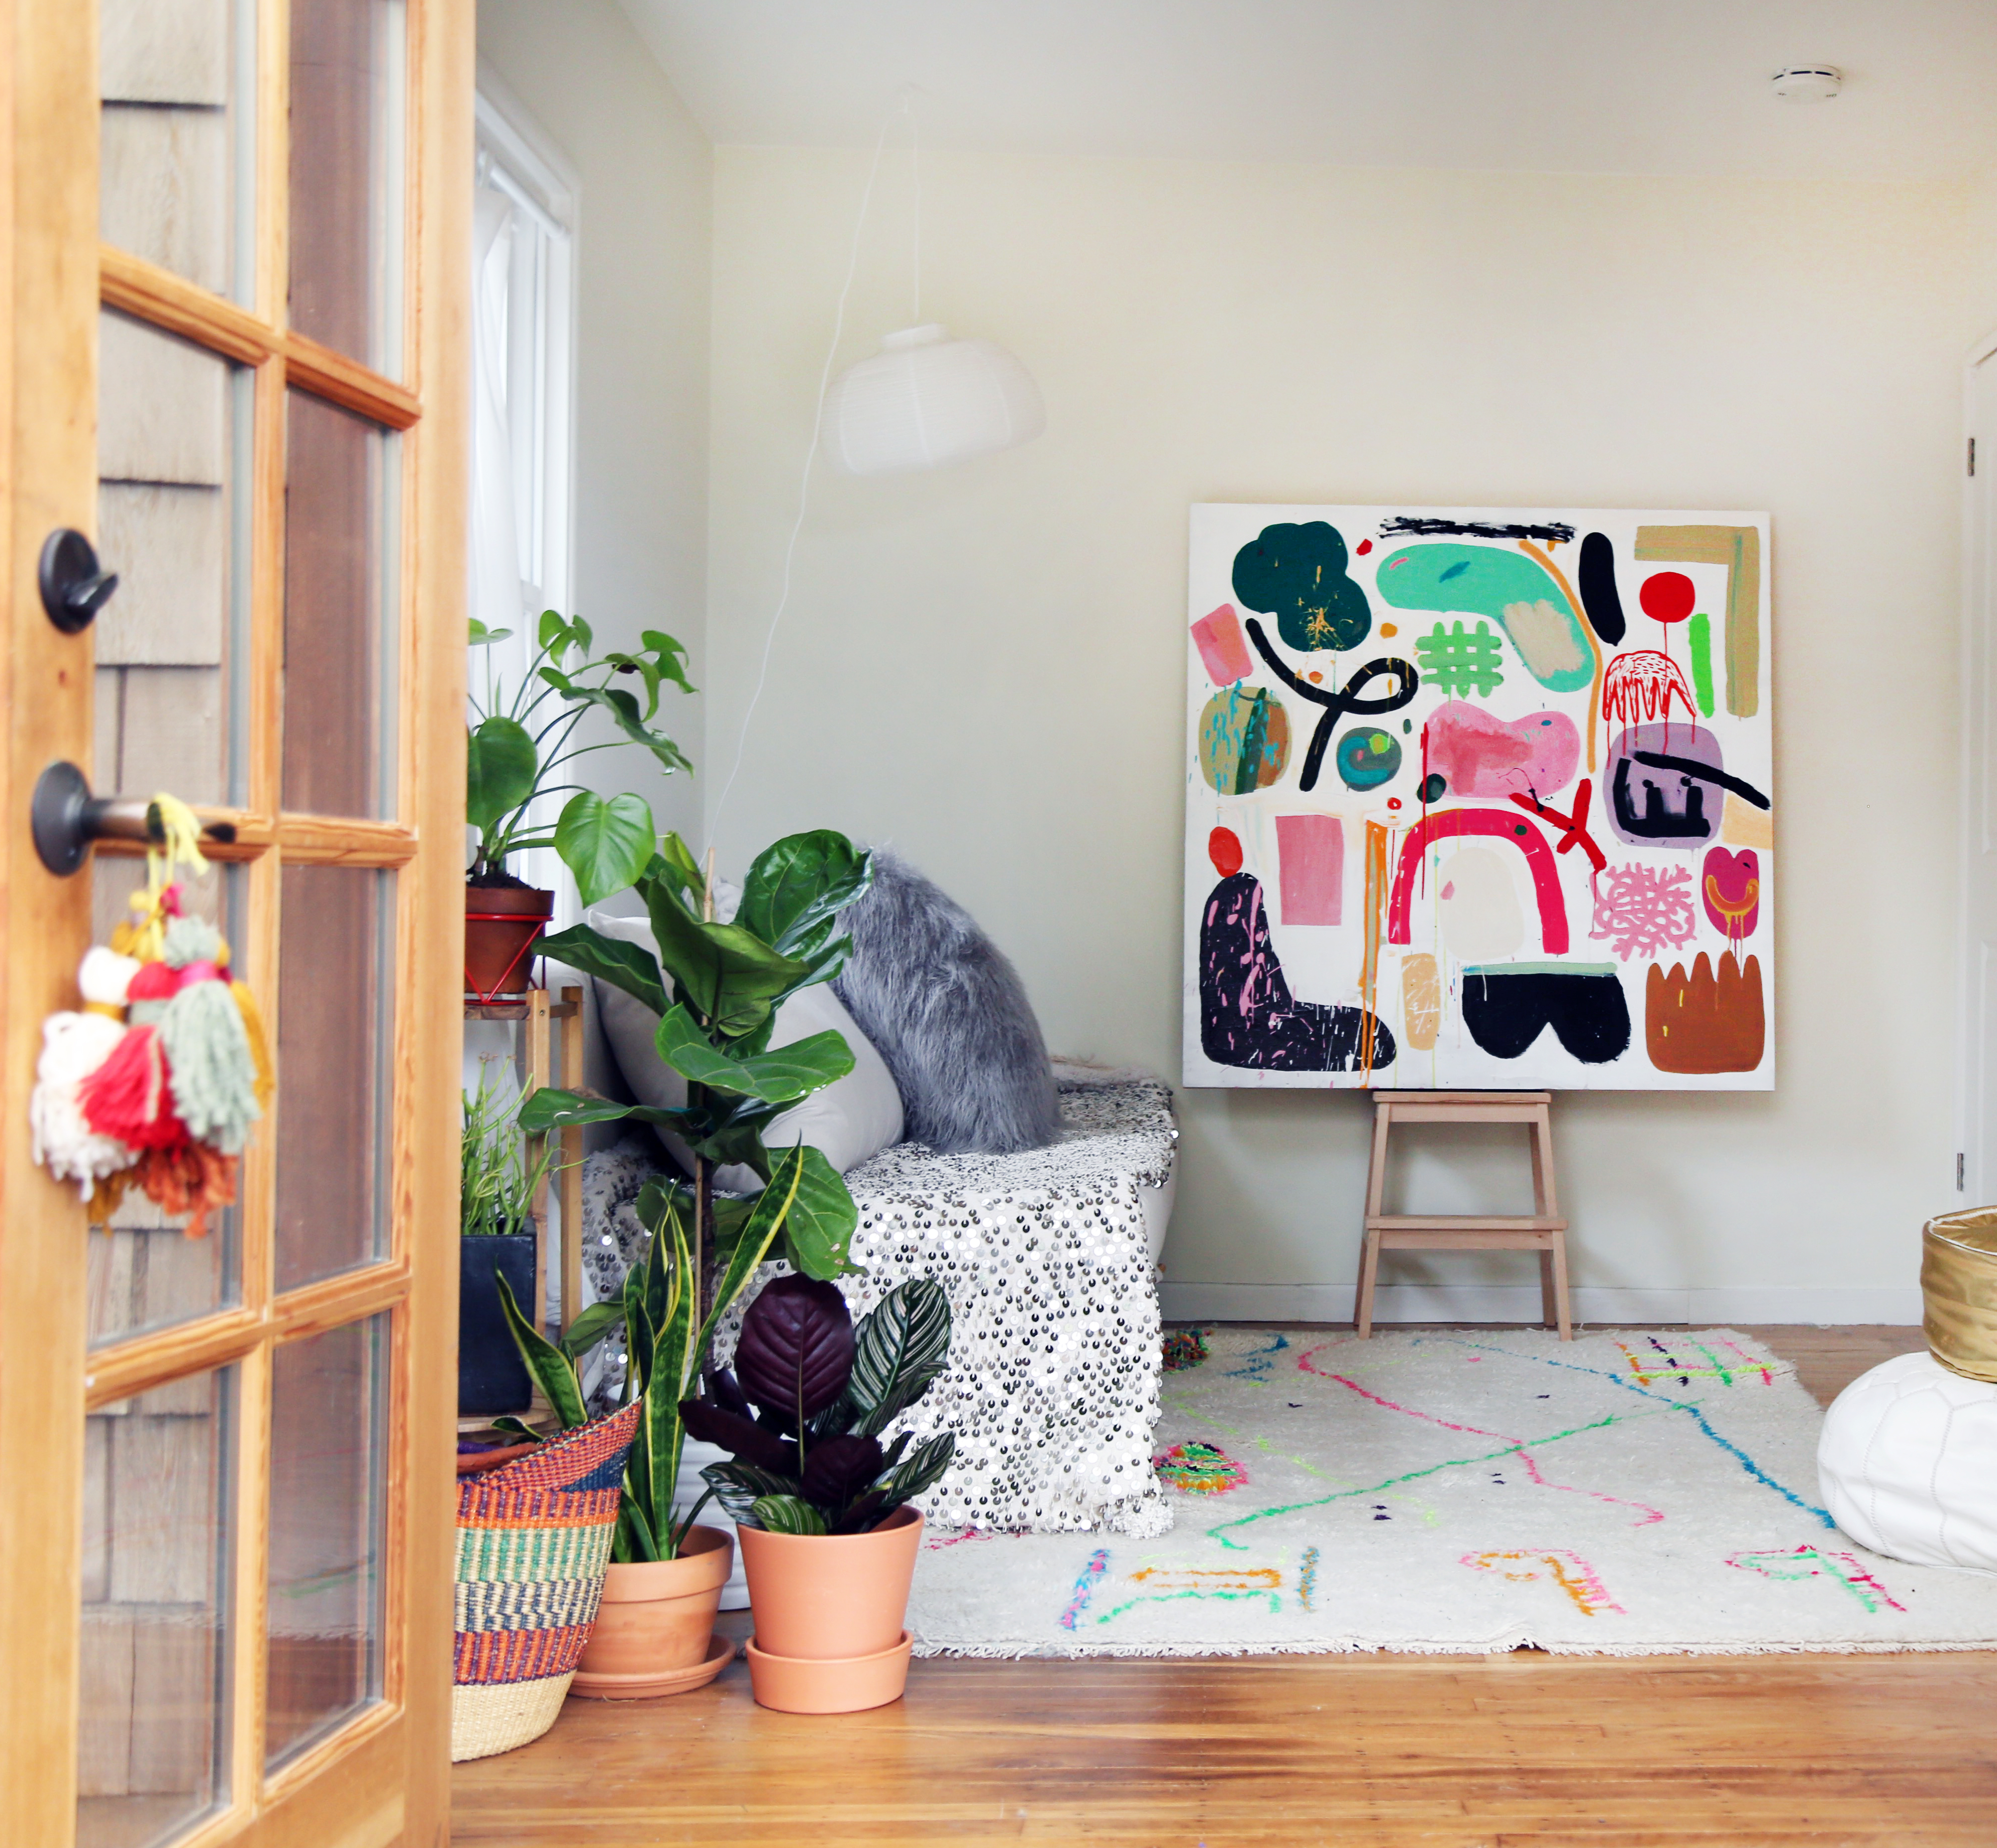
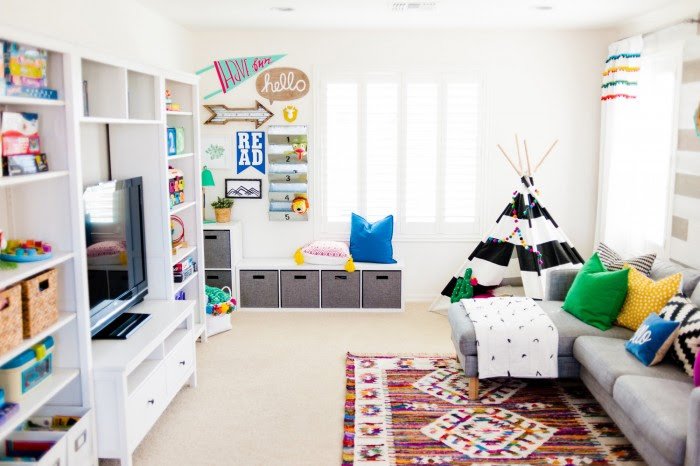
Well hello there!  We are so excited to have collaborated with The Land of Nod and share our Modern Boho Colorful Playroom Design!  The Land of Nod is a definite favorite for furniture and decor…we were able to find so many functional and fabulous pieces for our playroom refresh.  I have 3 kiddos and something that has always been important was having a space that the kids can play, explore, relax and learn…and don’t forget colorful!  When we moved into our new home a couple of years ago, I knew that the loft area would be assigned to my littles.  They are past the point of baby toys and I try to keep toys out of their bedrooms, so designing the space with multiple functions was really important.

A Modern Take on a Colorful Playroom

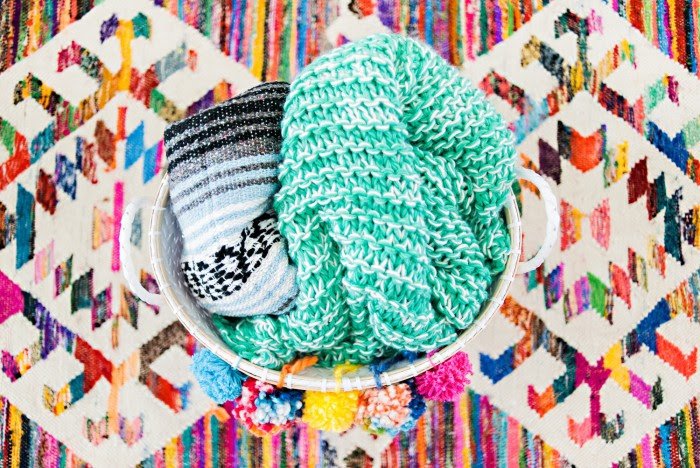
When designing any space, it is always a good idea to have a jumping off point of inspiration.  When I laid my eyes on this dreamy Casablanca Rug, it was love at first sight!  The colors, texture…EVERYTHING about it was perfect for this space.  I love color and I’m not afraid to use it.

A Modern Take on a Colorful Playroom

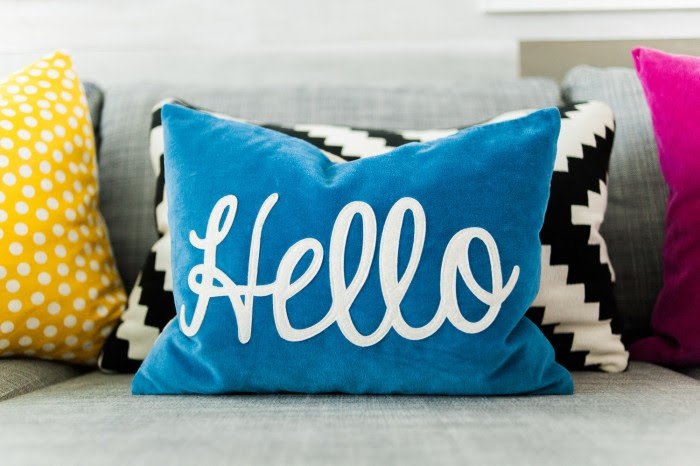
I had been eyeing up this Hello Pillow and knew that was the next item to build the color palette of off.

A Modern Take on a Colorful Playroom

The rug was used to define the center of the space, we already had a neutral gray sofa that was perfect for family movie nights and maybe an quick afternoon snooze.  So, I filled it up with colorful comfy pillows and that darling “Hello” pillow was the perfect finishing touch to tie it all together.

A Modern Take on a Colorful Playroom

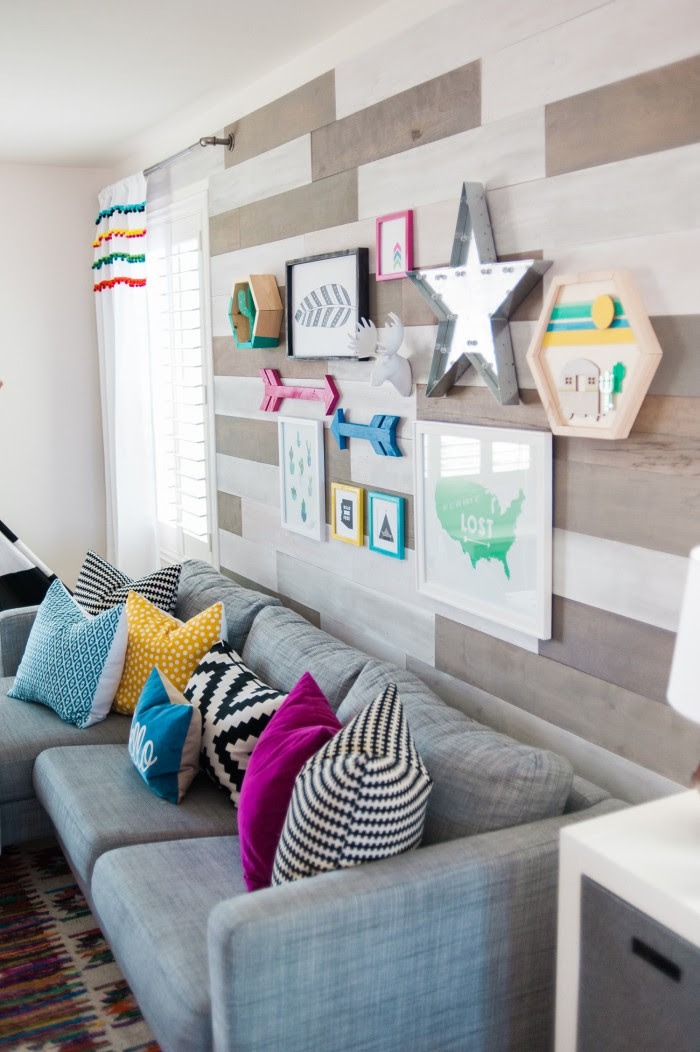
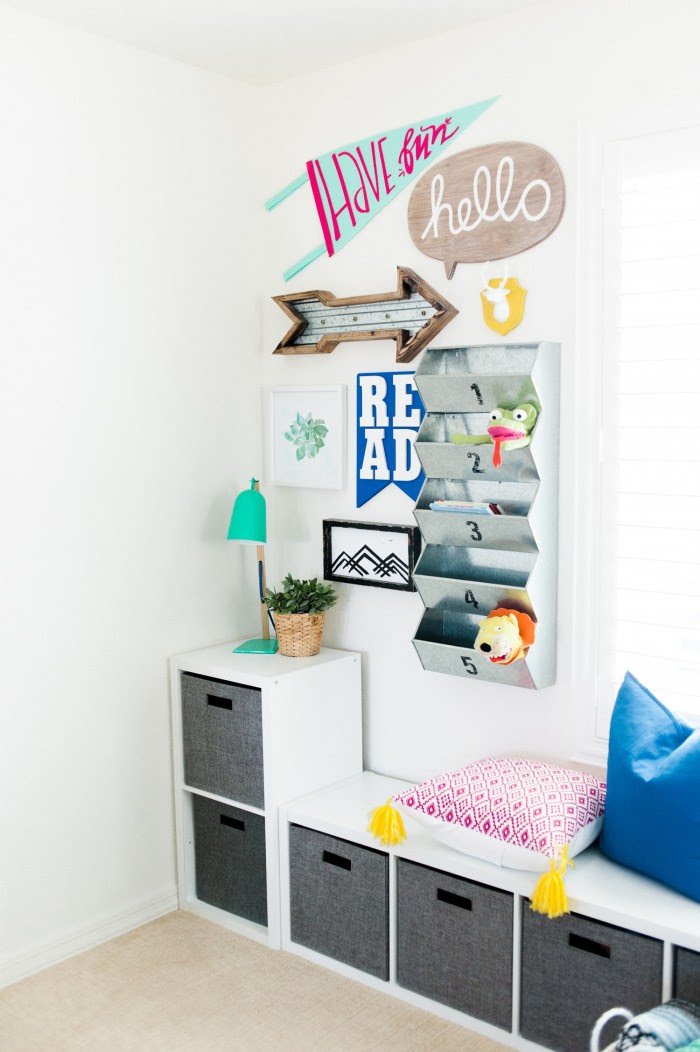
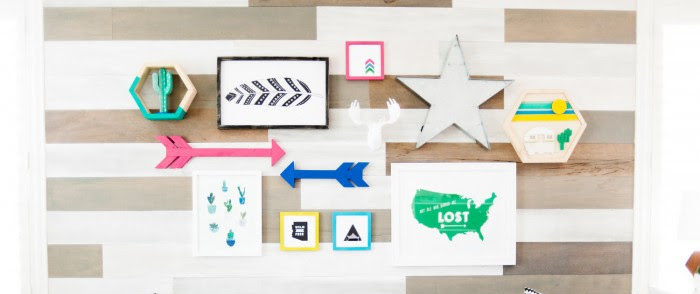
The wall behind the sofa came next (I’ll be sharing the plank DIY too).  I really wanted to add interest to the main wall so I opted to create my version of a DIY plank wall.  I definitely have a love for gallery walls and this Cacti print was the first piece I used to build the theme.

A Modern Take on a Colorful Playroom

One of my goals in designing the space was to have defined areas…this next area wall all about reading.

I used some storage cubicles to create a reading nook and the Take Five Wall Bin was the perfect storage solution for our little library.  The boys use this wall bin to hold the books they are currently reading or have checked out from our local library so they don’t get mixed in with the rest of the books. Having this wall bin also allows me to organize books by reading level seeing that all 3 of my boys vary quite a bit.

A Modern Take on a Colorful Playroom

This Mixed Media Table Lamp was the perfect colors for this quaint corner & it casts the right amount of light for a nighttime reading session.

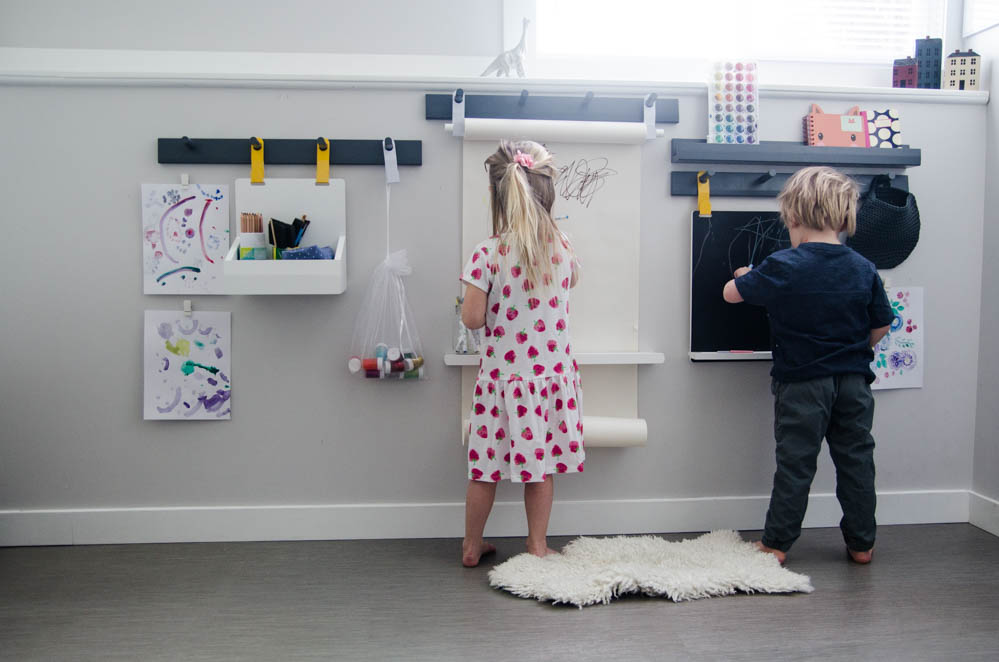
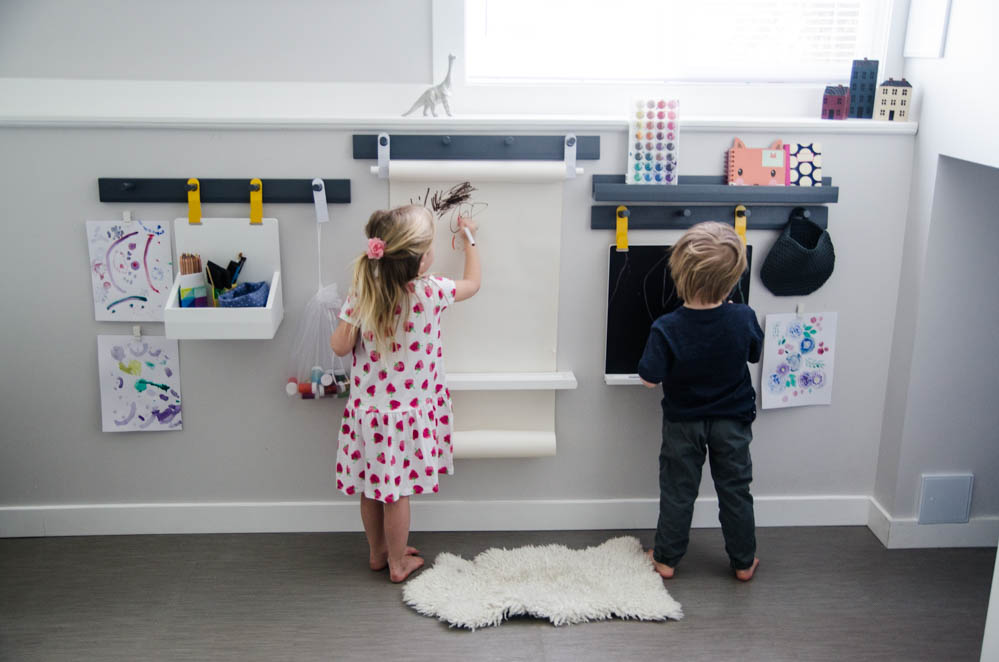
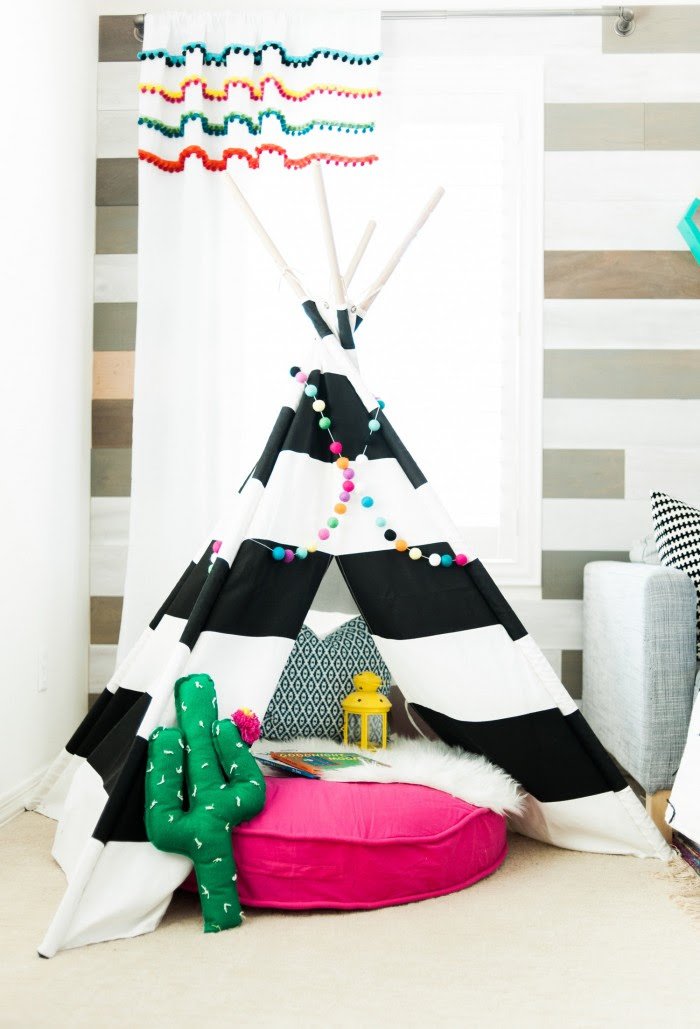
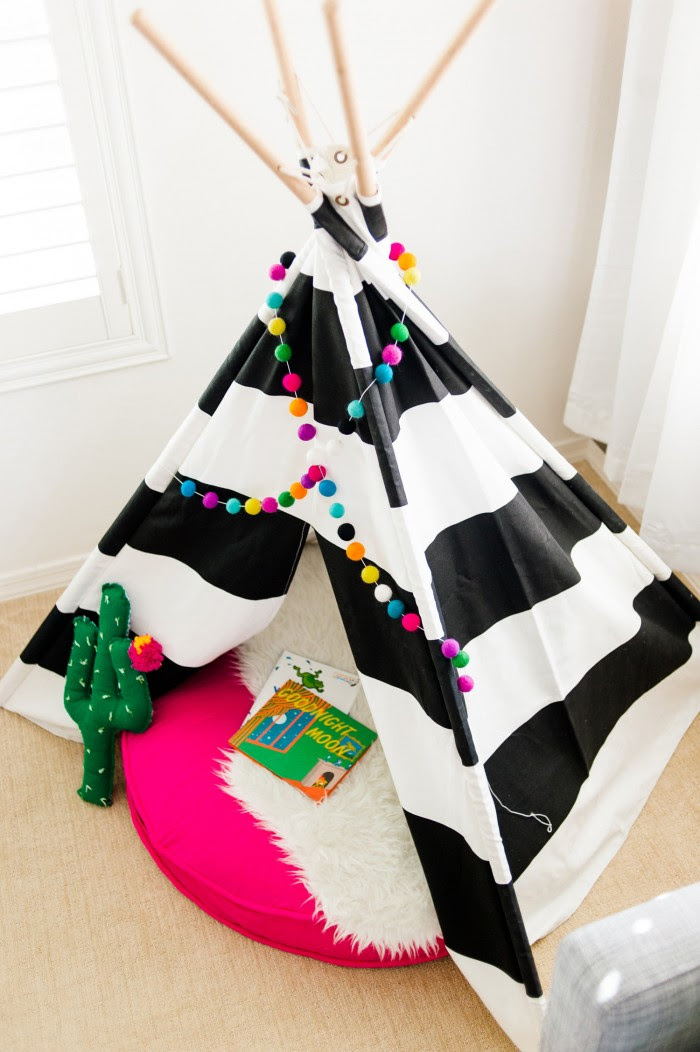
The next area | zone that was important for the space, was an area to play.  This black and white striped teepee paired with the hot pink Floor Cushion were the PERFECT pieces to put in the corner for a little imaginative play.  When this arrived, my boys went nuts!  Many make-believe camping trips and star gazing sessions have taken place so far, can’t wait to see what else they dream up!  A zone I didn’t include in this space was an area for art…I kept that contained to their under the stairs homework | art closet that you can see HERE.

A Modern Take on a Colorful PlayroomA Modern Take on a Colorful Playroom

I loved bringing in some natural finishes and textures and this geometric table lamp was the perfect item for that!

So, when designing a kids playroom, I think it is important to design a space that will grow with them, my boys are 4, 6 and 8 and there are specific zones that appeal to their individual interests.  It is also a good idea to design with a theme that can grow with them.

A Modern Take on a Colorful Playroom

Bright playful colors and lots of texture was the goal and I think it all came together amazingly with The Land of Nod’s awesome products!  This is a space not only my boys can enjoy but the whole family can too!

We will be sharing the DIY Plank wall, plus a few other DIY projects from this space that you’re not going to want to miss it!!!

Design & Styling | Rebecca Propes | Petite Party Studio

Photography | Jackie Lindfors | Everydaynesss Photography

A Girl’s Nursery in Teal

February 21, 2017

Post by Shawna,  Home Stylist from the Land of Nod’s Design Services Team

Blue is certainly not just for boys in this teal inspired nursery! For this room, I picked our Fretwork rug for its deep mint hue and elegant pattern. The Genie floor lamp is the perfect shade of blue with just a hint of green and makes for an excellent statement piece.

For the walls, I highly recommend painting them in Benjamin Moore’s Poseidon. The rich, vibrant teal is a perfect backdrop for cascading garland above delightful wall art, like this fox print by an artist we love, Gingiber!

A Girl's Nursery in Teal

Post by Shawna, Home Stylist from The Land of Nod’s Design Services Team. Our Design Services team offers free one-on-one design advice, mood boards and space planning. You have a room to decorate? They’d love to hear from you. Visit The Land of Nod’s Design Services page to get started today.

Fresh Bohemian Playroom

February 17, 2017

Post by Shawna, Home Stylist from the Land of Nod’s Design Services Team

The older my little boys get, the more my living room evolves. I’ve resisted, they’ve persisted, and toys, play tables and books have steadily made their way into what was once considered a tastefully curated space for grown-ups. But who am I kidding? The living room is where we all gather. Why not create a room that embraces the whole family?

For this room, I started with our Mid-Century Chesterfield sofa, with Crypton-protected fabric. This space is for the kids too, after all! Take some snazzy washi tape and hang one of our giant coloring wall posters to deter tiny hands from scribbling crayon elsewhere. Let the Typeface table light be your marquee to impromptu family concerts. When it’s time to say goodnight, pick a book from our clever Giraffe bookcase and snuggle up in the Urban Design Playhouse for some indoor camping.

Fresh Bohemian Playroom

Post by Shawna, Home Stylist from The Land of Nod’s Design Services Team. Our Design Services team offers free one-on-one design advice, mood boards and space planning. You have a room to decorate? They’d love to hear from you. Visit The Land of Nod’s Design Services page to get started today.

Megan Whitmarsh – Artist Interview

February 16, 2017

Interview with artist Megan Whitmarsh

 Megan Whitmarsh - Artist Interview

Tell us a bit about yourself…

  • HOMETOWN: I don’t really have one, I moved so much as a child. I was born in Cambridge, Massachusetts but barely lived there. Maybe Ann Arbor, Michigan which is where I spent the most of my childhood years.
  • CURRENT TOWN: Los Angeles, CA
  • FAVE ICE CREAM FLAVOR: Pistachio
  • FAVE BREAKFAST FOOD: Fresh herbs and greens from my yard cooked in an omelet with goat cheese. Earl grey tea with cream and honey.
  • FAVE HOLIDAY: My children’s birthday (twins)
  • FAVE COLOR: Hot pink
  • FAVE MOVIE: Hmmm… there are so many! I love The Incredible Shrinking Woman with Lily Tomlin and The Fantastic Mr. Fox.
  • FAVE DECADE: The 70’s

Megan Whitmarsh - Artist Interview

TELL US HOW YOU BECAME AN ARTIST: I was given my first studio when I was 4 years old and my parents rented an old craftsman that had been used as a pre-school before we moved in. There was a small room with a little sign that said “arts and crafts” which they left up and which I had to myself as my brothers spent most of their time in the “rec-room” across the hall. I remember making giant life size paper dolls out of manila folders and tiny comic books about rabbits. I don’t think I ever considered being anything other than an artist.

Megan Whitmarsh - Artist Interview

WHAT ARE THE MOST REWARDING AND THE MOST DIFFICULT PARTS OF RUNNING YOUR OWN BUSINESS? I love working at my own pace. I love that my work involves experimentation, play and creativity. I love that I can work alongside my children and that being an artist creates connection with others. Sometimes it’s hard to be focused and I need to work on my time management (I am overly optimistic about how much I can get done sometimes!) Sometimes I am not happy about my ideas or my execution of them and feel bad about the work. But when this happens I try to consider it as a self imposed challenge that means I need to better my ideas and work. I work harder and try to evolve.

Megan Whitmarsh - Artist Interview

HOW WOULD YOU DESCRIBE YOUR STYLE? Rueful pop.

IF YOU COULD TRAVEL ANYWHERE, WHERE WOULD IT BE?  I would take my children to visit Iceland. I loved it there. It felt magical and they have zoning laws which protect fairies and elves! We could ride the beautiful Icelandic horses!

Megan Whitmarsh - Artist Interview

IF YOU COULD POSSESS A SUPERPOWER, WHAT WOULD IT BE? Spread peace.

TELL US ABOUT THE ROBOT BEDDING YOU DESIGNED FOR THE LAND OF NOD. I was asked to create a playful take on robots. I immediately thought of a sketch I had made years ago of a funny little robot doing mundane stuff like walking a dog and reading the paper. I imagined the robot as a friendly character with prosaic habits and had fun creating a narrative around that. My kids enjoyed watching the process and made little suggestions here and there.

Megan Whitmarsh - Artist Interview

———-

Shop The Land of Nod’s Robot Bedding & browse our collection of kids bedding.