DIY Glitter Holiday Mugs
Written by Kacia of Coconut Robot
 I don’t know about you, but the time from Halloween to Christmas seems to just fly by. I find myself thinking that I have plenty of time for DIY gifts and decor projects….only to blink and have December holidays upon us!
I wanted to make gifts for Harlow’s preschool teachers this year, but I knew that if I kept saying “Oh, I’ll do it when we are closer to Christmas break” would leave me running out to buy a gift card the last morning of school before break.
Can I get an amen?
So one chilly morning, Harlow and I got our crafting on and made these DIY glitter holiday mugs for her teachers! We will be filling them with chocolates and gift cards and some artwork from Harlow as well! I’m seriously ecstatic about how they turned out!
 If you’ve followed any of my DIY projects and tutorials, you know that I like to push the boundaries of how materials are traditionally used. Enter iron-on glitter vinyl and ceramic mugs! I did some tests and found that ironing the vinyl right on to a ceramic mug….works! And it stays! I haven’t had the guts to put mine through the dishwasher, but after hand-washing and air-drying, they are still looking amazing!
How did we make them? Let me show you!
I purchased these mugs from Amazon — they are both microwave and oven safe.* I then had some glitter iron-on vinyl scraps left over from another project. (similar)
I have an at home vinyl cutting machine that I used to cut out the vinyl for my mugs, but if you don’t have one? Don’t fret! I have a bunch of options and ideas for you!
I love iron-on vinyl, because it’s easy to use and apply. Unlike adhesive vinyl, you don’t need an additional transfer sheet to apply the vinyl. Just cut, iron and peel away the clear backing.
- Free hand cut with a scissor. If you choose this option, you will cut through both the vinyl and the plastic backing. The matte side will be the side adhering to your mug and the plastic side will peel away. Keep this in mind as you are cutting letters and shapes, so that they don’t end up backwards! 🙂
- Free hand with a craft knife. Lightly draw a design on the matte side of your vinyl. Using a small craft, cut through the vinyl. You won’t have to press very hard — don’t try to cut through the plastic backing as well, it’s best if that is kept in contact. Weed away the excess vinyl, leaving only your design on the backing.
- Use a paper punch. Select holiday paper punches and cut out your designs. If your plastic backing is too thick to cut, be sure to put the vinyl side closest to the blade — as long as you cut through the vinyl, don’t worry about cutting through the backing too!
There are so many ways to use iron-on vinyl for these mugs! You could do something as simple as polka dots or stripes — both would be easy with a pair of scissors or a paper punch!
*I’m not entirely sure that it’s necessary that they are, but areas of the mug did get pretty hot as I was ironing!
 After you’ve cut out your designs, you are ready to begin ironing! If you were able to keep the plastic backing in place, your design will look like my “JOY JOY JOY” pieces. Remember to cut them out mirrored if cutting from the vinyl side! 🙂
If you are cutting through both the backing and your vinyl, your shapes will look like the snowflake pictured above.


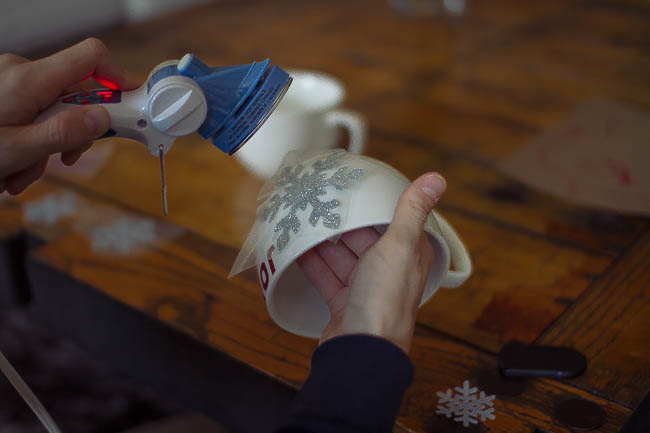
 Assemble your vinyl and mugs and a small iron. I love this mini iron, but any iron will work — just be careful! The mug can get pretty hot as you work!
Harlow worked on her drawings, giving me direction on where to place each of the snowflakes and words for both of the mugs.


 Follow the instructions found on your iron-on vinyl. I held my iron in place for at least 30 seconds on each letter. I love using a craft iron, because I don’t worry as much about it getting gunk on it from these projects — if you are using a nice iron, I would use a thin piece of fabric between your iron and the backing.
I iron and let it cool before peeling back the transfer plastic. When the edges are secured enough to remove, I remove the plastic and lightly iron on the vinyl to get it to stick really well. After it cools I check the edges to make sure I got every bit of the surface to adhere well to the mug!


 And that’s it! Continue this process until you achieve your desired look! Fill with candy or coffee or hot cider or soup or … well, you get the idea!


 Kacia is a natural blonde, type-A and an artist: proof that God has a sense of humor. Kacia writes Coconut Robot about her city-living family, motherhood, fashion, DIYs and really anything else that makes her smile. She is a published quilt designer and loves dreaming up new projects and tutorials to share with her readers. Addicted to coffee and Instagram. (@CoconutRobot)